2015-16 Civil Rights Data Collection (CRDC) Research & Evaluation
NCES Cognitive, Pilot, and Field Test Studies System
Approved CRDC 13-14 User Guide
2015-16 Civil Rights Data Collection (CRDC) Research & Evaluation
OMB: 1850-0803

DEVELOPED FOR

Civil Rights Data Collection (CRDC)
Survey Tool User Guide
Revision: 5 (Responses to AIR Copy Edit) Date: 03/20/2015
Document History and Distribution
Revision History
-
Revision #
Revision Date
Description of Change
Author
0
08/22/2014
Initial Draft
S. Harris
1
11/07/2014
First Revised Draft
S. Harris
2
02/09/2015
Second Revised Draft
S. Harris
3
02/17/2015
Responses to AIR Review
S. Harris
4
03/11/2015
Responses to ED Review
S. Harris
5
03/20/2015
Responses to AIR Copy Edit
S. Harris
Distribution
-
Recipient Name
Recipient Organization
Distribution Method
Table of Contents
Chapter 1 Introduction 1
Chapter 2 Using the CRDC Survey Tool 3
2.1 Getting to the Survey Tool 3
2.2 Logging In to the Survey Tool and Home Page 3
2.2.1 General Login 3
2.2.2 Home Page 7
2.2.3 User Menu 9
2.3 Reporting Data Using the Survey Tool 16
2.3.1 Data Entry 16
2.3.2 File Upload 48
2.3.3 Combining Reporting Methods 52
2.4.1 Purpose/Function 53
2.4.1 Access 53
2.5.1 Purpose/Function 54
2.5.2 LEA Submissions Report 55
2.5.3 Error Resolution Report 56
2.5.4 LEA Submission Progress Report 58
2.5.5 User Access Report 59
2.5.6 Additional Reporting Functionality 59
2.5.7 Collection Metrics and Tracking 62
2.6 Administrative Functions 63
2.6.1 User Management 63
2.6.2 System Management 77
2.7.1 User Qualification 79
2.7.2 Requirements for Certification of Submissions 79
2.7.3 Certification Process 79
2.7.4 Certification Issues 86
Chapter 3 Document Approvals 87
Appendix A Acronyms and Abbreviations A-1
Appendix B Additional Resources B-2
List of Figures
Figure 1. CRDC Survey Tool Login Page 3
Figure 2. CRDC Survey Tool Login 3
Figure 3. New CRDC Account Created Email 4
Figure 4. CRDC Confirm Your Account 4
Figure 5. CRDC Create Your Password 5
Figure 6. CRDC Survey Tool Invalid Email 5
Figure 7. CRDC Survey Tool Incorrect Login 6
Figure 8. CRDC Survey Tool Login Confirmation 7
Figure 9. CRDC Survey Tool Home Page 8
Figure 10. CRDC Survey Tool User Menu 9
Figure 11. CRDC Survey Tool User Profile Dialog Screen 9
Figure 12. CRDC Survey Tool User Access Page 10
Figure 13. CRDC Survey Tool User Access Permissions 11
Figure 14. CRDC Survey Tool User Access Legend 12
Figure 15. CRDC Survey Tool User Menu Select Change Password 12
Figure 16. CRDC Survey Tool Change Password Dialog Screen 13
Figure 17. CRDC Survey Tool Forgotten Password 13
Figure 18. CRDC Survey Tool Reset Password 13
Figure 19. CRDC Survey Tool Password Reset 14
Figure 20. CRDC Survey Tool Password Reset Confirmation Email 14
Figure 21. CRDC Survey Tool Password Reset Password Dialog Screen 14
Figure 22. CRDC Survey Tool Password Reset Successful 15
Figure 23. CRDC Survey Tool Password Reset Error 15
Figure 24. CRDC Survey Tool Home Page Select Data Entry or File Upload 16
Figure 25. CRDC Survey Tool School Form Submission 17
Figure 26. CRDC Survey Tool Hide Optional Questions 17
Figure 27. CRDC Survey Tool List of Optional Questions 18
Figure 28. CRDC Survey Tool School Selection Dropdown Menu 19
Figure 29. CRDC Survey Tool Manage School Order 19
Figure 30. CRDC Survey Tool Table Navigation Module Landing Page 20
Figure 31. CRDC Survey Tool Navigation “Breadcrumbs” 21
Figure 32. CRDC Survey Tool Table Navigation Module Instruction Screen 22
Figure 33. CRDC Survey Tool Table Navigation Overall Enrollment Table 23
Figure 34. CRDC Survey Tool Table Navigation Mode 23
Figure 35. CRDC Survey Tool Table Navigation Mode (First Table) 23
Figure 36. CRDC Survey Tool Table Navigation Mode (Last Table) 23
Figure 37. CRDC Survey Tool School Navigation Module Landing Page 24
Figure 38. CRDC Survey Tool School Navigation Module Instruction Screen 25
Figure 39. CRDC Survey Tool School Navigation Overall Enrollment Table 26
Figure 40. CRDC Survey Tool School Navigation Mode 26
Figure 41. CRDC Survey Tool District Form Module Landing Page 27
Figure 42. CRDC Survey Tool District Form Module Instruction Screen 28
Figure 43. CRDC Survey Tool District Form Student Count Table 28
Figure 44. CRDC Survey Tool District Form Table Navigation 29
Figure 45. CRDC Survey Tool District Form Table Navigation (First Table) 29
Figure 46. CRDC Survey Tool District Form Table Navigation (Last Table) 29
Figure 47. CRDC Survey Tool Overall Enrollment Data Entry 30
Figure 48. CRDC Survey Tool Overall Enrollment Error and Warning Summary 31
Figure 49. CRDC Survey Tool Overall Enrollment Element Expanded 32
Figure 50. CRDC Survey Tool Overall Enrollment Error Expanded 33
Figure 51. CRDC Survey Tool Overall Enrollment Validation Checks 34
Figure 52. CRDC Survey Tool Error Icon Popup 34
Figure 53. CRDC Survey Tool Error Details 35
Figure 54. CRDC Survey Tool Technical Information 36
Figure 55. CRDC Survey Tool Warning Icon Popup 36
Figure 56. CRDC Survey Tool Warning Details 37
Figure 57. CRDC Survey Tool Show All Checks (Summary) 38
Figure 58. CRDC Survey Tool Show All Checks (Element) 39
Figure 59. CRDC Table With Skipped (NA) Items 40
Figure 60. CRDC Table With Skipped Indicator Showing 40
Figure 61. CRDC Table With Skipped Warning Icon 41
Figure 62. CRDC Skipped Warning Message 41
Figure 63. CRDC Table with Automatically Generated Zeros 42
Figure 64. CRDC Table with Automatic Zero Indicator 42
Figure 65. CRDC Table with Automatic Zero Error Icon 43
Figure 66. CRDC Automatic Zero Error Message 44
Figure 67. CRDC Error Explanation – Reason Code Selection 46
Figure 68. CRDC Error Explained 47
Figure 69. CRDC Survey Tool File Upload Screen 48
Figure 70. CRDC Survey Tool File Upload Add File Browser Window 49
Figure 71. CRDC Survey Tool File Upload Files Added 50
Figure 72. CRDC Survey Tool File Upload In Progress 50
Figure 73. CRDC Survey Tool File Upload Files Uploaded 51
Figure 74. CRDC Survey Tool File Upload Element Submission Table 51
Figure 75. CRDC Survey Tool Resources Page 53
Figure 76. CRDC Survey Tool File Reports Screen 54
Figure 77. CRDC Survey Tool File Reports Download 55
Figure 78. CRDC Survey Tool Downloaded Report in Excel 55
Figure 79. CRDC Survey Tool Error Resolution Report Selection 56
Figure 80. CRDC Survey Tool Error Resolution Report in Excel (Part 1) 57
Figure 81. CRDC Survey Tool Error Resolution Report in Excel (Part 2) 58
Figure 82. CRDC Survey Tool LEA Submission Progress Report in Excel 58
Figure 83. CRDC Survey Tool Error Report 60
Figure 84. CRDC Survey Tool Error Report 61
Figure 85. CRDC Survey Tool Error Report Link Destination 62
Figure 87. Register New User 64
Figure 88. Register New User Confirmation 64
Figure 89. Manage User Permissions – LEA Staff 65
Figure 91. Add User Dialog Email Search 66
Figure 92. Add User Dialog Email Selected 66
Figure 94. User Permissions Expanded 68
Figure 95. LEA Form Permissions Expanded 68
Figure 96. LEA Form All Permissions Granted 69
Figure 97. Permissions Updated 69
Figure 98. School Form Permissions 70
Figure 99. School Form Permissions Updated 71
Figure 100. Remove User Check 71
Figure 102. Manage User Permissions – LEA Admins 72
Figure 103. Manage User Permissions – School Staff 73
Figure 104. Manage User Permissions – Select School 73
Figure 105. Manage User Permissions – Select School User 73
Figure 106. Manage User Permissions – School Module Permissions Selected 74
Figure 107. Manage User Permissions – User Permissions Lookup 75
Figure 108. Manage User Permissions – User Permissions Lookup Legend 76
Figure 109. Edit LEA Contacts 77
Figure 111. School Management – Manage Existing School 78
Figure 112. CRDC Survey Tool Certification Dashboard 79
Figure 113. CRDC Survey Tool Current Submission Status LEA Detail 80
Figure 114. CRDC Survey Tool Current Submission Status School Detail 81
Figure 115. CRDC Survey Tool Running Pre-Certification Checks 82
Figure 116. CRDC Survey Tool Pre-Certification Check Results (Reason Codes) 82
Figure 117. CRDC Survey Tool Pre-Certification Check Results (PSC Review Required) 83
Figure 118. CRDC Survey Tool Running Certification Checks 84
Figure 119. CRDC Survey Tool Certification Blocked 84
Figure 120. CRDC Survey Tool Certification Dashboard (Complete) 85
Figure 121. CRDC Survey Tool Ready for Certification (Complete) 86
The purpose of this document is to provide users of the Civil Rights Data Collection (CRDC) survey tool with all required instructions on how to use the tool’s functions and features.
The scope of this document is the use of the survey tool itself, as opposed to the details of the survey instrument and the questions and required data contained therein.
The CRDC is a mandatory survey that collects data on key education and civil rights issues in our nation's public schools, authorized under the statutes and regulations implementing Title VI of the Civil Rights Act of 1964, Title IX of the Education Amendments of 1972, Section 504 of the Rehabilitation Act of 1973, and the Department of Education Organization Act (20 U.S.C. § 3413). The regulations implementing these provisions can be found at 34 CFR 100.6(b), 34 CFR 106.71, and 34 CFR 104.61. The CRDC is conducted by the Office for Civil Rights (OCR) of the U.S. Department of Education.
The CRDC is a longstanding and critical part of the overall enforcement and monitoring strategy used by OCR to ensure that recipients of the Department of Education’s federal financial assistance do not discriminate on the basis of race, color, national origin, sex, or disability. OCR relies on the CRDC data it receives from public school districts as it investigates complaints alleging discrimination, determines whether the federal civil rights laws it enforces have been violated, initiates proactive compliance reviews to focus on particularly acute or nationwide civil rights compliance problems, and provides policy guidance and technical assistance to educational institutions, parents, students, and others.
The CRDC is a biennial survey that has been conducted since 1968. The 2013–14 and 2015–16 CRDC will collect data from a universe of all public local education agencies (LEAs) and schools, including long-term secure juvenile justice facilities, charter schools, alternative schools, and schools serving students with disabilities.
Over the last decade, the CRDC has been conducted primarily online, using Web-based surveys filled out by representatives at the LEA. Data submitters have the option to manually input survey data into the web interface via an internet-connected computer/web-browser or to upload a flat file submission.
Chapter 1 is the Introduction, explaining the purpose, scope, background, and organization of this document and providing a list of referenced documents.
Chapter 2 provides step-by-step instructions on how to use the CRDC survey tool, with accompanying explanations and illustrations using screen shots from the actual tool. Any data shown in these screen shots are not real and are for example purposes only.
Chapter 3 is reserved for final document approvals.
The appendices provide a list of acronyms and abbreviations and other additional resources.
The CRDC survey tool is accessible to all users through the following URL:
https://surveys.nces.ed.gov/crdc/.
This URL takes the user to the CRDC login page, which contains explanatory text about the CRDC survey (see figure 1).
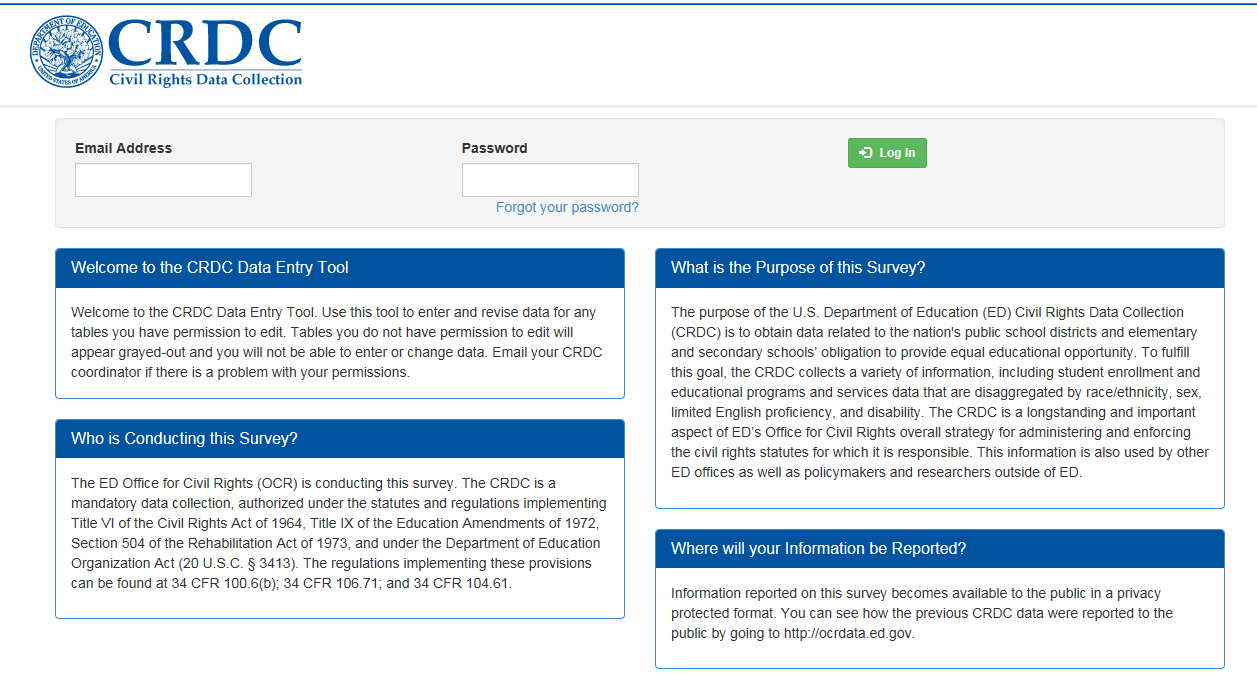
Figure 1. CRDC Survey Tool Login Page
A user may log in to the survey tool using a registered email address and a current password (see figure 2).
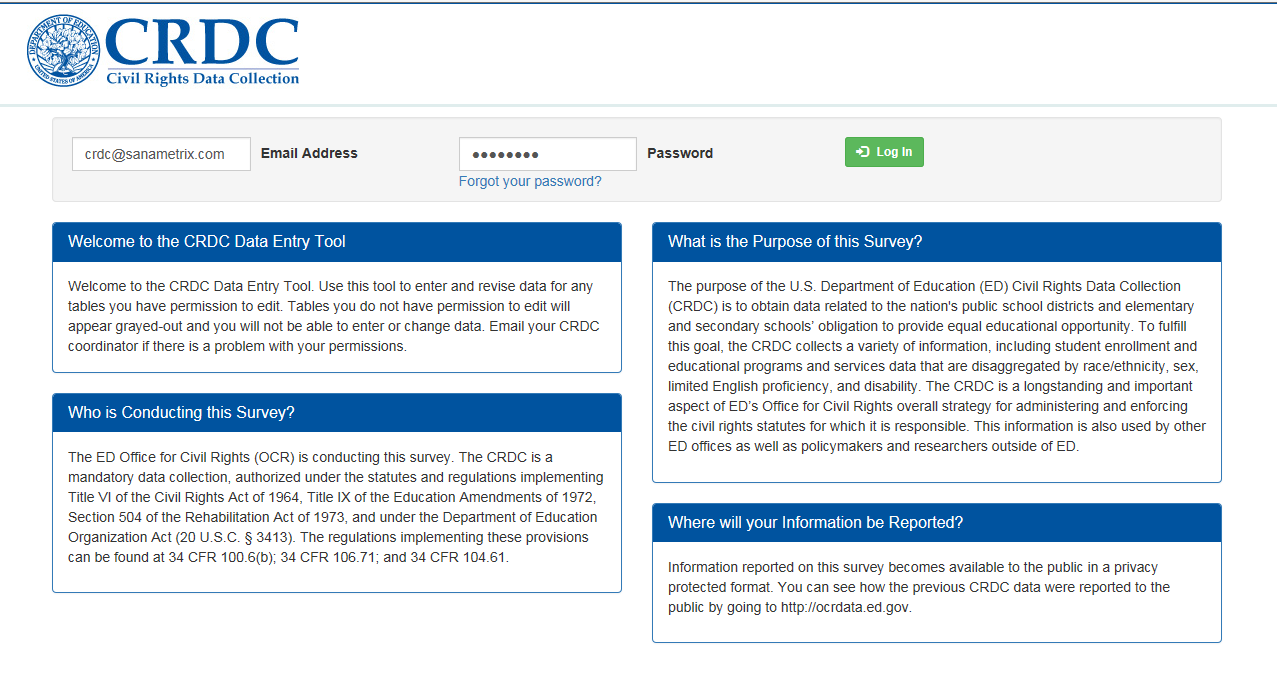
Figure 2. CRDC Survey Tool Login
In order for a user to obtain a registered email address and a current password, an administrator will first need to add a CRDC account for the user’s email address (as shown in detail in section 2.6 of this guide, which covers administrative functions). This will result in the new user receiving an email informing them that a new CRDC account has been created (see figure 3).
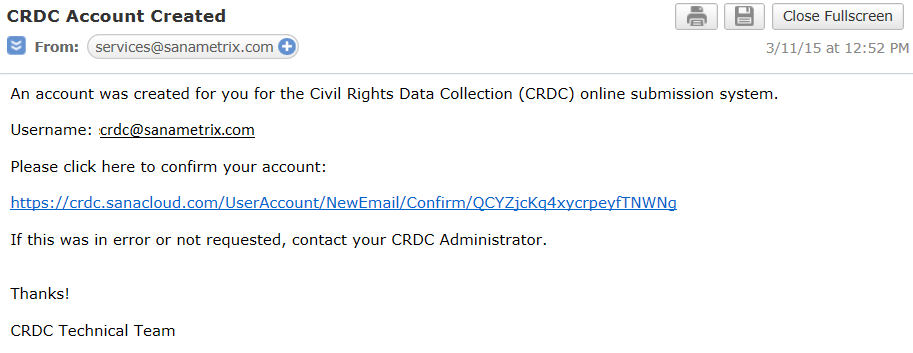
Figure 3. New CRDC Account Created Email
Following the link provided in the email will take the new user to a screen where they can confirm their account (see figure 4).
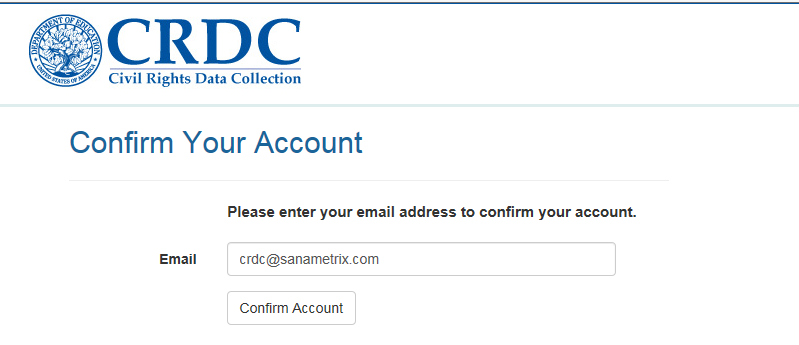
Figure 4. CRDC Confirm Your Account
Selecting the Confirm Account button will take the new user to another screen where they can create a password according to the instructions provided (see figure 5).
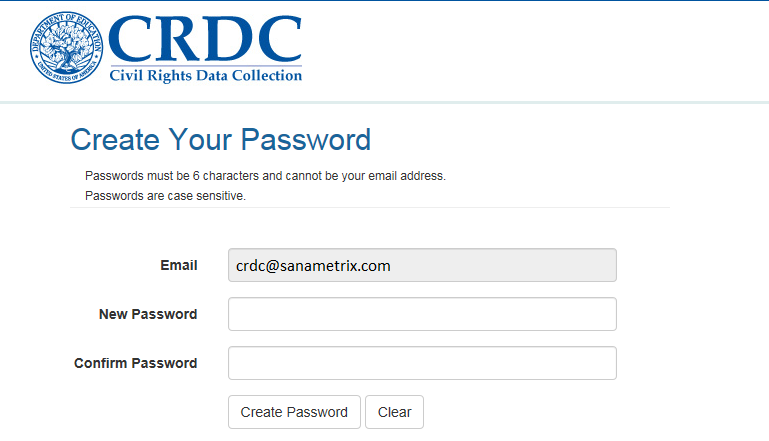
Figure 5. CRDC Create Your Password
The password that is created must be 6 characters long (and not be the same as the user’s email address), and the New Password field and the Confirm Password field must match exactly; otherwise, the system will return errors.
Once the password has been created, the user is returned to the main login page. This page will return standard error messages if the email provided is not in a valid format or if either the email address or password is incorrect or not registered in the system. Figure 6 illustrates the error message for an invalid email address.
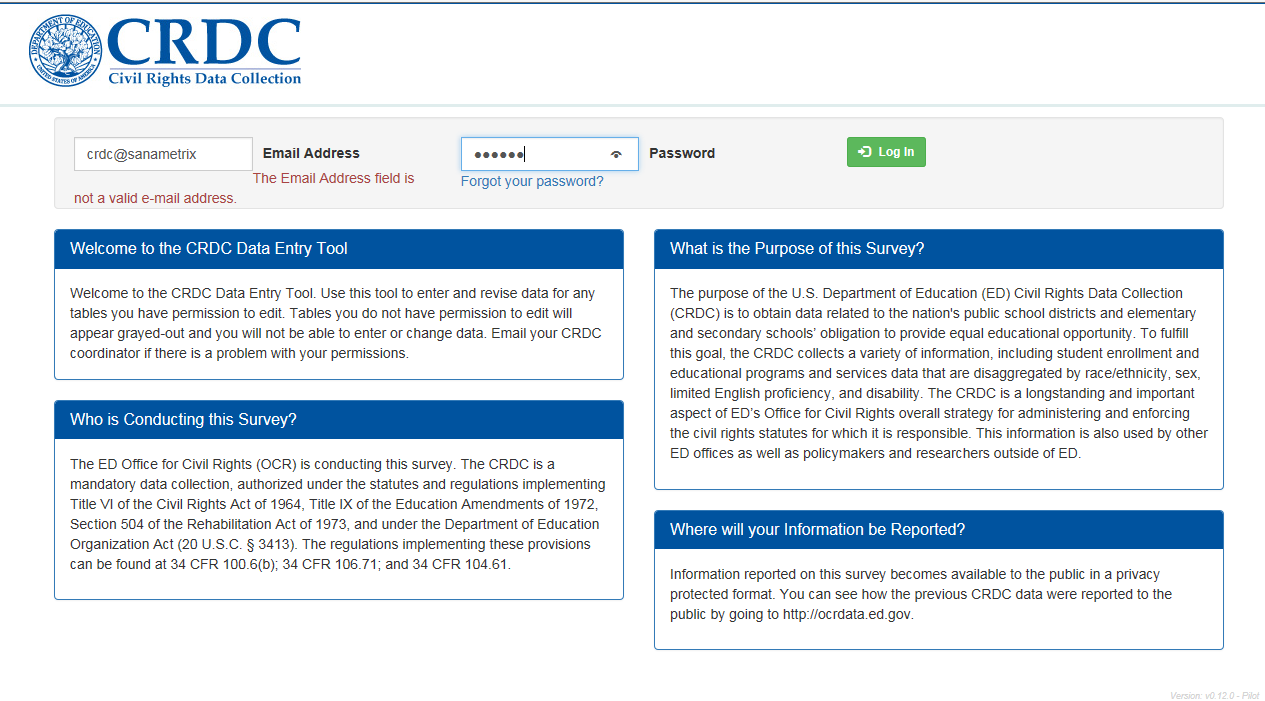
Figure 6. CRDC Survey Tool Invalid Email
Figure 7 illustrates the general error message for an incorrect combination of email address and password.
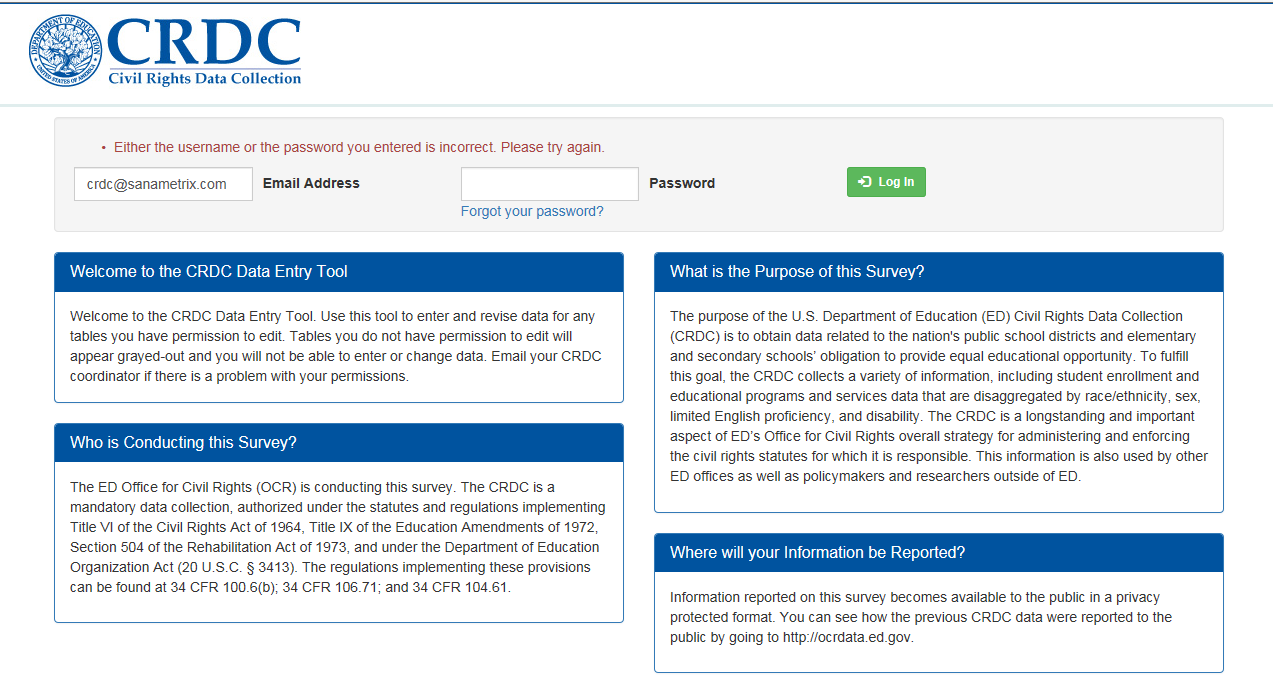
Figure 7. CRDC Survey Tool Incorrect Login
Entering a valid email and password combination brings the user to the Home page for the tool, but the user is first shown a message regarding the OMB control number for the survey itself, with relevant contact information if the user has any questions (see figure 8).
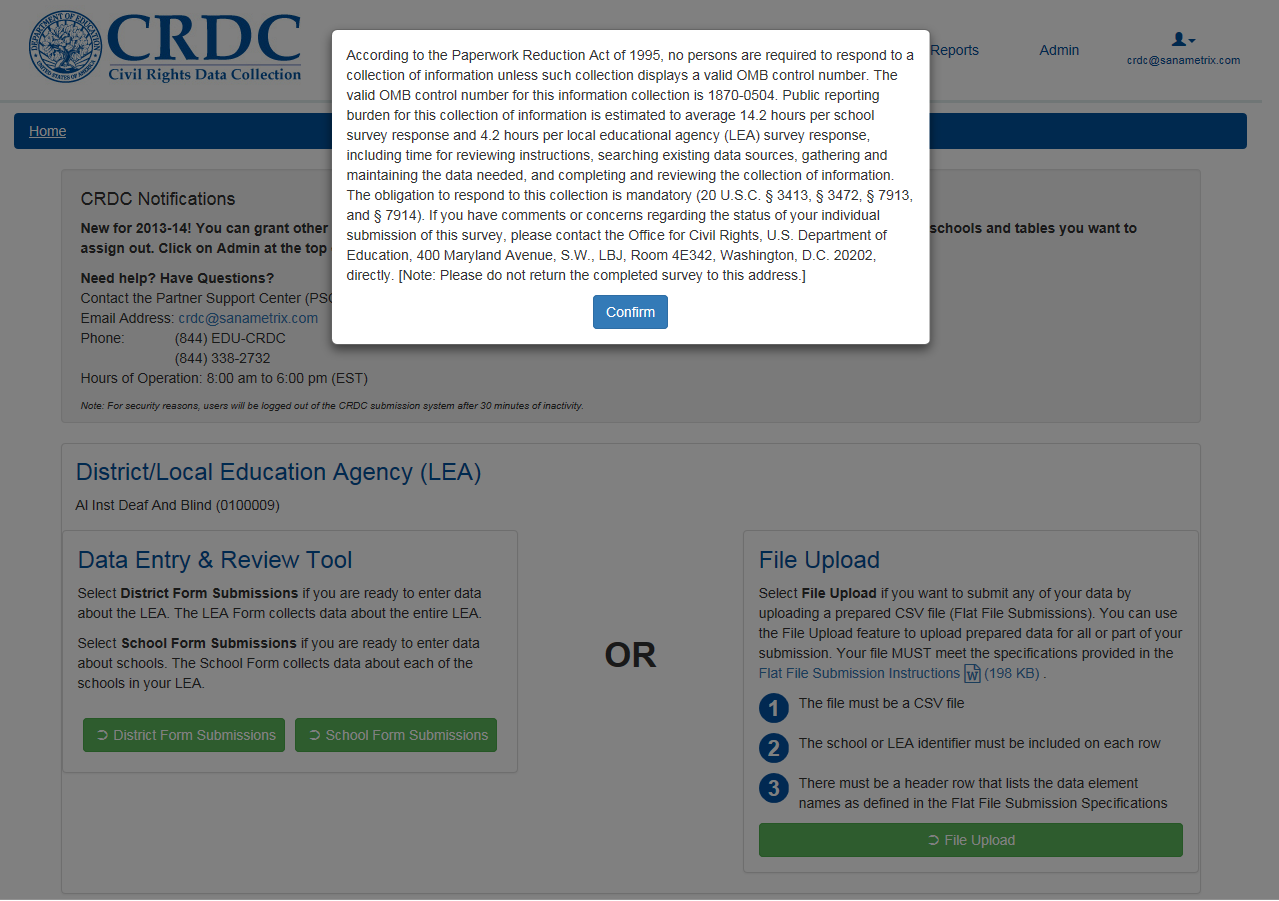
Figure 8. CRDC Survey Tool Login Confirmation
Once users select the Confirm button to indicate an understanding of this message, they are taken to the Home page itself (see figure 9).
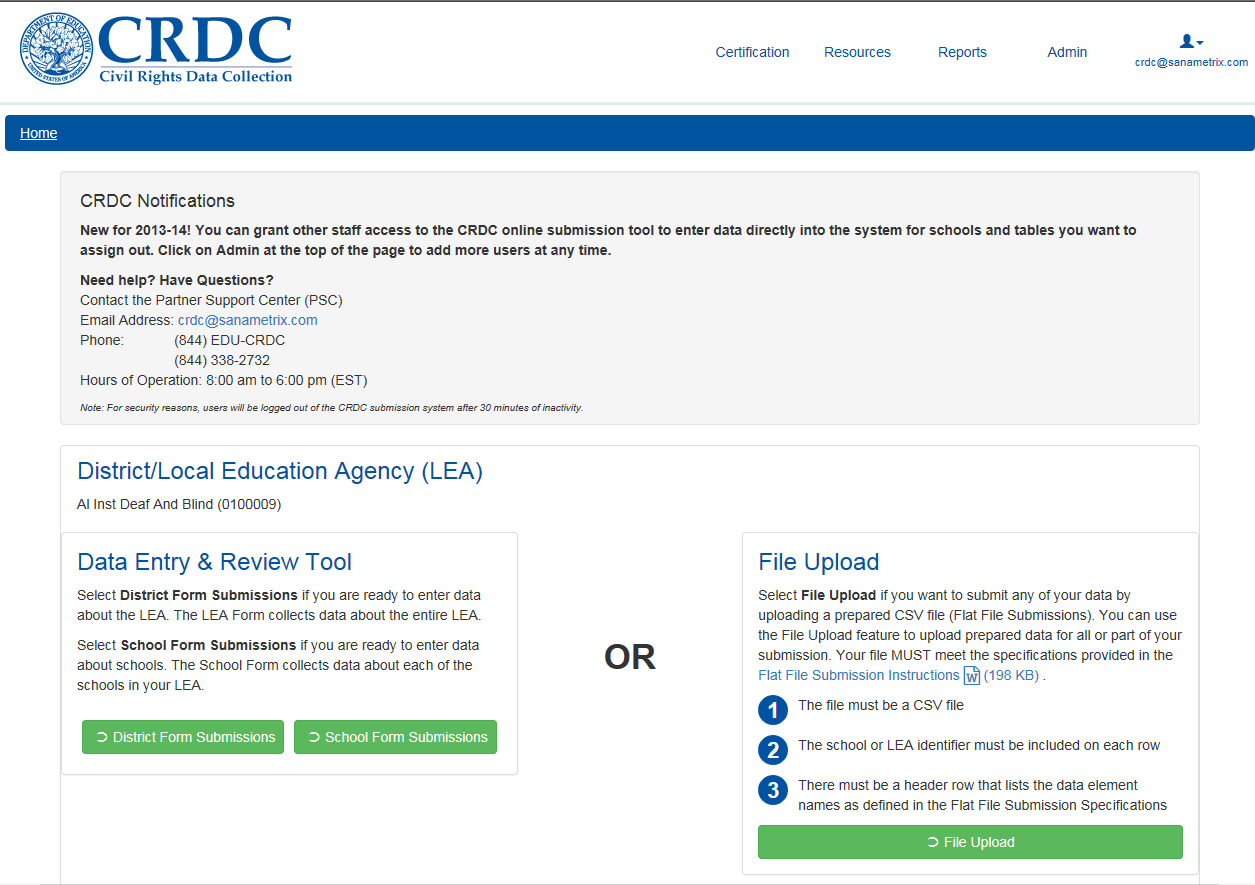
Figure 9. CRDC Survey Tool Home Page
The top area of the Home page contains basic information and notifications about the submission process, including contact information for the Partner Support Center (PSC), the help center standing ready to help respondents with their CRDC data submissions. Below that are links to two different means of submitting the required data: the Data Entry & Review Tool (using online forms) for both the District and School forms and File Upload. Immediately above these links is shown the LEA for which data are currently being submitted. As the majority of LEA and School users of this system are only associated with (and only have permission for) one LEA, they will only see their own LEA listed here. Any users possessing permissions for more than one LEA or state will see pull-down menus for their available selections in this same space.
In the upper-right portion of the screen are menu links to other areas of the tool: Resources and Reports, for all users; and Admin and Certification, only for those users with the appropriate permissions. These areas of the tool and the permissions required to use them are explained in the relevant sections of this guide.
User controls are represented in the menu links by an icon of a person’s head, with the current user’s email address displayed underneath.
Figure 10 shows the User menu. The User menu options are User Profile, User Access, Change Password, and Logout.

Figure 10. CRDC Survey Tool User Menu
Selecting User Profile takes the user to a dialog screen where profile information beyond the user’s email address may be entered (see figure 11).
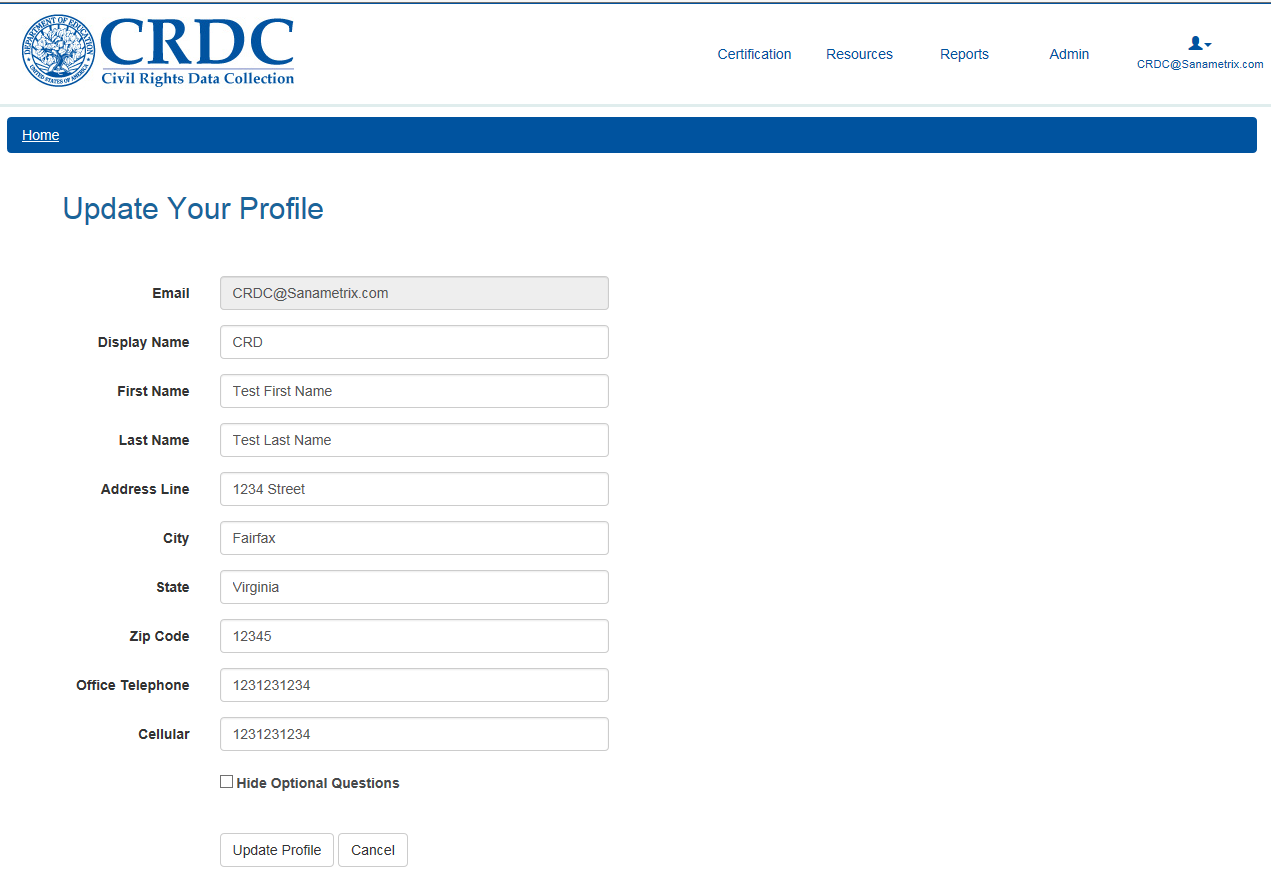
Figure 11. CRDC Survey Tool User Profile Dialog Screen
Selecting User Access takes the user to a screen with a table that lists the permissions that their account possesses; a legend at the bottom of the screen explains how to read the table (figure 12).
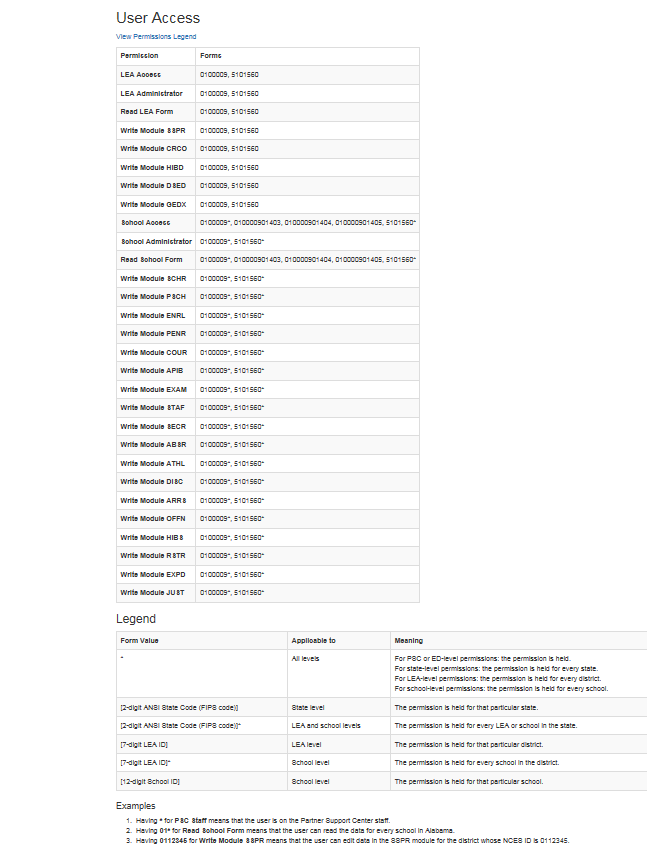
Figure 12. CRDC Survey Tool User Access Page
The left-hand column of the table on the User Access page shows the list of permissions assigned to the current user account; the right-hand column lists the Forms (District and School) by LEA and School ID (see figure 13).
User access roles are explained in greater depth in section 2.6.2 on User Management.
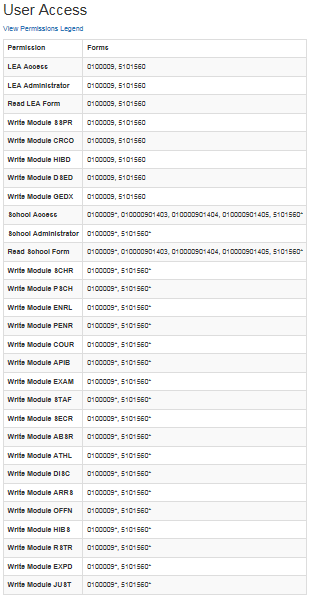
Figure 13. CRDC Survey Tool User Access Permissions
The legend at the bottom of the User Access page explains how to interpret the information provided in the permissions table (see figure 14).
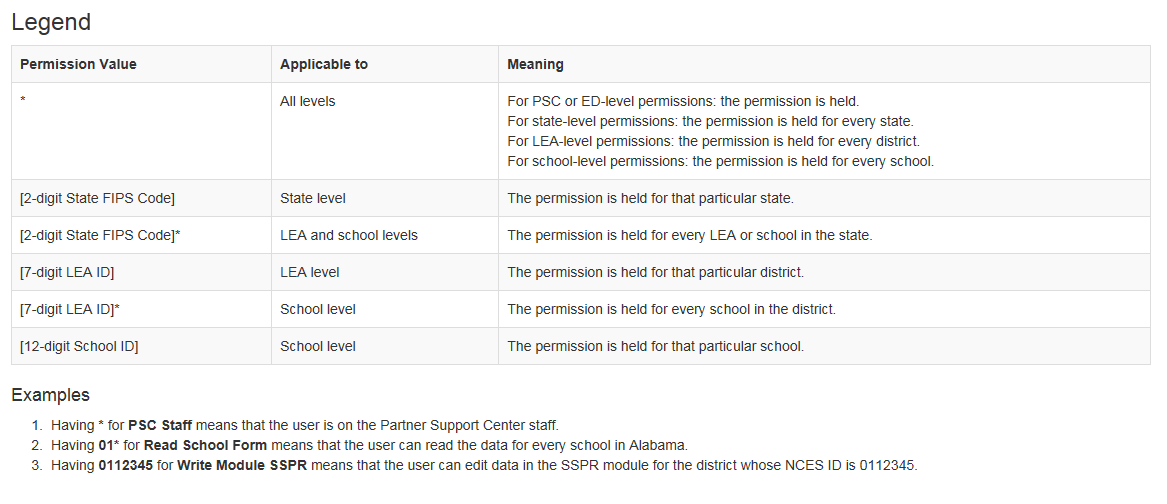
Figure 14. CRDC Survey Tool User Access Legend
“Change Password” takes the user to the Change Password dialog screen, which is discussed below. “Logout” logs the user out of the system.
Resetting Passwords
Users of the new survey tool have the ability to change their own passwords.
Change Password
If a user recalls the current password, changing it may be accomplished by selecting Change Password from the User menu available on every screen of the tool (see figure 15).

Figure 15. CRDC Survey Tool User Menu Select Change Password
This will bring up the Change Password dialog screen.
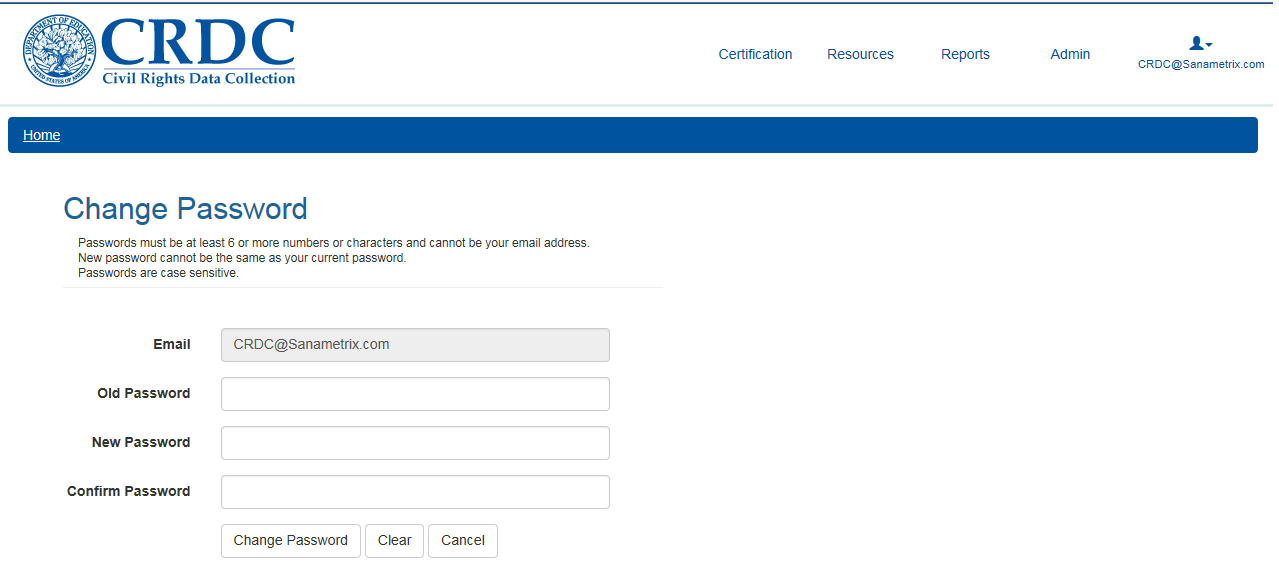
Figure 16. CRDC Survey Tool Change Password Dialog Screen
The email address will already be filled in for the logged-in user. All that is required is to enter the old password, then enter and confirm the desired new password. Errors will be shown if either the old password is incorrect or if the New Password and Confirm Password fields do not match.
Forgotten Passwords
If a user has forgotten the current password, they will need to follow the “Forgot your password?” link under the Password field (see figure 17).

Figure 17. CRDC Survey Tool Forgotten Password
This will bring the user to the Reset Password dialog screen (see figure 18).
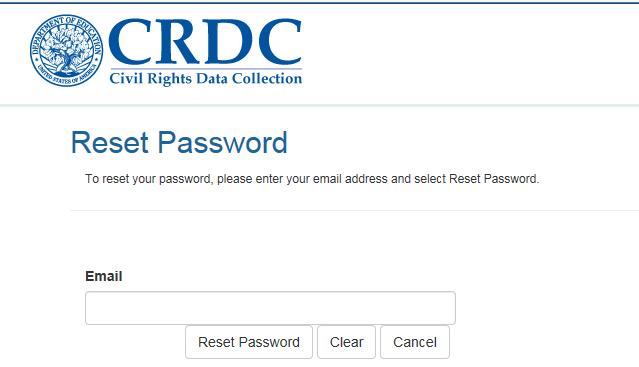
Figure 18. CRDC Survey Tool Reset Password
After the user enters the email address and selects the Reset Password button, the following message will appear on the screen (see figure 19).
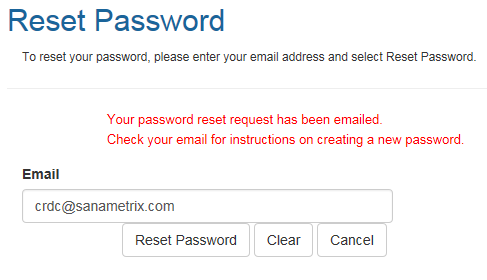
Figure 19. CRDC Survey Tool Password Reset
The user will then receive a confirmation email formatted as follows (see figure 20).

Figure 20. CRDC Survey Tool Password Reset Confirmation Email
Selecting the confirmation link or URL will bring the user to the following dialog screen (see figure 21).
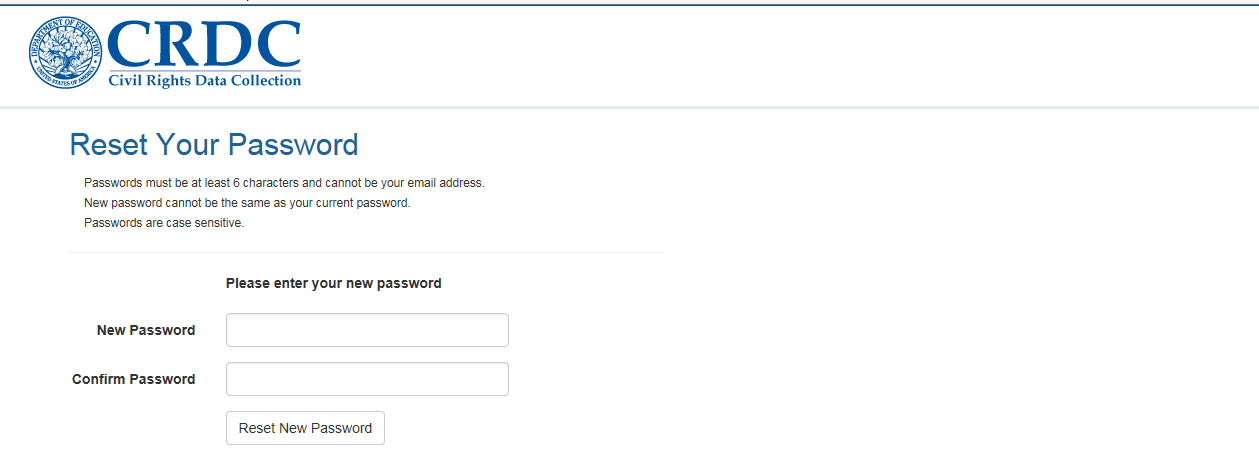
Figure 21. CRDC Survey Tool Password Reset Password Dialog Screen
If the user provides matching passwords in the two fields, he or she will receive the following message (see figure 22).
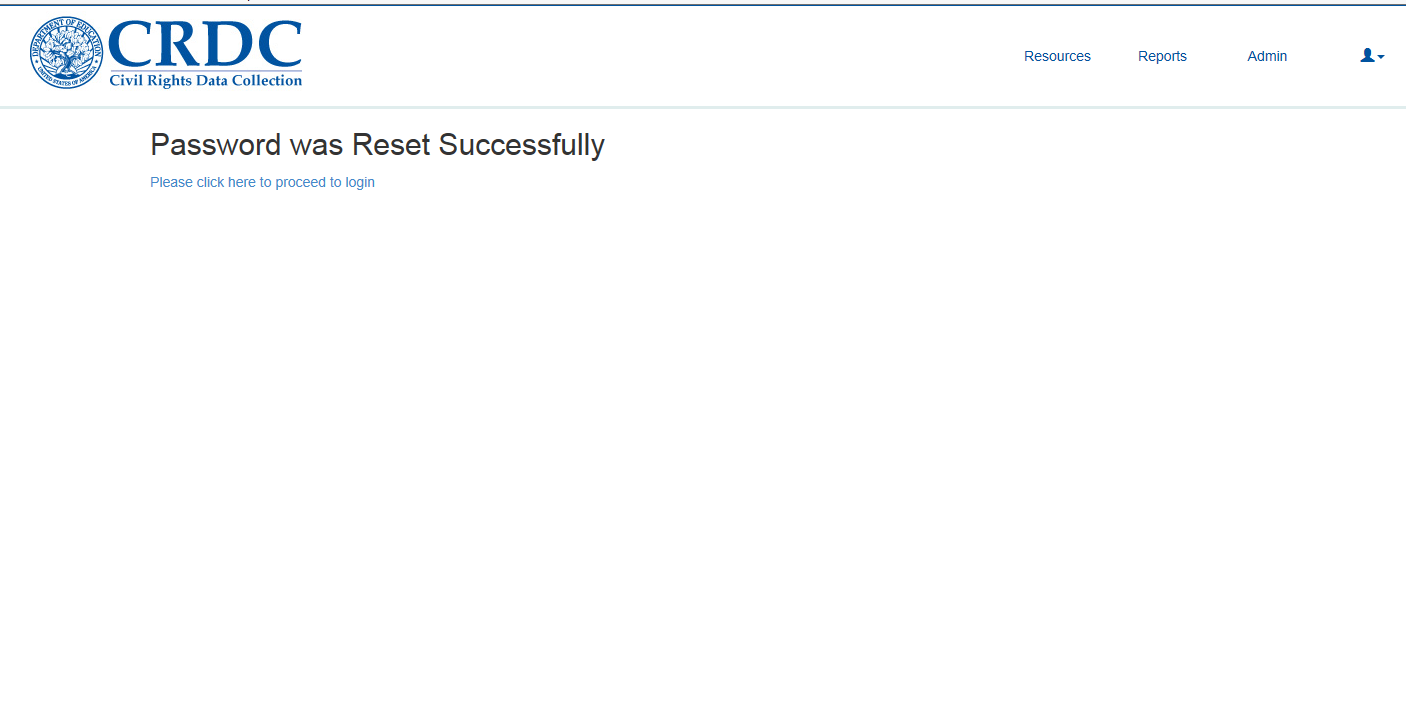
Figure 22. CRDC Survey Tool Password Reset Successful
As usual with password resets, non-matching fields will return an error message (see figure 23).
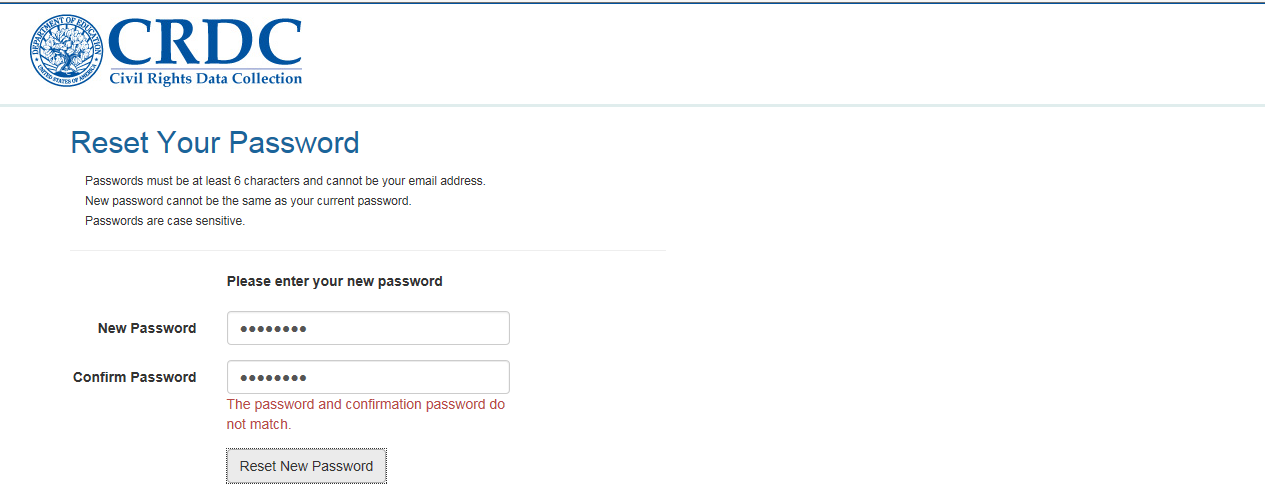
Figure 23. CRDC Survey Tool Password Reset Error
The core purpose of the CRDC survey tool is to report data relevant to the CRDC survey instrument. This can be done in two ways: by using the online forms for data entry provided within the tool itself and by uploading files in comma-separated value (CSV) format containing the relevant data. LEAs may opt to use one method or the other, or to combine the two, reporting some data in one way and some data in the other way. All data reported by either online data entry or file upload go to the same data repository and are reflected in the online data entry and all reports.
In the context of the CRDC survey tool, “Data Entry” refers to direct entry of data into the online forms.
Purpose/Function
The purpose of the Data Entry section of the tool is to provide user-friendly online forms for the direct entry of data relevant to the CRDC survey.
Entering the Data Entry Area
From the Home page of the CRDC survey tool, the user sees the Data Entry & Review Tool on the left side of the screen and File Upload on the right side. Under the Data Entry & Review Tool, the user may opt to enter data into the School Form Submissions or the District Form Submissions online forms (see figure 24).

Figure 24. CRDC Survey Tool Home Page Select Data Entry or File Upload
Navigation Within the School Form Submissions
Selecting School Form Submissions brings the user to the School Form Submission screen. Here the user has a choice between navigating by school and navigating by table. The choices are explained on screen (see figure 25).
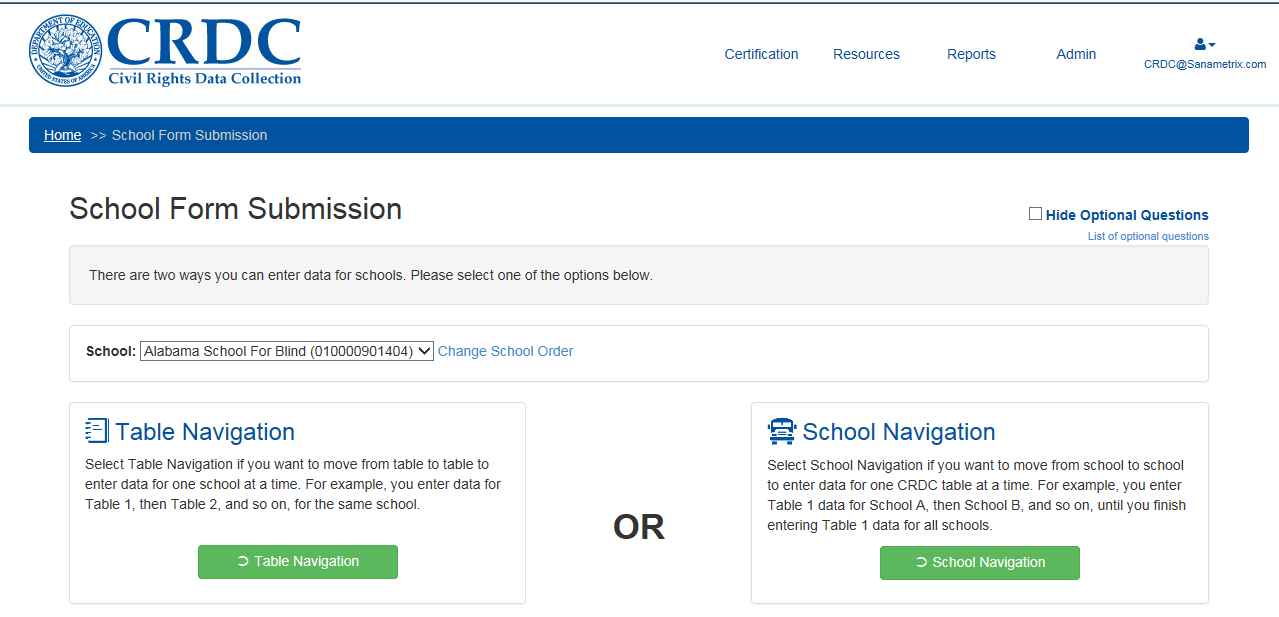
Figure 25. CRDC Survey Tool School Form Submission
Hide Optional Questions
Users have the option of hiding optional questions once they have entered data into the tables. Resting the cursor or otherwise focusing on the Hide Optional Questions checkbox selection toward the top right of the screen will bring up a brief explanation of its purpose, as shown in figure 26.

Figure 26. CRDC Survey Tool Hide Optional Questions
There is also a list of all of the optional questions on the current School Form available via the “List of optional questions” link below the checkbox.
Selecting “List of optional questions” brings up the following list (see figure 27).
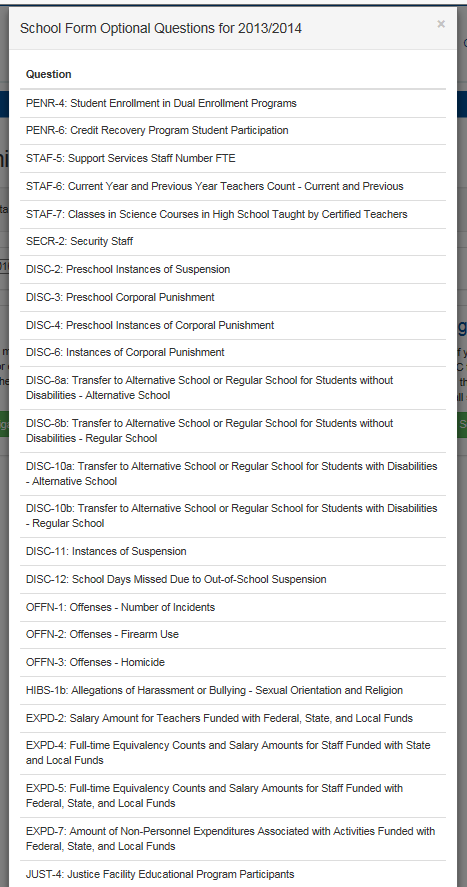
Figure 27. CRDC Survey Tool List of Optional Questions
Any optional question may be skipped by the respondent and still allow for certification of a district’s submission upon completion of all the questions that are required (i.e., all those not listed here).
School Selection and Change School Order
Prior to selecting a navigation mode, the user may select which school within the district or LEA will have its data displayed and edited, using the School selection dropdown menu (see figure 28).
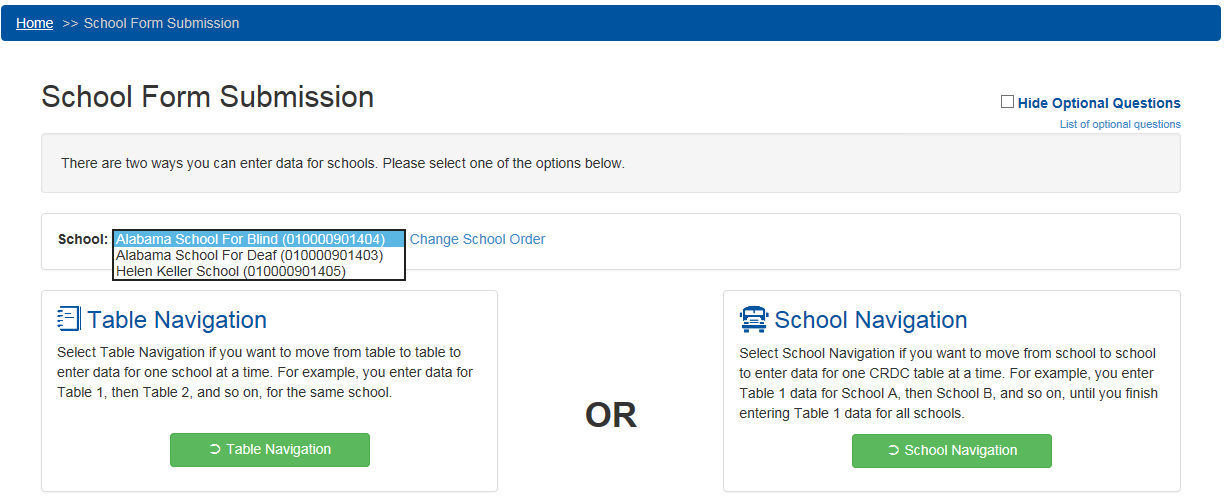
Figure 28. CRDC Survey Tool School Selection Dropdown Menu
The order in which schools are displayed in this dropdown menu, as well as the order in which they will be seen when using School Navigation (see section 2.3.1.3.4 below), may be managed by selecting the Change School Order link next to the dropdown menu. Selecting Change School Order brings up the following screen (see figure 29).
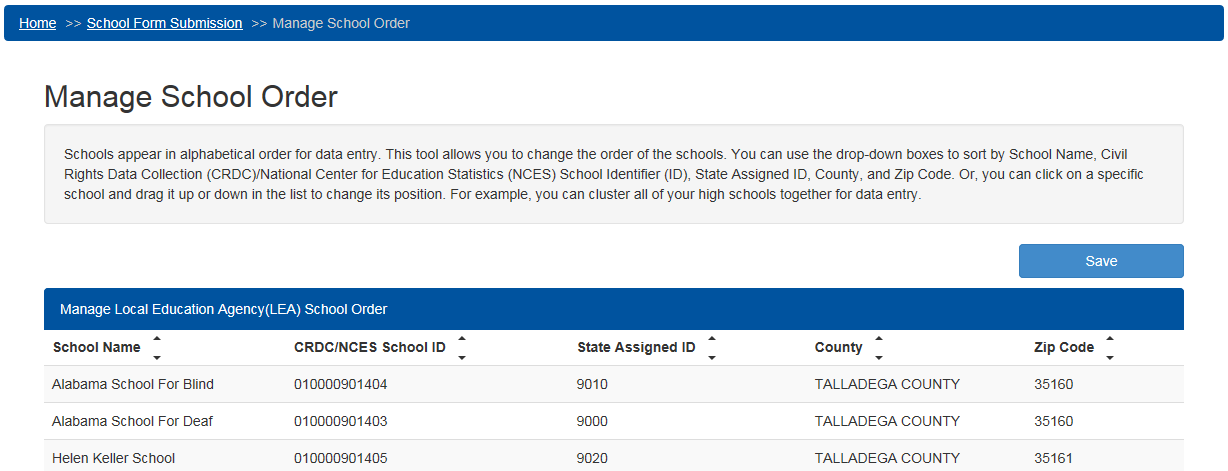
Figure 29. CRDC Survey Tool Manage School Order
The Manage School Order screen allows the user to order schools within an LEA by School Name (default), NCES School ID, State Assigned ID, County, or Zip Code, or to manually drag and drop schools into a preferred order.
Table Navigation
If a user selects Table Navigation, they go to the following screen, in which they may select a topical module to enter data into for the first school in the defined school order or the one selected in the School selection dropdown menu (see figure 30).
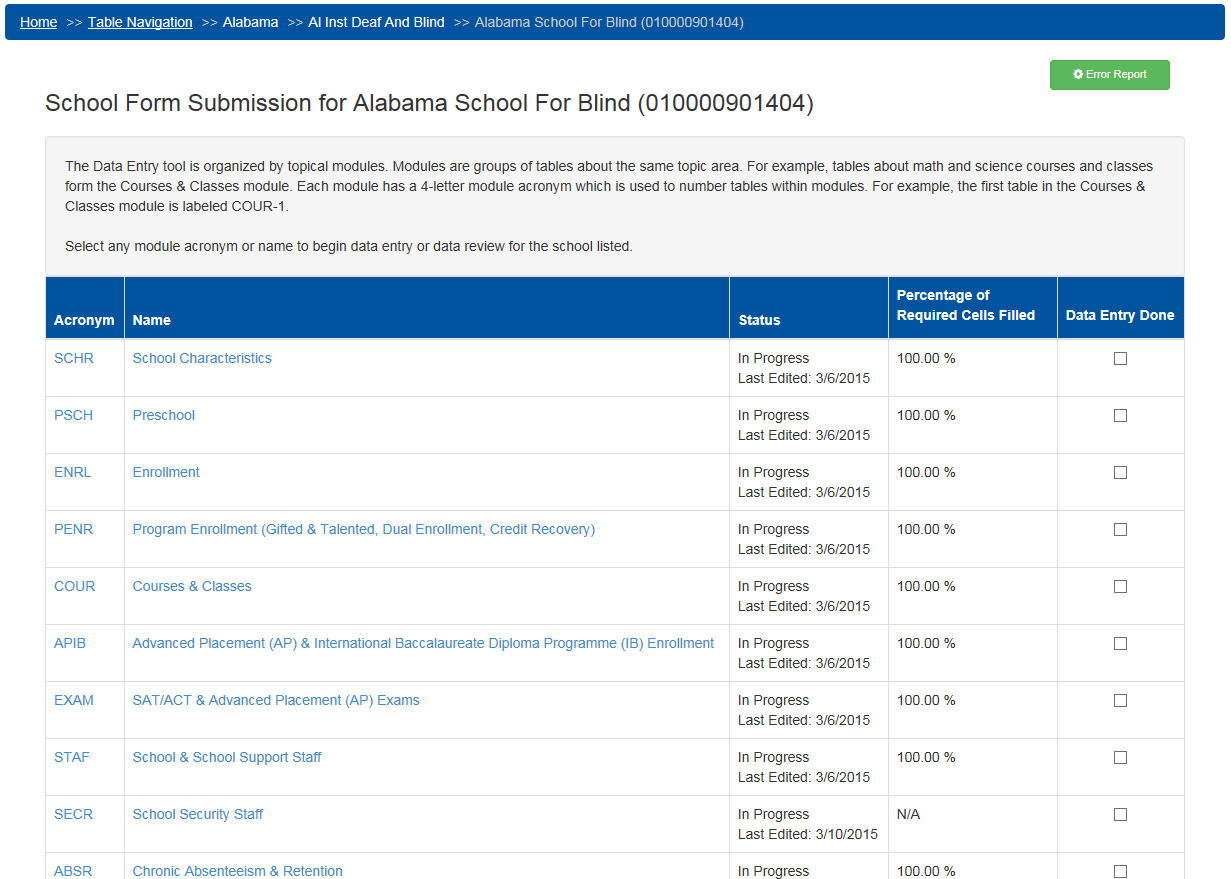
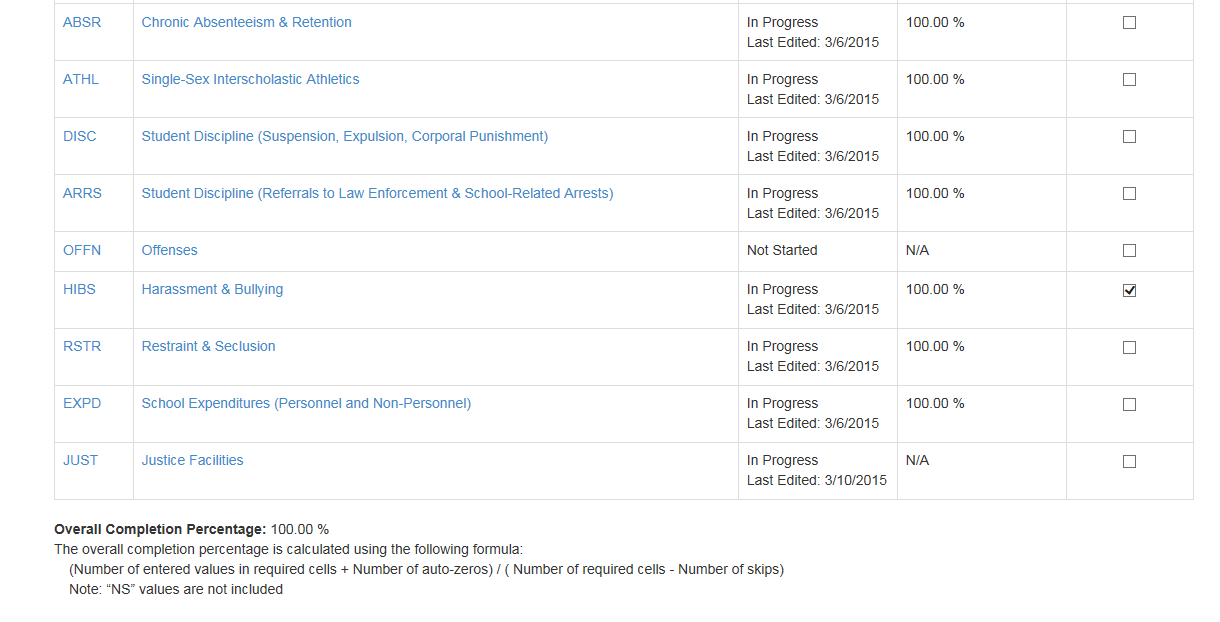
Figure 30. CRDC Survey Tool Table Navigation Module Landing Page
The main part of the Module Landing page consists of a table of the topical groupings of CRDC questions within the School Form. Each module’s acronym, full name, and current data entry status are provided in the table. Each module that is currently active and open for data entry shows up with its acronym and full name as active links available for selection. Clicking on either the acronym or full name will take a user to the same page.
The Module Landing page appears the same for the Table Navigation and School Navigation modes of entering data, with the only visible difference being the “breadcrumbs” displayed in the top blue navigation bar (see figure 31). These “breadcrumbs” are displayed on every screen within the CRDC system, constantly indicating the user’s location within the tool. They are particularly useful in the Data Entry section of the tool, as the online forms for data entry have both more levels of navigation and multiple LEAs and schools that might be subject to data entry and review.

Figure 31. CRDC Survey Tool Navigation “Breadcrumbs”
In this instance, from left to right, the ‘“breadcrumbs” indicate the type of navigation being used, the state, the LEA, and the particular school being edited. If the user had instead chosen School Navigation, everything would appear the same except the navigation type, which would display as “School Navigation” rather than “Table Navigation.”
The “breadcrumbs” can also be used for active navigation. Any individual element of the “breadcrumbs” that is underlined is an active link that will take the user to the indicated location. For example, in this case, selecting the “Home” link would take the user to the Home page, while selecting the “Table Navigation” link would take the user back up to the main School Form Submission screen. As the user goes further down into the hierarchy of data entry screens, additional “breadcrumbs” become active links in this way.
The Module Landing page also contains an Error Report link (for the user to access a report on the error and warning counts for the selected school), the percentage of required cells filled for a given module, check boxes for indicating when data entry for a particular module is done, and reporting on the overall completion percentage at the bottom of the screen.
Selecting the Error Report link next to the screen title with the school name brings up a detailed Error Report for the entire School Form. This Error Report will be discussed in depth in section 2.5 of this manual, which covers Reports and reporting functionality.
Selecting a module from the Module Landing page brings the user to a screen with instructions for the module as a whole (see figure 32).
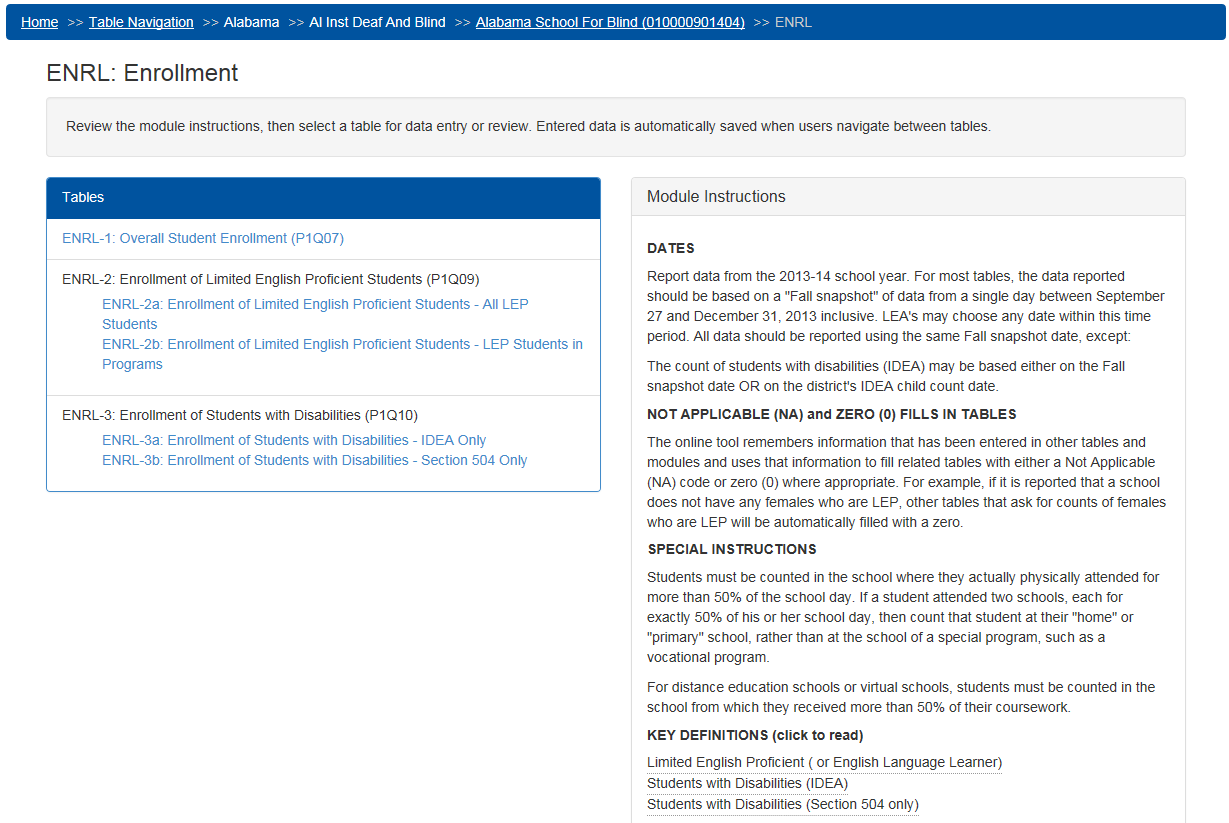
Figure 32. CRDC Survey Tool Table Navigation Module Instruction Screen
The primary purpose of this screen is to provide links to the individual tables within the module in which users may actually enter data in response to survey questions. This screen also provides links to key definitions in the instructions and questions.
Again, the Module Instruction screens appear the same regardless of navigation mode, apart from the “breadcrumbs” in the blue navigation bar along the top of the screen indicating the user’s location in the tool. Note how the acronym for the individual module being viewed is added to the “bread crumb” trail in this instance, as well as how the school name (“Alabama School for Blind”) has become an active link. Selecting the school name link in this instance would take the user back to the Module Landing page for this school.
Selecting an individual table within the module brings up the screen for that table and adds an entry for the specific table to the “breadcrumbs,” while the module acronym (“ENRL”) in this case becomes an active link that will take the user back to the Module Instruction screen if selected (see figure 33).
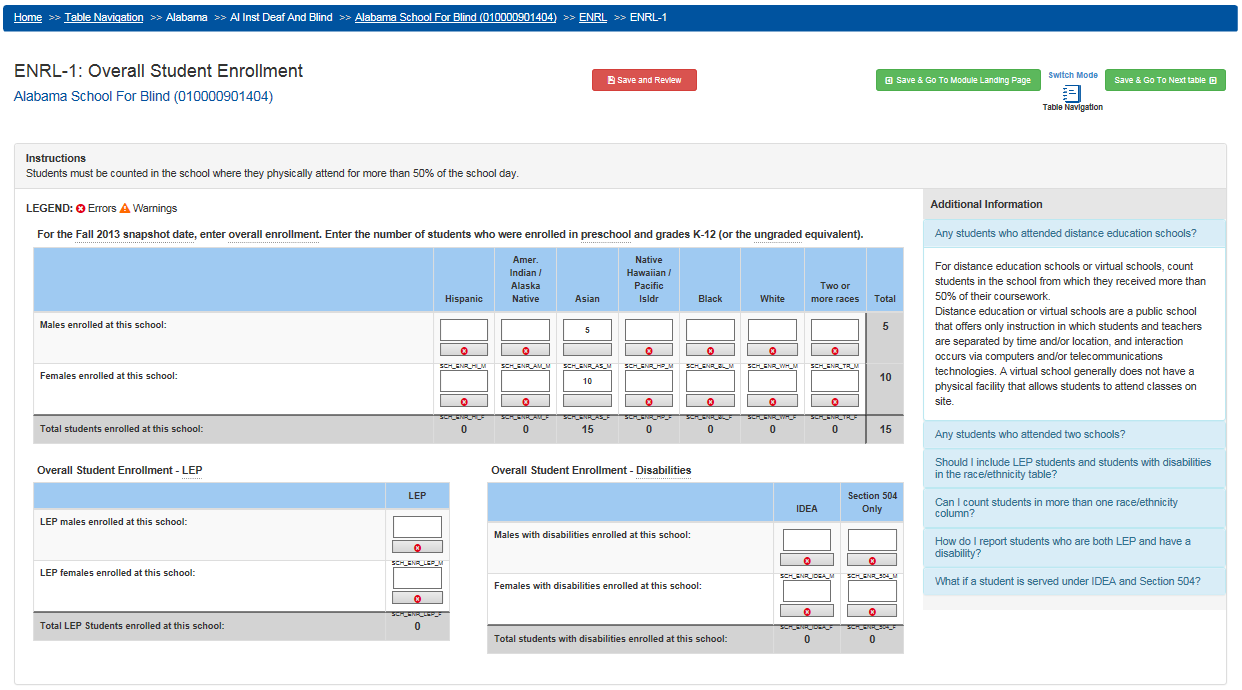
Figure 33. CRDC Survey Tool Table Navigation Overall Enrollment Table
In Table Navigation mode, selecting the Previous and Next navigation buttons in the upper-right portion of the screen (see figure 34) will take the user to the previous or next table (for which the user has data entry permissions) within the list of tables, within the same module and School Form.

Figure 34. CRDC Survey Tool Table Navigation Mode
For the first table within a module that the user navigates to, rather than “Save & Go To Previous table,” the button on the left will read “Save & Go To Module Landing Page” instead, and will function accordingly (see figure 35).

Figure 35. CRDC Survey Tool Table Navigation Mode (First Table)
The same is true for the button on the right, but for the last table in the module (see figure 36).

Figure 36. CRDC Survey Tool Table Navigation Mode (Last Table)
The Switch Mode selection button, which is positioned between the navigation buttons, allows users to switch navigation mode from Table Navigation to School Navigation without going back up through the hierarchy of screens to the School Form Submission screen. Selecting Switch Mode will take the user to the same table within the same module within the same School Form, with the only difference being that the user will now be navigating using School Navigation and the navigation buttons and “breadcrumbs” will reflect this change.
School Navigation
If the user selects School Navigation rather than Table Navigation from the School Form Submission screen, they will go to the following version of the Module Landing page (see figure 37).
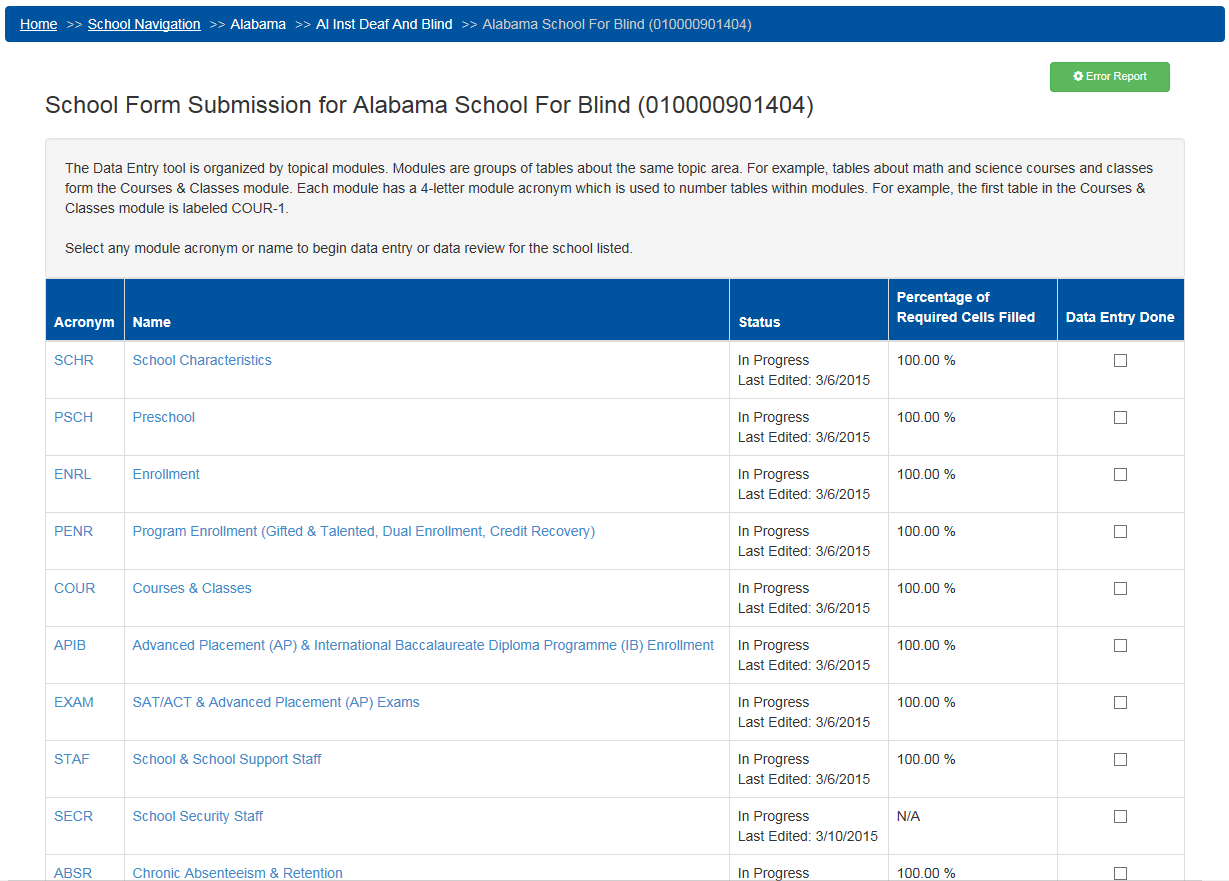
Figure 37. CRDC Survey Tool School Navigation Module Landing Page
As noted above, the only difference apparent at this level is that the “breadcrumbs” indicate that the user is in School Navigation rather than Table Navigation.
Selecting a module brings up the Module Instruction screen, as before (see figure 38).
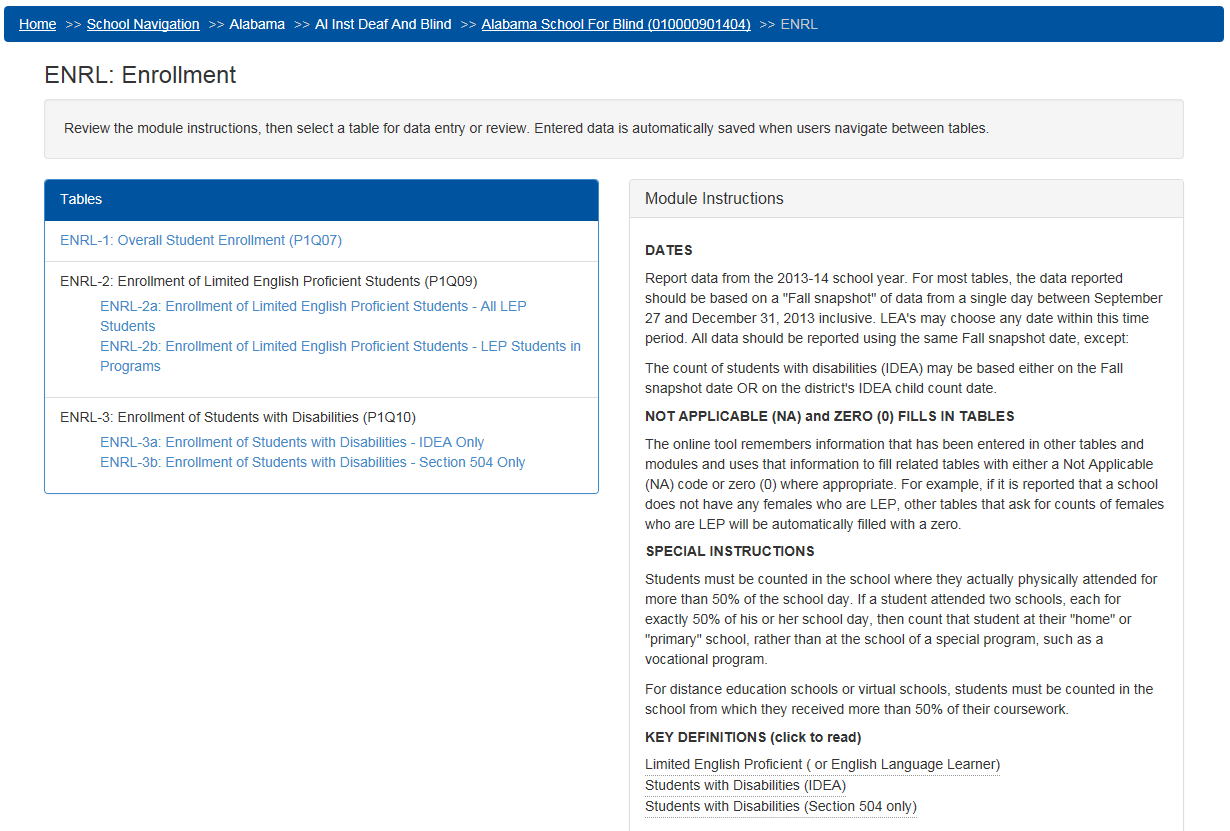
Figure 38. CRDC Survey Tool School Navigation Module Instruction Screen
Again, the functionality here is the same as in Table Navigation, the only difference being the navigation mode that is indicated in the “breadcrumbs."
Selecting an individual table within the module brings up the School Navigation version of that table (see figure 39).
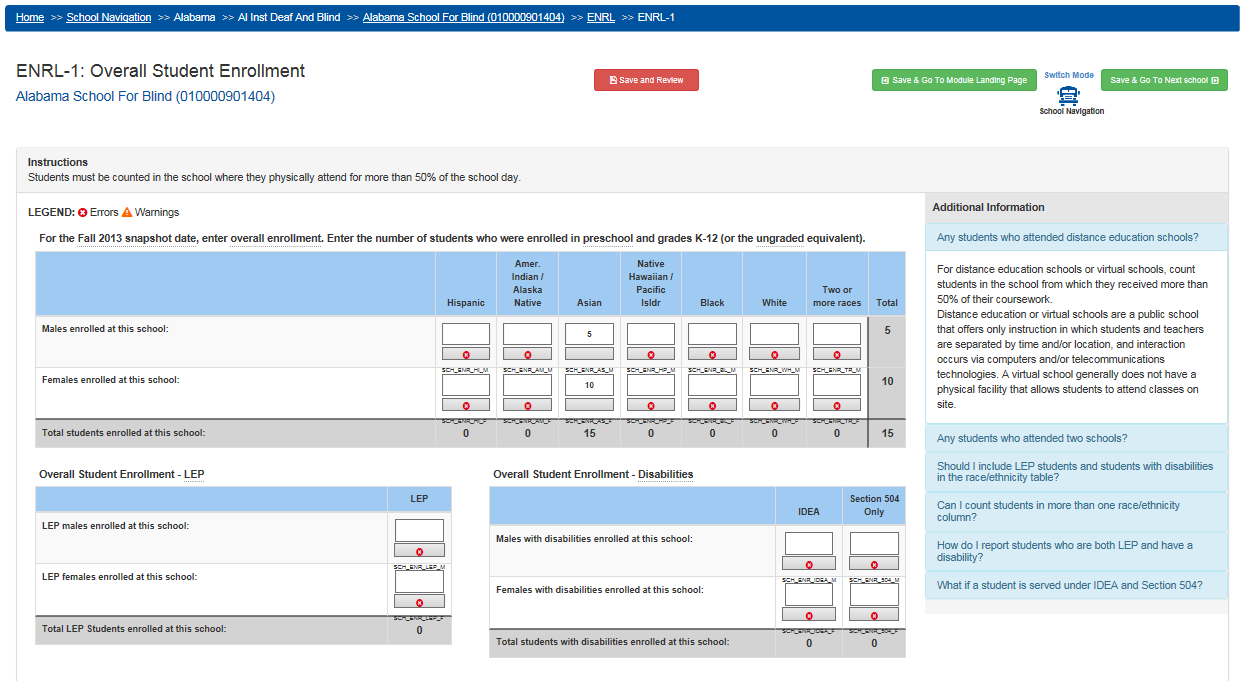
Figure 39. CRDC Survey Tool School Navigation Overall Enrollment Table
Looking closely at the navigation buttons reveals the differences between the Table Navigation and School Navigation versions of these screens. In School Navigation, the Previous and Next navigation buttons in the upper-right portion of the screen will take the user to the previous or next school within the LEA, while remaining in the same table within the module (see figure 40). This functionality operates according to the order of schools, either through the default (school name) order or as earlier defined by the user through the Change School Order functionality.

Figure 40. CRDC Survey Tool School Navigation Mode
There are variations on these buttons when the user is at the first or last school in the defined order, such that when there are no more schools, the next or previous button will take the user to the next or previous question or to the Module Landing page, similar to how the Table Navigation buttons act when at the beginning or end of a module.
The Switch Mode selection exists here to allow users to switch navigation mode from School Navigation to Table Navigation without having to go back up within the hierarchy of screens to the top-level School Form Submission screen. Just as when switching from Table Navigation to School Navigation, selecting Switch Mode here will take the user to the same table within the same module within the same School Form, with the only difference being that the user will now be navigating using Table Navigation and the navigation buttons and “breadcrumbs” will reflect this change.
Navigation Within the District Form Submissions
Navigation within the District Form Submissions is similar to the School Form. Selecting District Form Submissions from the School Form Submission screen brings the user directly to the district version of the Module Landing page (see figure 41).
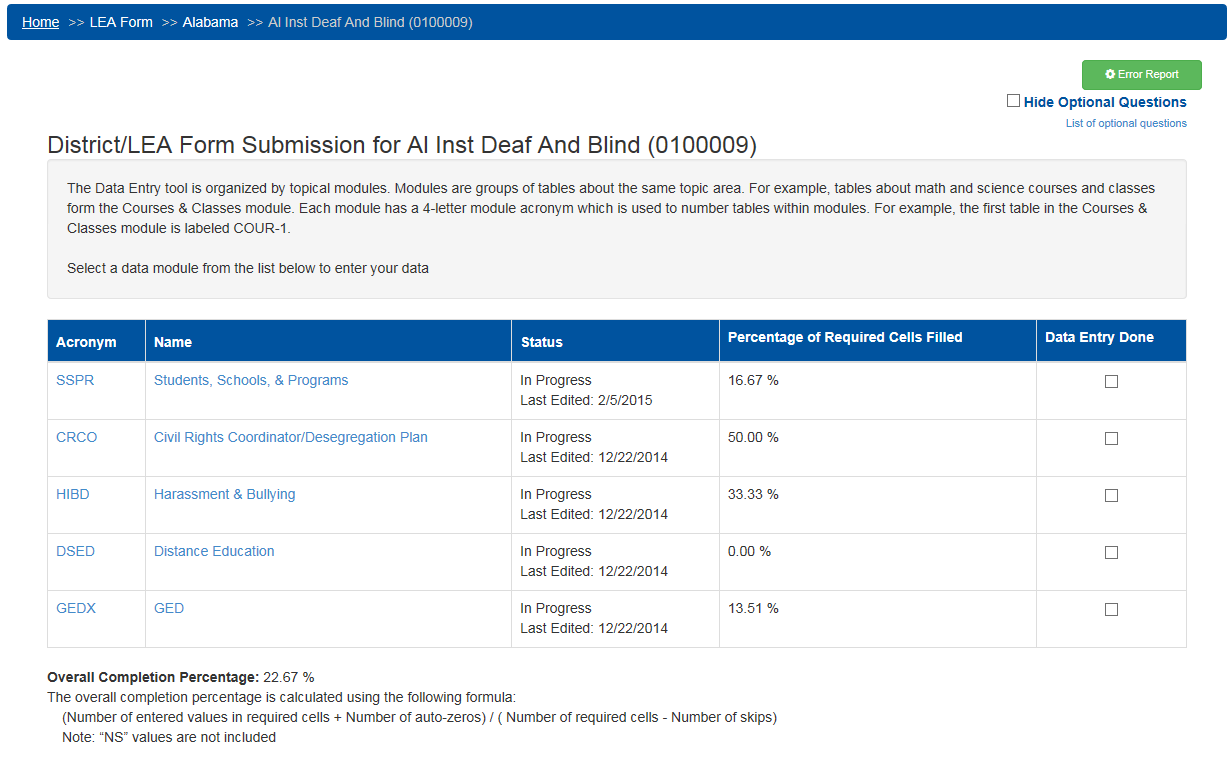
Figure 41. CRDC Survey Tool District Form Module Landing Page
The District Form is divided into topical modules (albeit a smaller number of them) in much the same way as the School Form. Error Reports and Hide Optional Questions also work identically to the way they do within the School Form.
Selecting an active module for data entry brings up the Module Instructions screen with the list of available questions and tables (see figure 42).
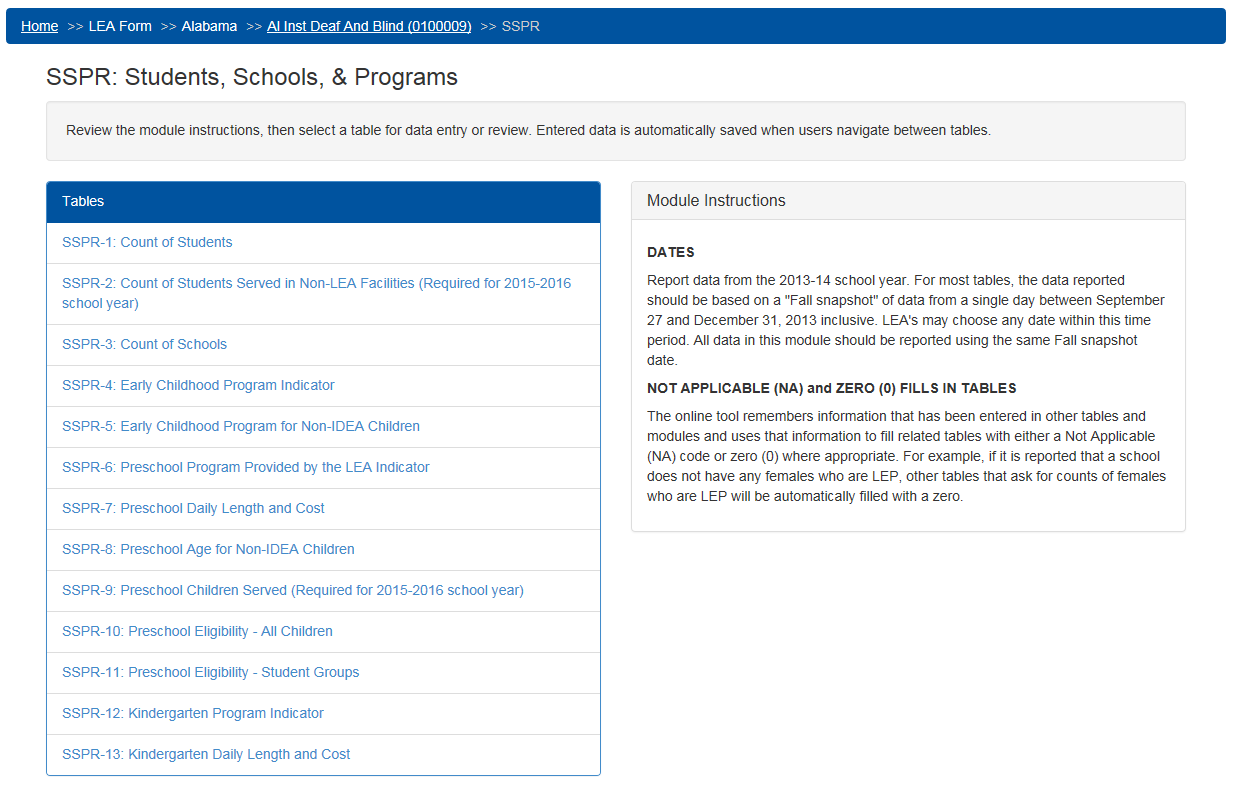
Figure 42. CRDC Survey Tool District Form Module Instruction Screen
Selecting an individual table within the District Form brings up that table (see figure 43).
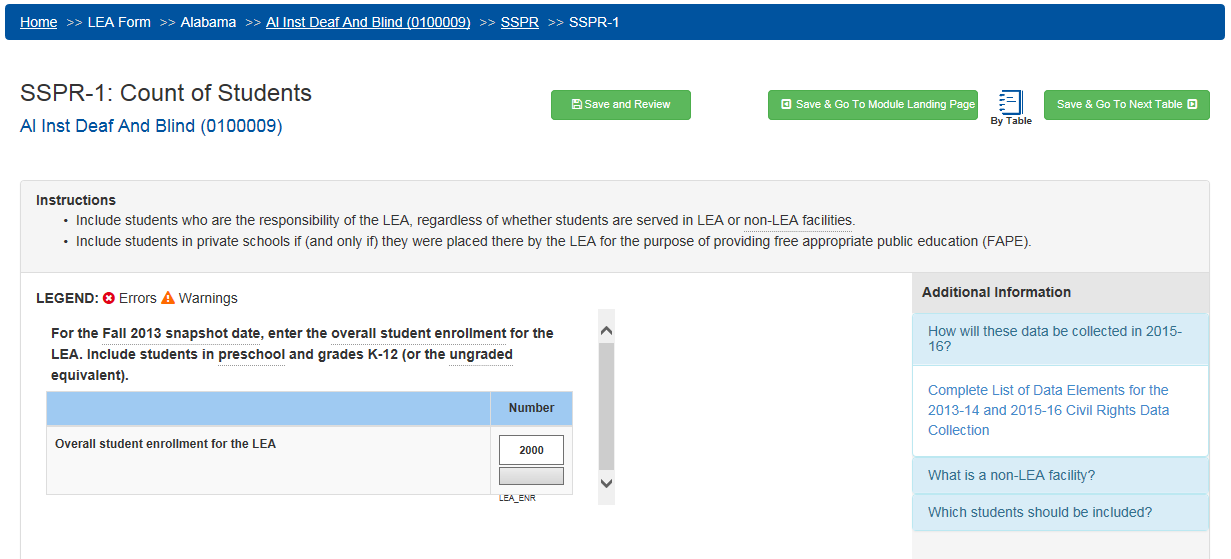
Figure 43. CRDC Survey Tool District Form Student Count Table
Note that the “breadcrumbs” reflect the user’s navigation path and provide navigation links in the same manner as when navigating the School Form.
Since the vast majority of users will only be submitting data for one district or LEA, all navigation within the District Form is from table to table, as is Table Navigation within the School Form. There is no equivalent of School Navigation for the District Form Submissions process. Once the user has gone to the screen for a specific table in a module, the navigation buttons will take that user to the previous or next table within the same module within the same District Form (see figure 44).

Figure 44. CRDC Survey Tool District Form Table Navigation
Just as for Table Navigation in the School Form, in the first table within a module, the button on the left will read “Save & Go To Module Landing Page” rather than “Save & Go To Prev table,” and will function accordingly (see figure 45).

Figure 45. CRDC Survey Tool District Form Table Navigation (First Table)
Likewise, in the last table within a module, the navigation button on the right will change (see figure 46).

Figure 46. CRDC Survey Tool District Form Table Navigation (Last Table)
As there is no “LEA Navigation” mode analogous to the School Navigation mode available for the School Forms, a user with access and reporting responsibility for multiple districts would either require separate logins for these different user roles or would have to select a different LEA from the State and LEA dropdown selection on the Home Page before selecting District Form Submissions.
Data Entry Process
Once the user has selected a specific table representing a question or series of questions in the survey, the actual data entry can begin.
Initial Data Entry
Once in a specific table, the user may enter data in response to a question or series of questions manually in any of the clear fields. Totals are automatically calculated for the user. Some tables may be skipped due to internal logic between the survey items, but this will generally entail skipping over an entire table rather than an individual cell in the table. The navigation mode (School or Table) chosen for moving between different tables and schools within the form is irrelevant to the functionality for actually entering data once in a table (see figure 47).
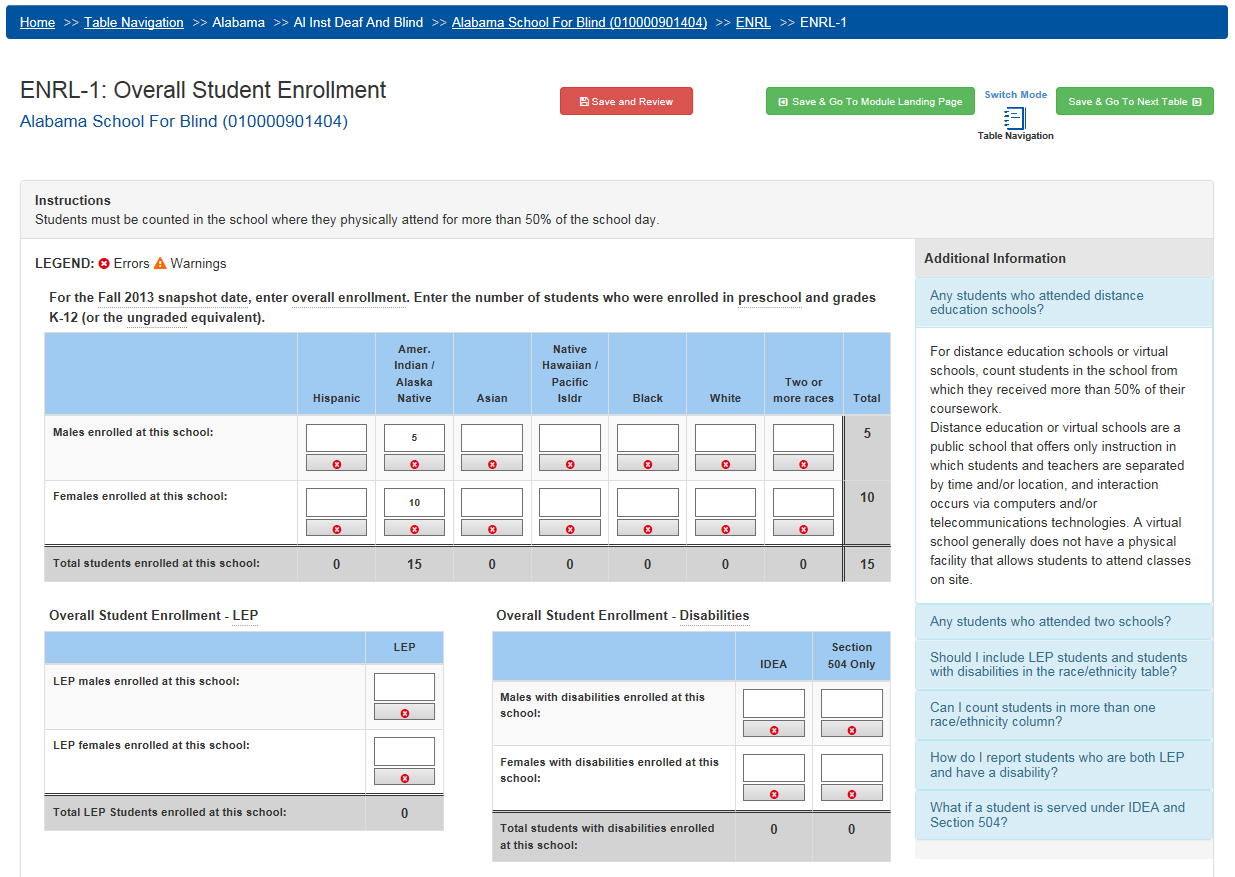
Figure 47. CRDC Survey Tool Overall Enrollment Data Entry
Within each table data entry screen, the top of the screen just beneath the main menu and breadcrumbs navigation identifies the current table and the school or district to which it applies, along with the Save and Review and Navigation buttons. Beneath that are some brief instructions and a legend identifying icons used, and then the actual table or tables with cells ready to be filled in with accurate data appear in the left and central portions of the screen, with an area for additional information to the right.
Within the table itself, each cell has a gray bar beneath it for display of Error or Warning icons, and beneath that the short name (used in flat file submissions) of the data element represented by that cell. Totals are calculated on a running basis as data are entered.
Real-Time Feedback/Status Display
The CRDC submission system automatically performs validation checks on all data as they are entered and flags errors or potential errors (warnings). These checks are called “Business Rules” and are run in real time as data are entered using the Data Entry & Review tool. Once some or all of the data have been entered for an individual table, the user can select the Save and Review button to apply the business rules to these data. In return, the system will return an Error and Warning Summary for the table as a whole, showing any errors, warnings, and pending validation checks that apply to the data entered (see figure 48).
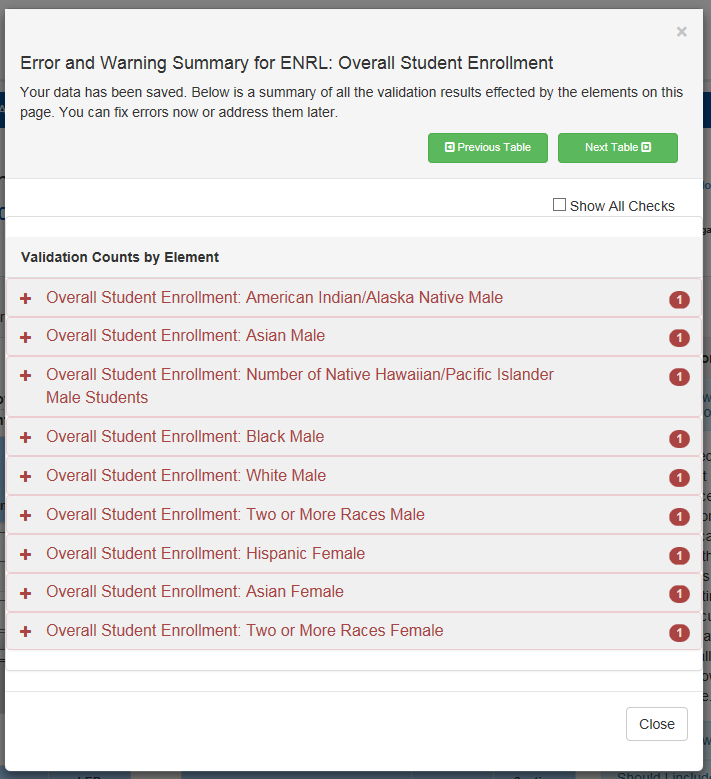
Figure 48. CRDC Survey Tool Overall Enrollment Error and Warning Summary
Initially, the Error and Warning Summary only shows a list of the data elements checked, with a count of Warnings or Errors for each beside it.
Each of the elements with active errors or warnings may be expanded from this view for a detailed list of the specific errors and warnings found for that element (see figure 49). Errors are conditions where the data must either be corrected or explained prior to certification, while Warnings are defined as conditions where a possible issue has been identified, but a correction or explanation may not be necessary.
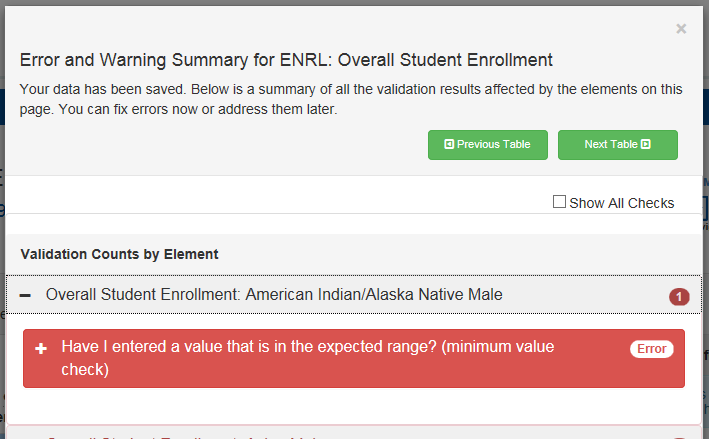
Figure 49. CRDC Survey Tool Overall Enrollment Element Expanded
Each specific error or warning may be further expanded upon within the summary (see figure 50).
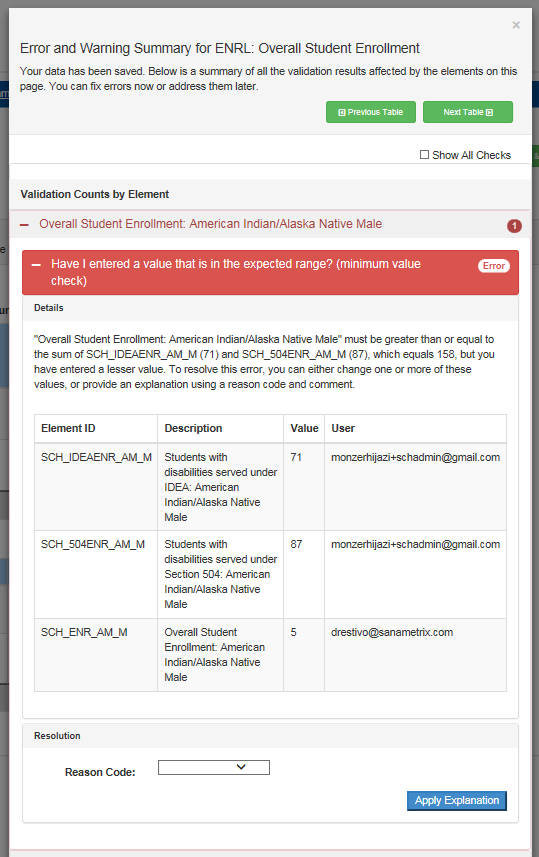
Figure 50. CRDC Survey Tool Overall Enrollment Error Expanded
Upon closing the Error and Warning Summary, the user will see that icons for these individual errors and warnings also appear in the individual fields within table itself (see figure 51).
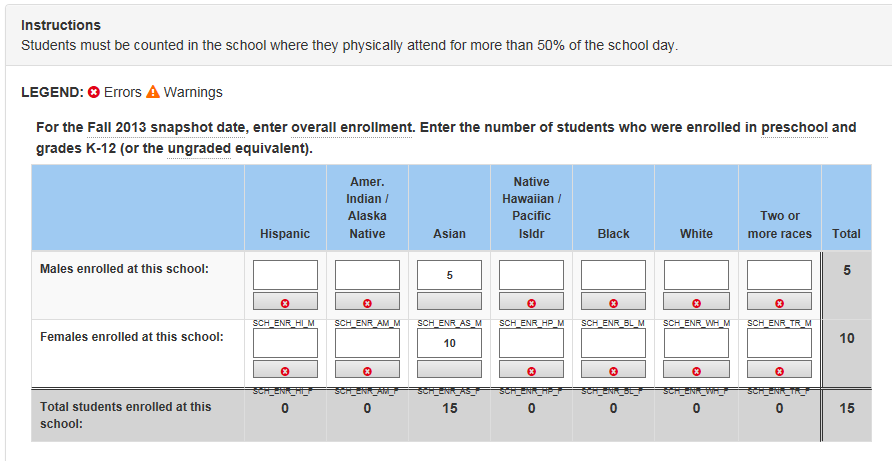
Figure 51. CRDC Survey Tool Overall Enrollment Validation Checks
Selecting the Save and Review Data button at any point will bring up the whole Error and Warning Summary again. The Save and Review Data button at this point displays the number of active errors and warnings for the whole table.
Further details on any of these conditions may be obtained by selecting them, either from an individual icon in the table or from a line in the Error and Warning Summary. For example, selecting one of the Error icons will bring up the following type of popup (see figure 52).
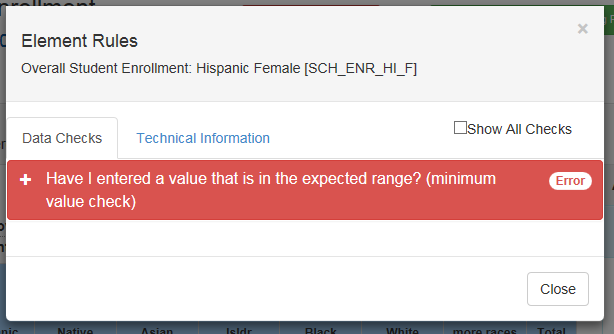
Figure 52. CRDC Survey Tool Error Icon Popup
In this case, the Error icon only indicated one particular active error.
Selecting the plus (+) sign to the left of the Error name will bring up full details (see figure 53).
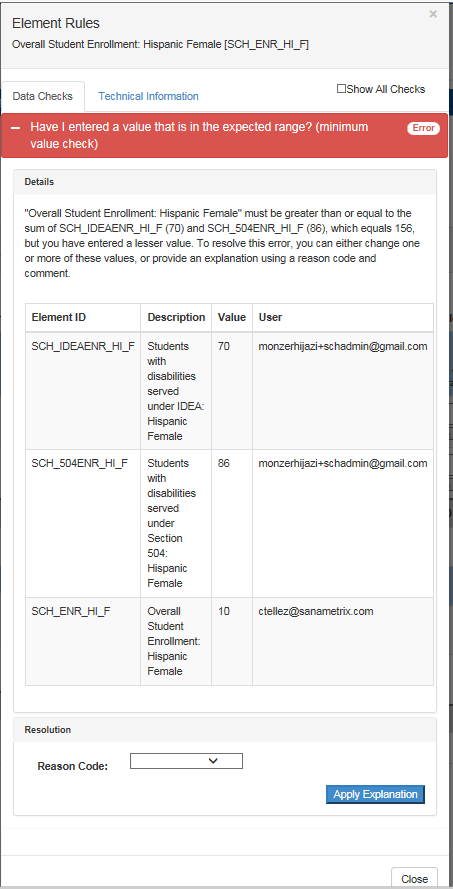
Figure 53. CRDC Survey Tool Error Details
Selecting the Technical Information tab will show technical details, including the LEA and School IDs, data element ID, module name, user ID associated with the data field, and whether the element is being skipped or automatically populated with a zero (see figure 54).
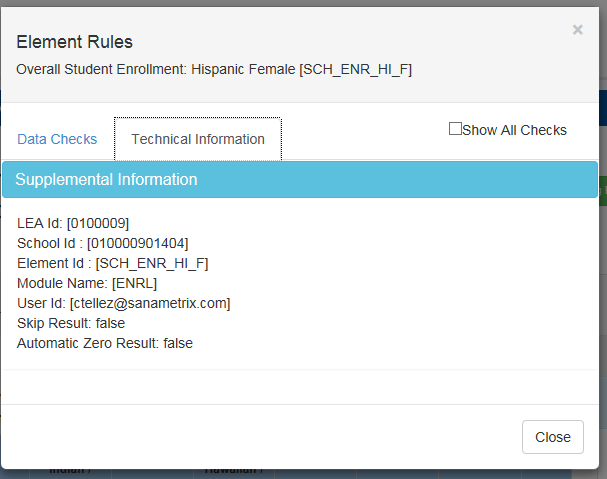
Figure 54. CRDC Survey Tool Technical Information
Selection of a Warning icon brings up similar information (see figure 55).
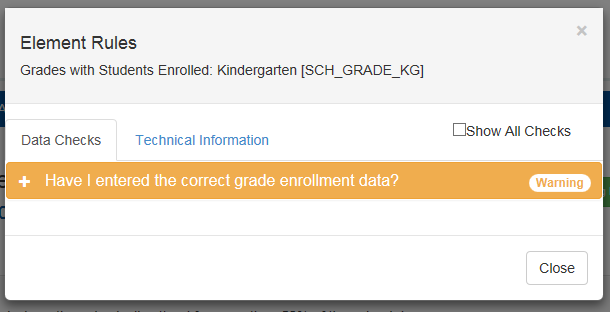
Figure 55. CRDC Survey Tool Warning Icon Popup
Expansion of the Warning message provides full details on the nature of the issue (see figure 56).
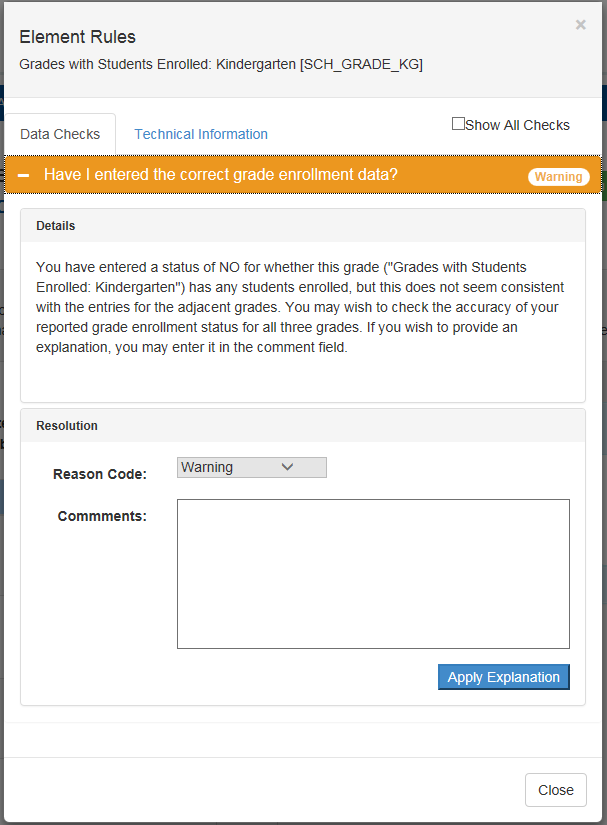
Figure 56. CRDC Survey Tool Warning Details
Generally, users will only be interested in the validation checks that a data element fails and which therefore generate an error or warning. However, it may sometimes be useful to be aware of all the validation checks that apply to an element, including those it has passed; for example, when considering a change to the reported value of the element in order to correct one error, a user may want to avoid triggering an entirely different error or warning. For this purpose, the user may check the Show All Checks option.
Checking Show All Checks changes the view so that is shows all validation checks, organized by data element (see figure 57).
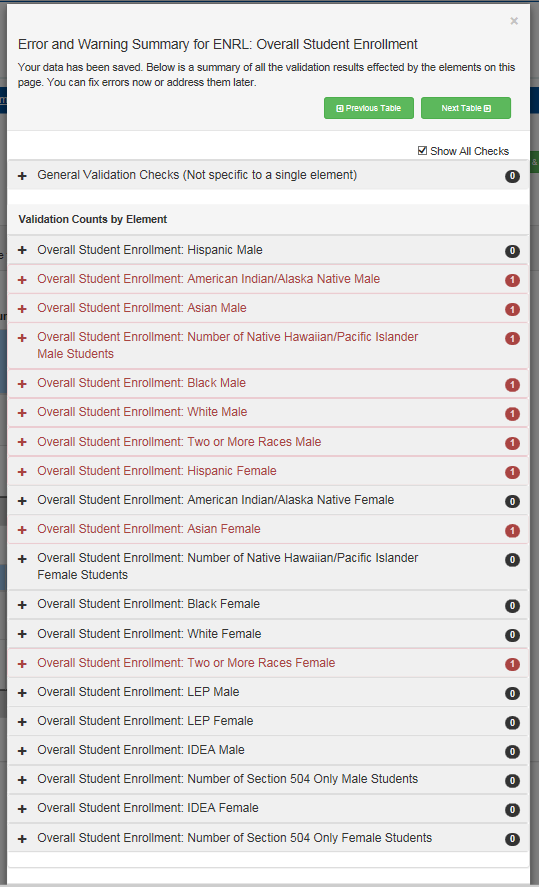
Figure 57. CRDC Survey Tool Show All Checks (Summary)
When a data element is expanded in this view, validation checks are displayed in descending order of priority to the user: Errors; then Warnings; then checks that are still Pending due to a lack of data; and, finally, checks that have been Passed, indicated in green (see figure 58). Each validation check enumerated in this view is expandable for full details, just as are Errors and Warnings.
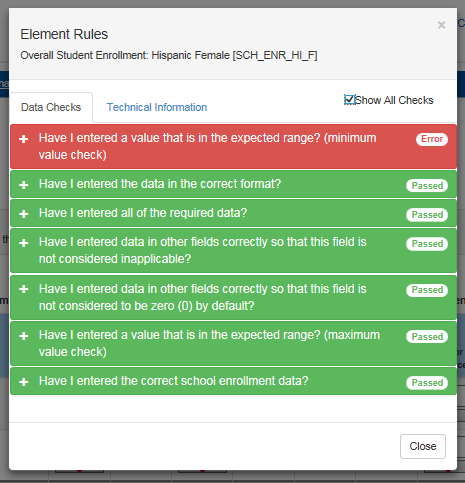
Figure 58. CRDC Survey Tool Show All Checks (Element)
The Show All Checks function is also available for the Error/Warning popup screens accessed through the icons in the table view. In this case, it will show all the validation checks for the specific element to which the icon belongs, in the same priority order.
The online data entry screens also show the user whether the system’s internal business logic dictates that certain data fields are not applicable and therefore are being skipped or whether values are being automatically filled in as zeros.
If an answer to a precursor question indicates that a table within a form is not applicable and therefore should be skipped, the table navigation will normally skip over that table entirely. However, if a user uses module or school navigation to see that table, the cells for the skipped data fields will show a series of grayed out “NA’s,” as shown in figure 59.
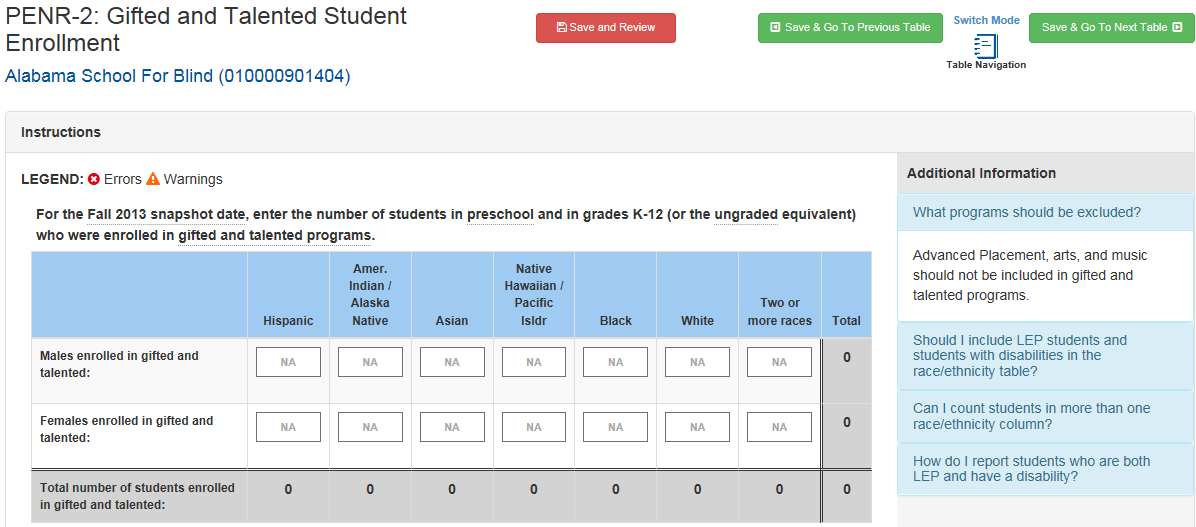
Figure 59. CRDC Table With Skipped (NA) Items
In this instance, the school was reported not to have any Gifted/Talented programs or enrollment at an earlier point in the form, so the entire Gifted and Talented Enrollment table was automatically filled in with “NA’s.” If the user nevertheless attempts to edit an “NA” entry, an indicator will show that it was intended to be skipped (see figure 60).
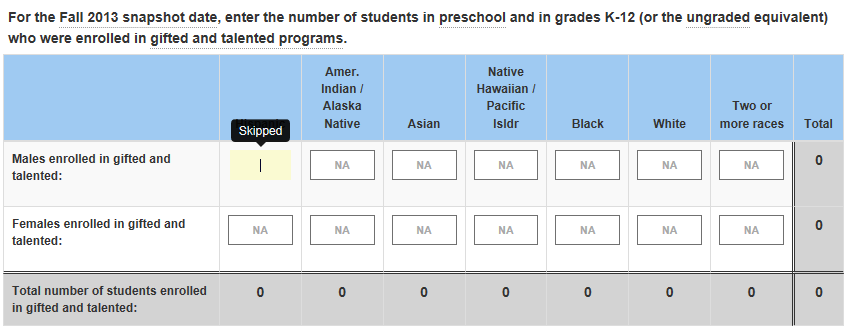
Figure 60. CRDC Table With Skipped Indicator Showing
If the user goes on to enter a value, a Warning will be generated, as shown in figure 61.
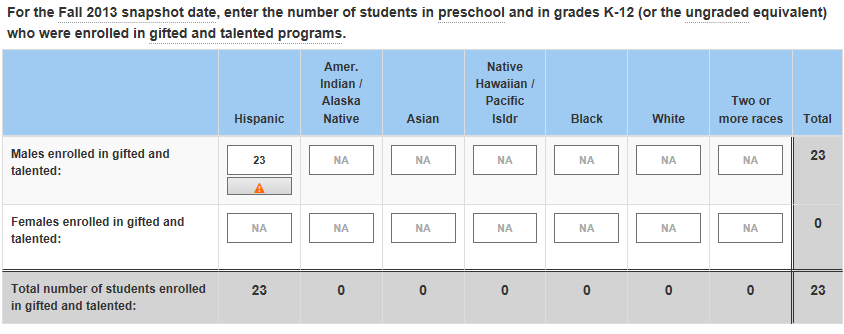
Figure 61. CRDC Table With Skipped Warning Icon
If a user selects the Warning icon, full details on why they are receiving a warning about entering data to a skipped field, why that field was originally skipped, and what will happen to their data if they do not remove the skip condition prior to certification are provided in the resulting Warning message (see figure 62).
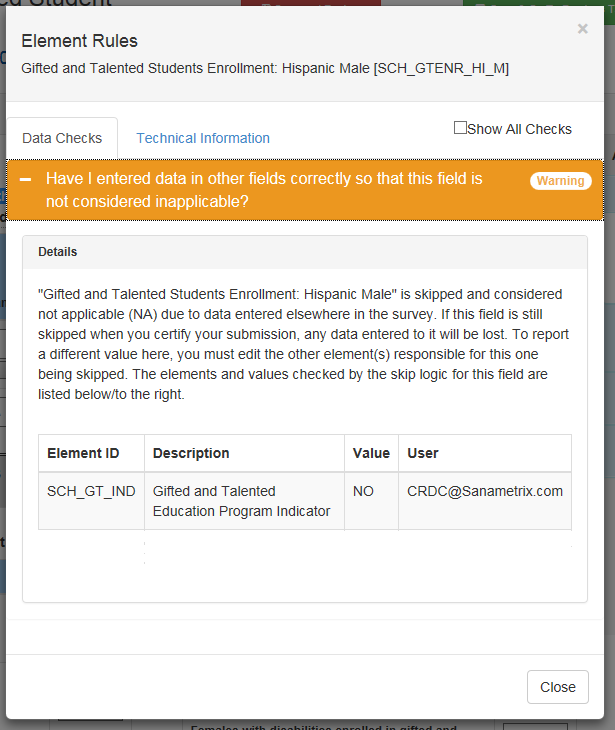
Figure 62. CRDC Skipped Warning Message
The Warning message includes details on which other field or fields have values that are causing this field to be skipped and which user submitted those values.
Likewise, the system will sometimes dictate that, based on the answers to precursor questions, later fields should automatically be filled in with zeros. For example, if there are no Hispanic students within a school at all, later tables that break down specific course enrollment or incidents of discipline by demographic groups will likewise have zeros reported for Hispanic students. This process generally goes element by element, field by field, rather than by whole tables.
In the example below, since no students were reported within certain demographic groups for the overall enrollment, there are automatically generated zeros (in gray) in the Student Participation in the SAT Reasoning Test or ACT table (see figure 63).
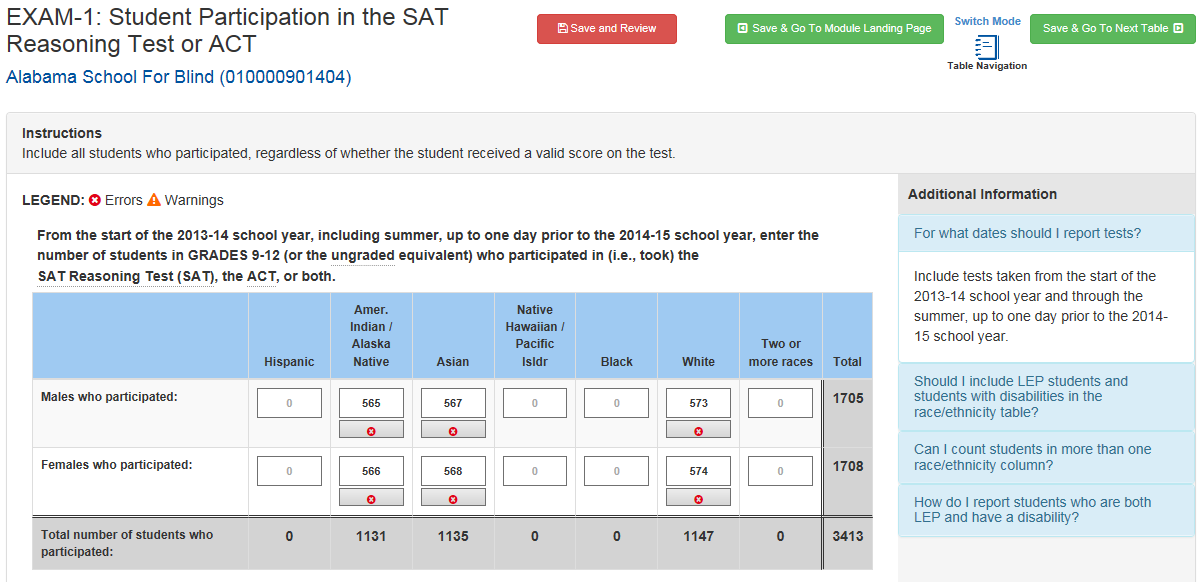
Figure 63. CRDC Table with Automatically Generated Zeros
If a user selects one of the cells with an automatically generated zero, they will see the following indicator (see figure 64).
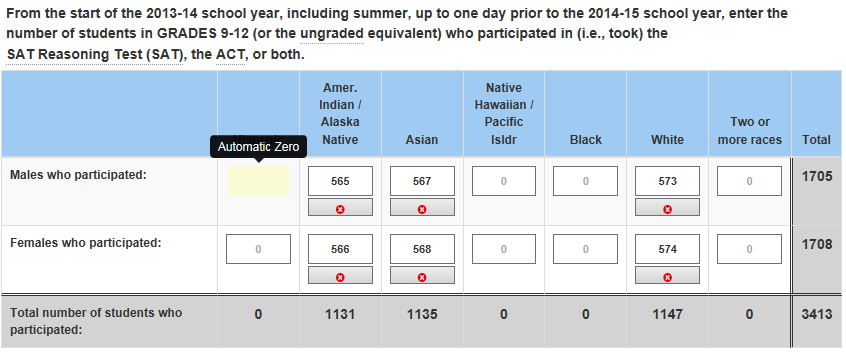
Figure 64. CRDC Table with Automatic Zero Indicator
If the user decides to change the value from zero, a new Error icon will be displayed for this field (see figure 65).
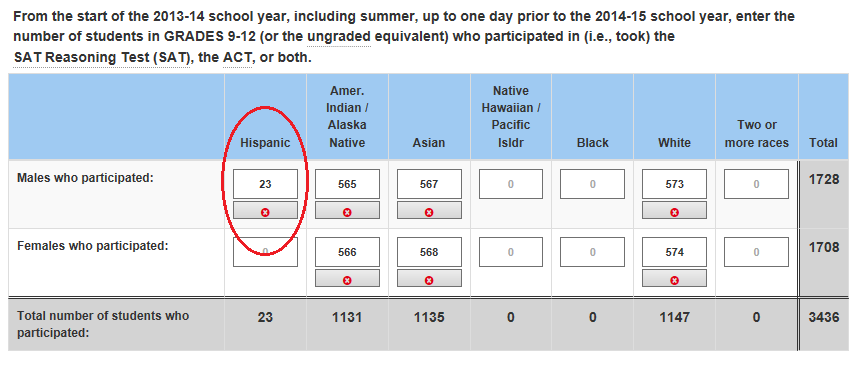
Figure 65. CRDC Table with Automatic Zero Error Icon
When the Error icon is selected, the resulting error message will provide details as to why changing the value without first addressing the cause of the automatically generated zero resulted in an error and how the system will treat this value (see figure 66).
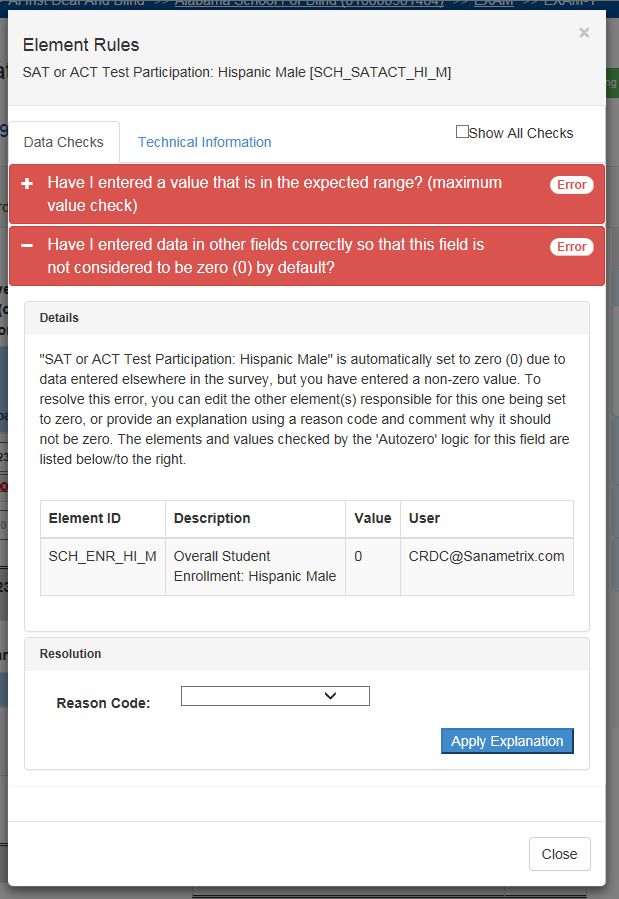
Figure 66. CRDC Automatic Zero Error Message
The details include information on what other fields and users caused the automatic zero to be generated.
Addressing Issues in Data Entry
When encountering errors, warnings, and other issues in the course of data entry in the online forms and tables, there are two basic ways to address them.
First, the user may change the value of the data element or elements that have failed validation checks so that the system no longer generates an error or warning. This requires some knowledge of the validation checks represented by the business rules in order to judge what would be an accepted value. However, the advantage of addressing the issue in this way is that the user may simply enter a new value into the data field and see if that fixes the issue. Also, as the business rules are designed to find problematic data, the more accurate and complete the data entered, the less likely they are to trigger an error on a validation check.
Second, if the value of the data element itself cannot or should not change, the user may resolve the issue by entering a reason code and/or comment that provides an explanation of why the value submitted is valid or, in the case of missing values, by providing a plan for capturing the required data at a later point. In the case of missing values, an explanation by way of a reason code and/or comment may or may not be accepted by the PSC as the specific situation dictates. The PSC will determine the specific actions needed on a case-by-case basis.
The process for explaining an error is, first, to simply to open up the details of the specific error and then select a reason code (see figure 67).
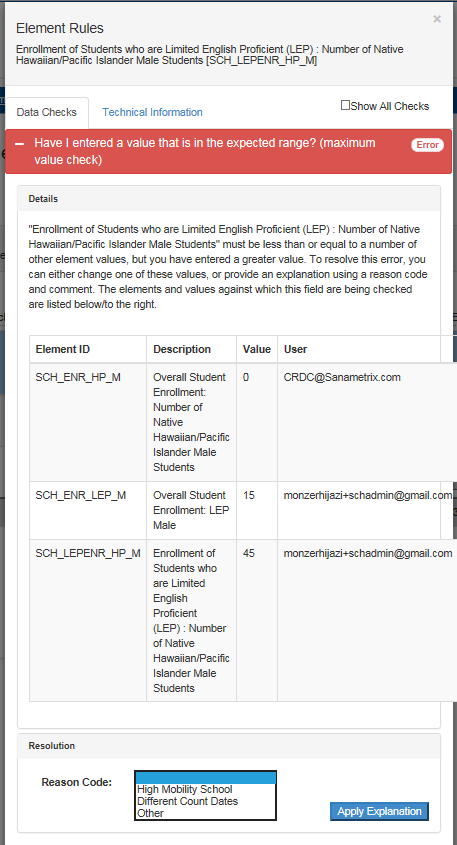
Figure 67. CRDC Error Explanation – Reason Code Selection
Depending on the error and the reason code selected, the reason code may be sufficient explanation or a comment may also be required. The reason code OTH: Other Reason, as a catch-all, will always require further explanation by means of a comment.
Once the required information has been selected and filled in, the user may select Apply Explanation in order to submit the explanation. If the explanation is accepted, the status of the validation check will change to Error Explained, with details similar to those shown in figure 68.
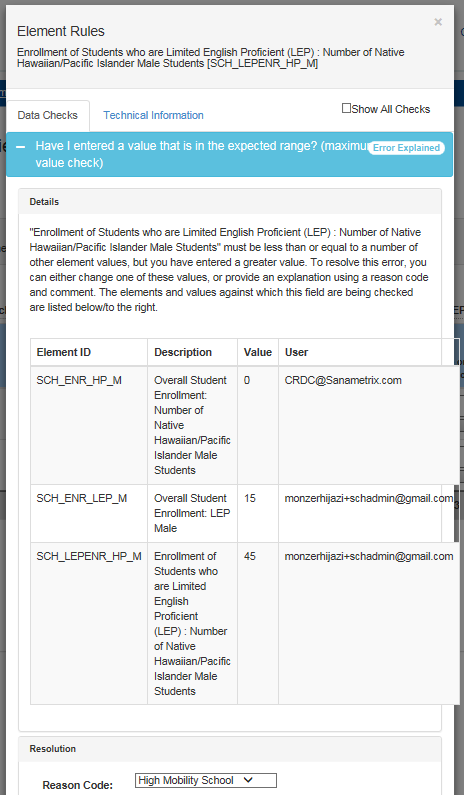
Figure 68. CRDC Error Explained
This change in status will then be reflected by there being one less error in the error and warning count on the Save and Review button, in the Error and Warning Summary, and by the validation check icons within the table.
In the context of the CRDC survey tool, “File Upload” refers to the reporting of data by uploading properly formatted CSV files.
Purpose/Function
The purpose of the File Upload section of the tool is to provide a user-friendly interface for the upload of CSV files containing data relevant to the CRDC survey.
Entering the File Upload Area
From the Home page of the CRDC survey tool, the user sees Data Entry options on the left side of the screen and File Upload on the right side. Selecting File Upload on the right brings the user directly to the main File Upload screen (see figure 69).
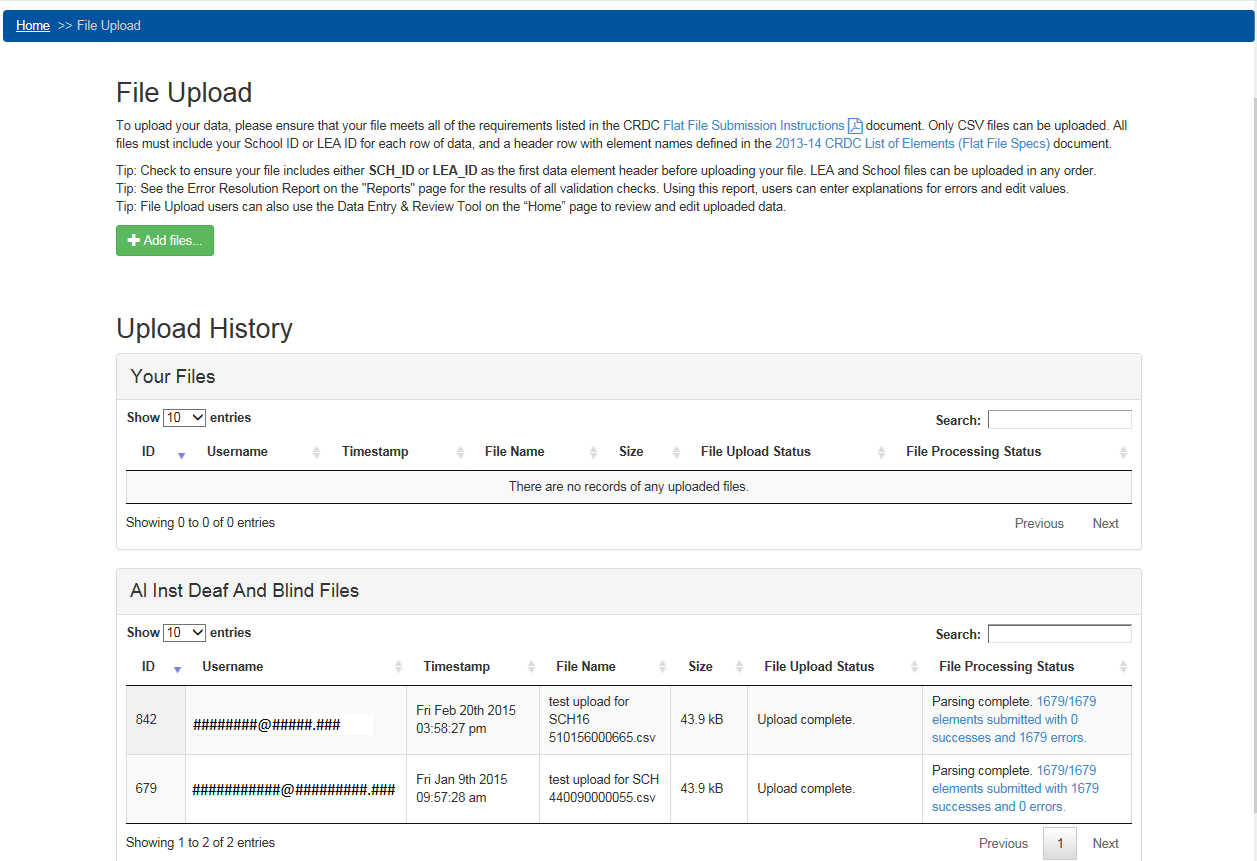
Figure 69. CRDC Survey Tool File Upload Screen
This screen provides the ability to add files for upload via browsing functionality and then to initiate the actual upload of one or multiple files at a time. It also shows the file upload history (if any) including IDs, usernames (i.e., email addresses), timestamps, file names, sizes, and file upload and processing status. This is shown in two tables: first, “Your Files,” representing files uploaded by the current user; second, a table showing all files uploaded for the school selected on the Home page when the user entered the File Upload screen.
Preparing Files for Upload
Initial Data Submission Files
File Upload will only work with properly formatted CSV files containing appropriate data headers for all data elements being submitted. For full details on the formatting of CSV files for initial data submission and upload, please see the CRDC SY 2013–14 Flat File Submission Instructions.
Error Correction Submissions
Once the data have been reported and processed by the system, the user may download an Error Resolution Report from the Reports area of the tool. This report is an editable Excel sheet that may be used to provide changed data values, reason codes, and comments. The edited file may then be uploaded, using the same procedures as for an initial data submission file, in order to submit the changed and new data to the system.
File Upload Process
Once properly formatted CSV files have been prepared for upload, there are a few steps involved in actually uploading them in order to submit the data they contain.
Adding Files
First, the user must select the file or files to be uploaded by selecting the Add Files button. This will bring up a standard browser window for selection of files from the user’s computer or network (see figure 70).
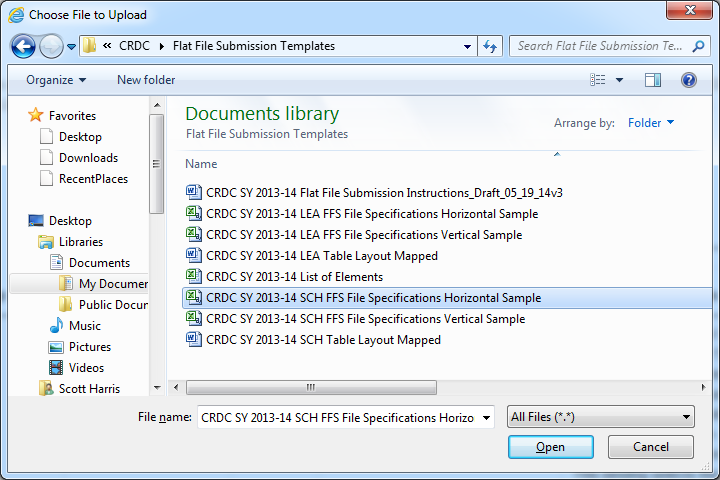
Figure 70. CRDC Survey Tool File Upload Add File Browser Window
Next, the user selects a file or files and selects the Open button to add them to the upload queue, returning to the File Upload screen upon completion. The files to be uploaded are now shown (see figure 71).
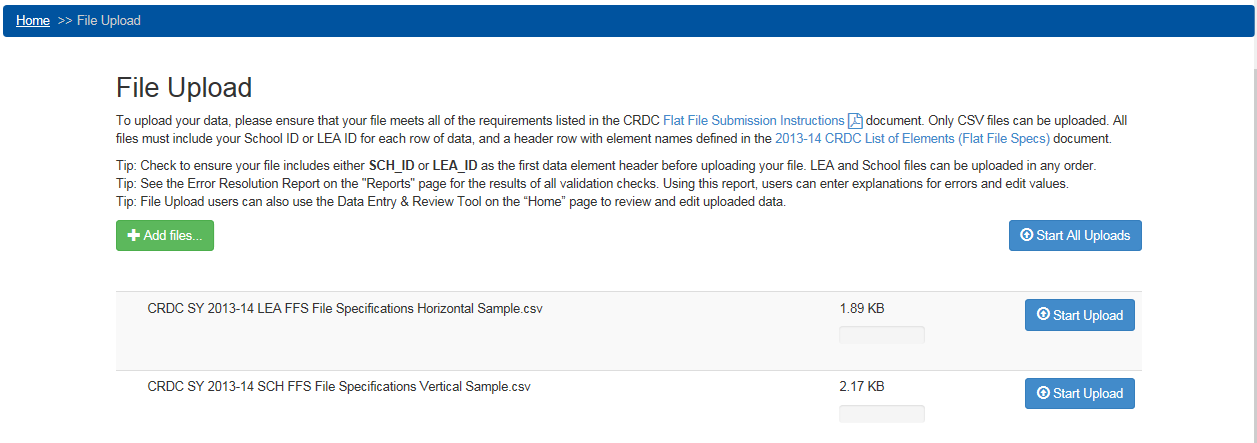
Figure 71. CRDC Survey Tool File Upload Files Added
Initiating File Upload
Once files have been selected and added, the user simply selects the Start Upload button (or, in the case of multiple files, Start All Uploads) to initiate the actual upload. The screen will show the progress of the upload itself in real time, which will likely occur quickly for files of a reasonable size (see figure 72).
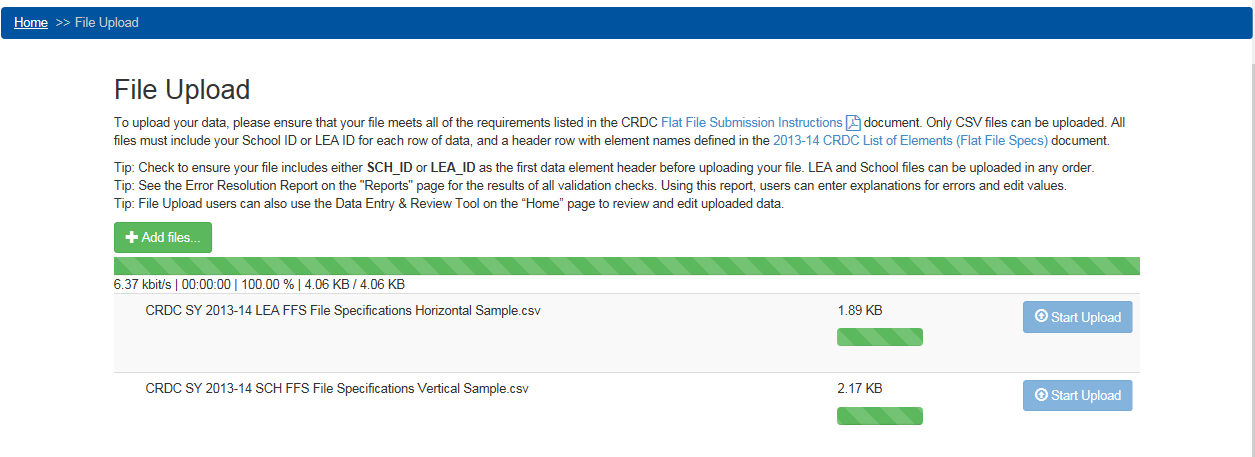
Figure 72. CRDC Survey Tool File Upload In Progress
Upon completion of the upload, the File Upload screen will display as follows (figure 73).
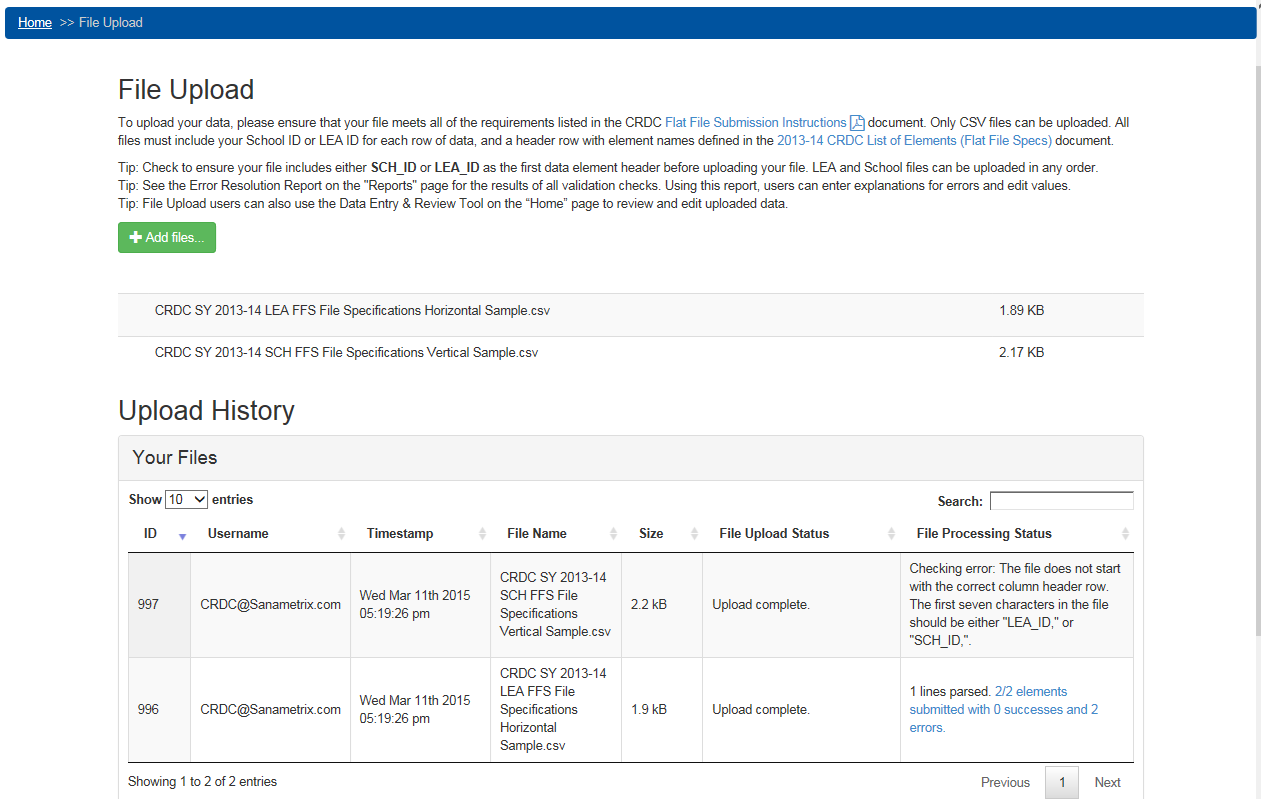
Figure 73. CRDC Survey Tool File Upload Files Uploaded
Note that the Upload History now reflects the new uploads and their processing status. When the file checking is completed, the file status will be reflected in an updated Upload History table. In this snapshot, one file has failed due to a checking error involving the column header and the other has been successfully parsed with all elements submitted, although there are errors with those element submissions.
Following the link for “##/## elements submitted with ## successes and ## errors.” will bring up the following table, which may be broken down into a number of screens depending on length (see figure 74).

Figure 74. CRDC Survey Tool File Upload Element Submission Table
This table shows all of the forms (by Form ID), elements, and values submitted within the relevant file. Most files will contain a much greater number of submitted element values than are shown in this instance.
Real-Time Feedback
Direct feedback within the File Upload area consists of the progress bars, Upload History table, and Element Submission table shown above. Users may also check the results of their file uploads in the Online Data Entry area or in the Reports section of the tool at will, although there may be slight delays in system processing logic so that these areas will fully reflect the newly uploaded data.
Data Submission Reports
At this time, data submission reports consist of the Element Submission tables discussed above, the Error Reports available within the Online Data Entry area, and the file downloads and other reports available in the Reports section of the tool (see section 2.5 below).
Of particular interest in the Reports section is the Error Resolution Report, a downloadable Excel sheet of all detected errors and warnings that may be edited by the user with changed values, reason codes, and comments, and then uploaded again using the Add File and Start Upload functionality just discussed.
Addressing File Upload Issues
Issues with the data contained in file upload submissions may be addressed either by further file uploads with corrected data using the Flat File Submission templates, file uploads using the Error Resolution Report template that contain data corrections and/or explanations by means of reason codes and comments, or handling of individual issues using the Data Entry portion of the CRDC survey tool.
The data submitted to the CRDC survey tool using either the Data Entry or File Upload functionality all go to the same data stores. As such, some data may be reported using one means while other data are submitted using the other, and each method may be used to correct or address errors arising from the other.
The purpose of the Resources section of the tool is to provide a consolidated resources page where users can go for contact information, important and helpful links, and downloads of documents relevant to the data collection.
The Resources page may be accessed from any screen within the tool by selecting the Resources menu link from the top-level menu present on each screen. While constantly being updated, the current Resources page appears as follows (see figure 75):
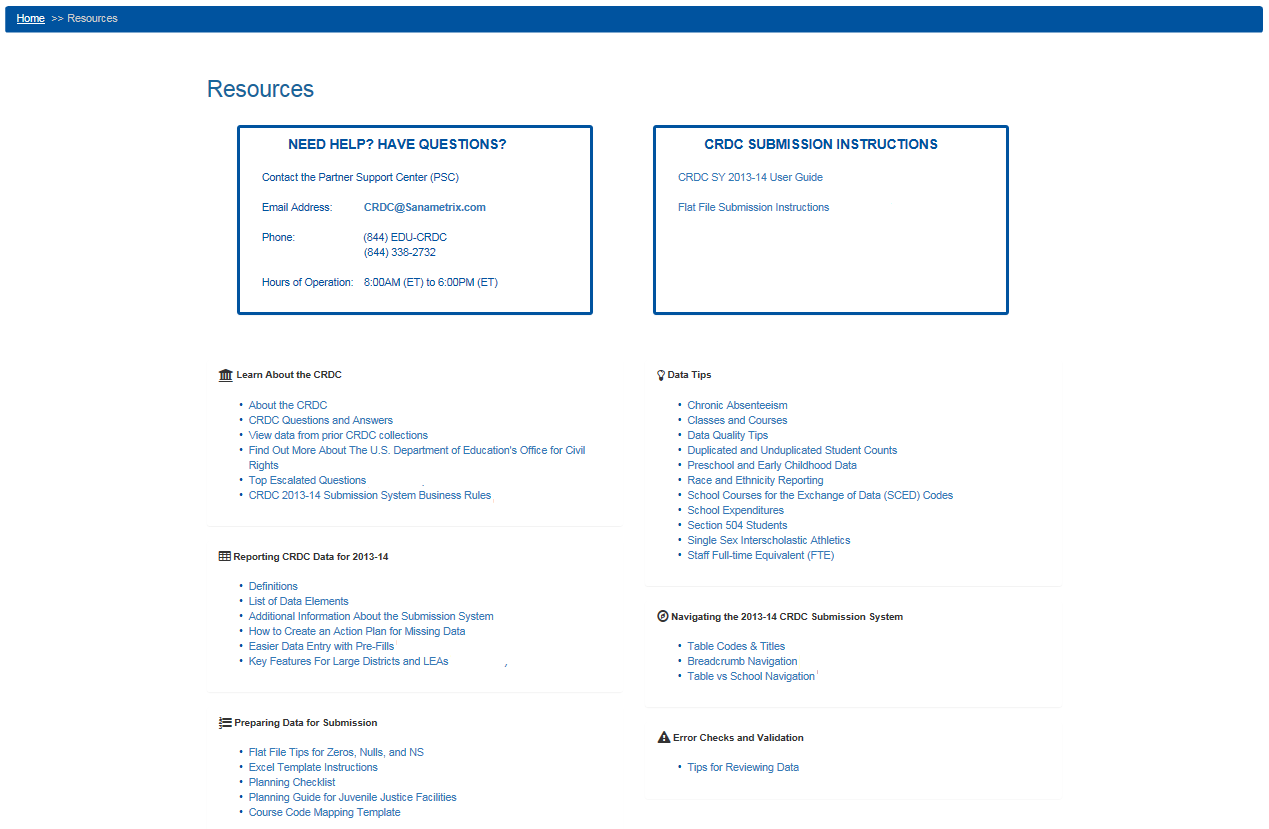
Figure 75. CRDC Survey Tool Resources Page
The purpose of the Reports section of the tool is to provide the user’s primary access to reporting functionality. The Reports screen supports the download of four report types: the LEA Submissions Download, the Error Resolution Report, the LEA Submission Progress Report, and the User Access Report. There also exist reporting functions and reports available from other screens. In order to access this feature, the user must first select the Reports menu item in the top-level menu. This brings the user to the following screen (see figure 76).
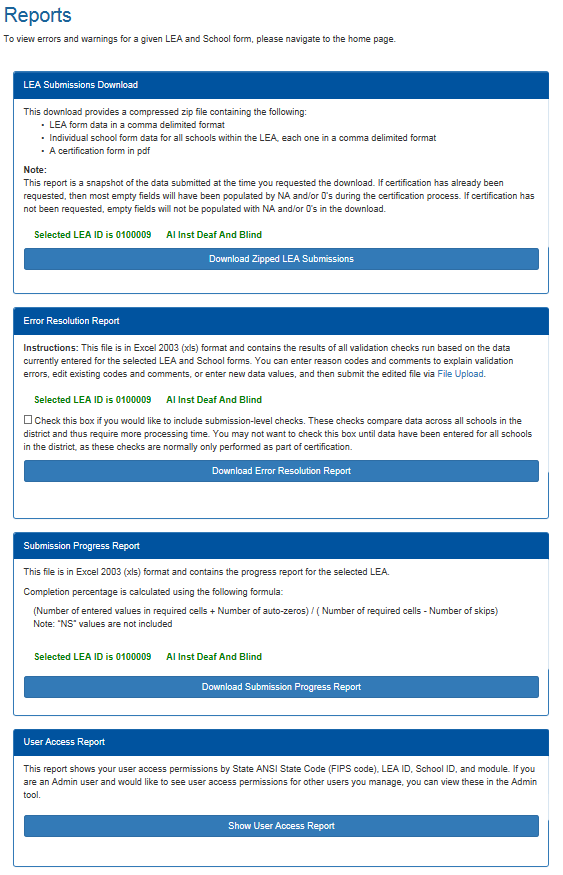
Figure 76. CRDC Survey Tool File Reports Screen
The LEA Submissions Report is a CSV report on all LEA and school data submitted to date, plus a PDF certification form, downloadable in the form of a compressed zip file. Selecting the Download Zipped LEA Submissions button starts the download process. Selecting Open, or Save and then Open, results in a view of the zip file as follows (see figure 77).

Figure 77. CRDC Survey Tool File Reports Download
The individual CSV files may be opened in Excel or another spreadsheet program, or in a text editor to see the raw format. Figure 78 below illustrates how a Schools in LEA file (the file containing School Form data for schools within a given LEA) might look in Excel.

Figure 78. CRDC Survey Tool Downloaded Report in Excel
These CSV files may be used for purposes of review, or edited and then uploaded using the File Upload functionality in order to submit new or changed data.
As already mentioned under section 2.3.2 (on File Upload functionality), the Error Resolution Report not only provides a list of all Errors and Warnings based on the data as currently submitted, but may also be edited to either change submitted data values or to provide explanations for reason codes and/or comments, then uploaded as a CSV file in order to submit the new data. (Note that users may also use the Online Data Entry tool to review and revise data.) To view and edit the Error Resolution Report, the user must first download it from the Reports screen (see figure 79).
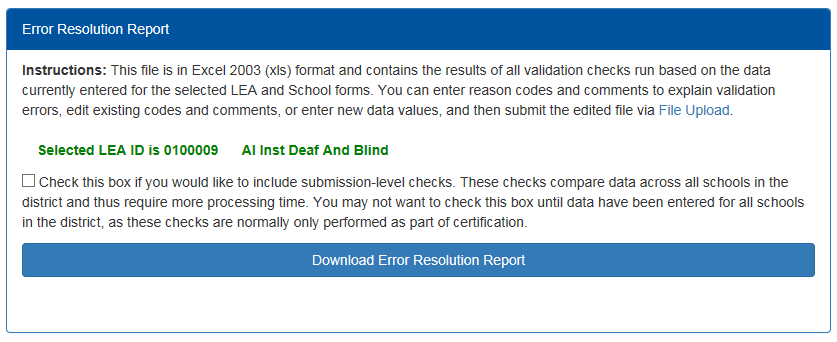
Figure 79. CRDC Survey Tool Error Resolution Report Selection
The user is given the option of including submission-level validation checks. As the explanation beside the check box indicates, submission-level checks compare data across all schools in the district in various ways. Not only does this require significant processing time, but if data have been entered for some, but not all, schools within the district, these checks can fail in two ways. They may fail to detect issues within the district submission due to insufficient data to work with, or they may return false positives based on expected data being missing. For these reasons, it is most useful to leave the submission-level checks unchecked until the data to be submitted are complete.
Once the user selects the Download Error Resolution Report button, the system will generate the file according to the latest data submitted.
Once downloaded and opened, the resulting file will appear as follows in Excel (see figure 80):
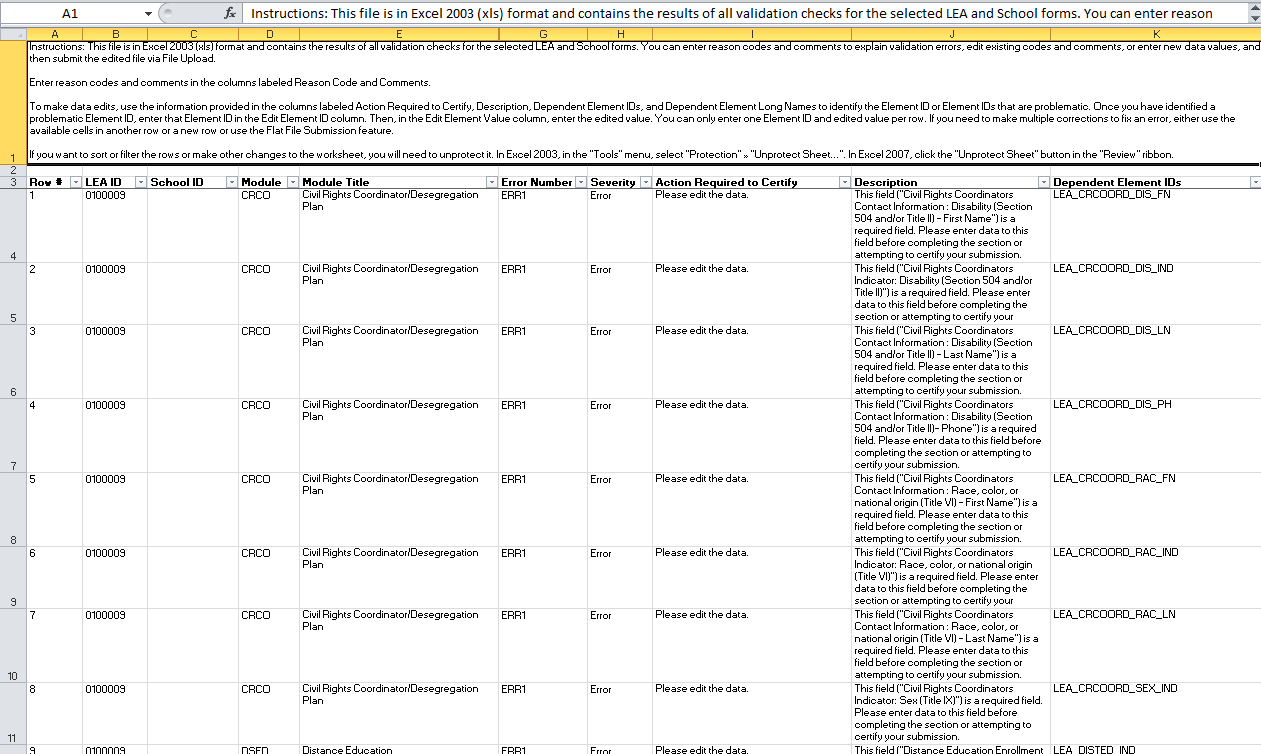
Figure 80. CRDC Survey Tool Error Resolution Report in Excel (Part 1)
Detailed instructions on using the Error Resolution Report as a template for File Upload are provided in the first row of the Excel file.
If the user scrolls to the right, they can see additional columns, including those used to insert changed element values, reason codes, and comments (see figure 81).
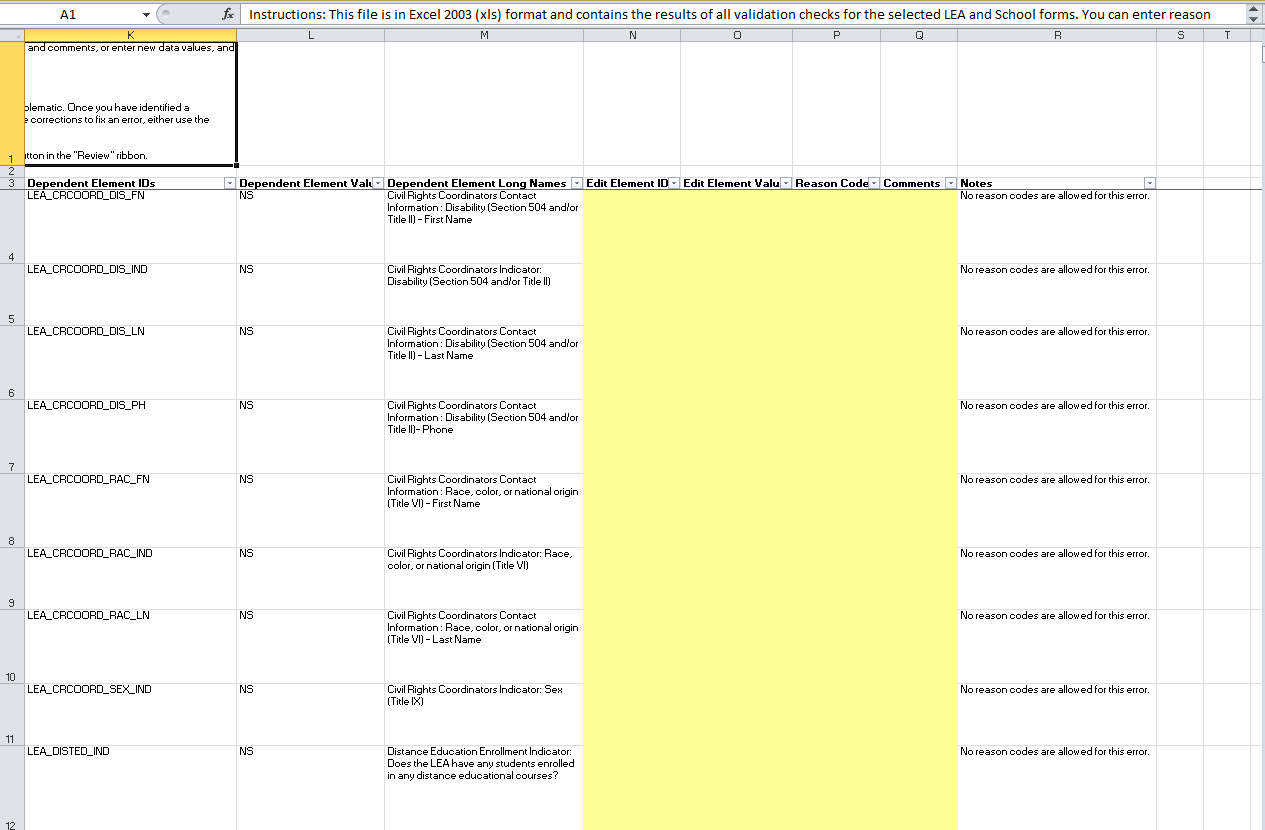
Figure 81. CRDC Survey Tool Error Resolution Report in Excel (Part 2)
Once all the desired edits have been made, the user can upload the report from the File Upload area of the tool in order to correct and explain issues in the data submission.
The LEA Submission Progress Report is a downloadable report on the submission progress of all LEA and School forms for a given LEA. The user need only select the Download Submission Progress Report button on the Reports screen to download an Excel report in the following format (see figure 82).

Figure 82. CRDC Survey Tool LEA Submission Progress Report in Excel
The selection of Show User Access Report simply takes the user to the same screen as was previously shown to be accessible from the User Access item on the main User Menu.
While the Reports screen is intended as the primary point through which to access reporting functionality, other areas do exist within the tool where the user can access reports and feedback on submission status, progress, and errors.
Submission Status Reporting
The LEA Submissions Report provides a complete submission status, as it shows all data as currently submitted for the LEA. However, there are other ways to view this submitted data. Any user with the required Read privileges for the LEA and its schools may review the submitted data by viewing it in individual cells and tables within the Online Data Entry screens, as discussed in detail in section 2.3.1. In addition, a user may review recently submitted data element values using the Element Submission tables available through the File Upload screens, as shown in section 2.3.2.
Submission Progress Reporting
The LEA Submission Progress Report shows completion percentages by form for the LEA, and is the easiest place to look for data on progress for the LEA as a whole. However, a user may also see completion percentages for each form, as well as by module and individual table, within the Data Entry & Review Tool screens (see section 2.3.1). A user with the authority to certify the LEA’s data submission may also check their overall progress by district and school using the Certification Submission Status table in the Certification Dashboard (see section 2.7.3).
Error Reporting
The Error Resolution Report is intended as a consolidated means to view Errors and Warnings and to address them, whether by changing or explaining data submissions. However, users may also view and address them using the Error Report, Error and Warning Summary, and individual Error and Warning icons available through the Online Data Entry screens (see section 2.3.1) or through the Element Submission tables for a particular file upload (see section 2.3.2). Those authorized to certify their district’s data submission may also access the Pre-Certification Check Preview and Ready for Certification functions from the Certification Dashboard (see section 2.7.3).
The Error Report available from the Module Landing pages in the Data Entry & Review Tool, not having been covered in depth in section 2.3.1, is discussed in more detail here.
Error Report
As discussed under section 2.3.1 for Data Entry, the Module Landing page for each form contains an Error Report button next to the screen title with the district or school name. Selecting this button brings up a detailed Error Report for the entire District or School Form (see figure 83).
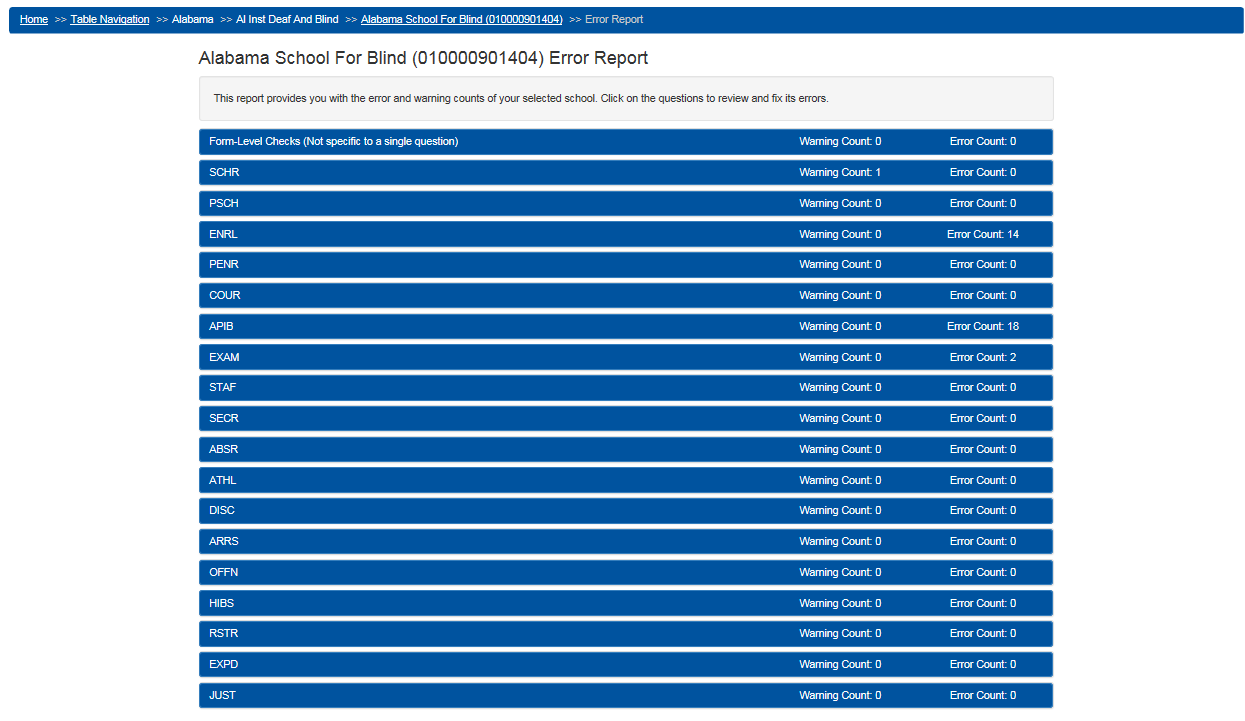
Figure 83. CRDC Survey Tool Error Report
The Error Report provides a list of data modules for the District or School Form and the number of warnings and errors currently known to exist according to the validation checks.
The user may expand any module in the Error Report in order to see more detail on the specific questions with warnings or errors (see figure 84). Errors are defined as conditions where the data must either be corrected by changing the value in the field or the apparent discrepancy must be explained prior to certification of the district’s data submission. Warnings are defined as conditions where a possible issue has been identified, but a correction or explanation is not necessary prior to certification.
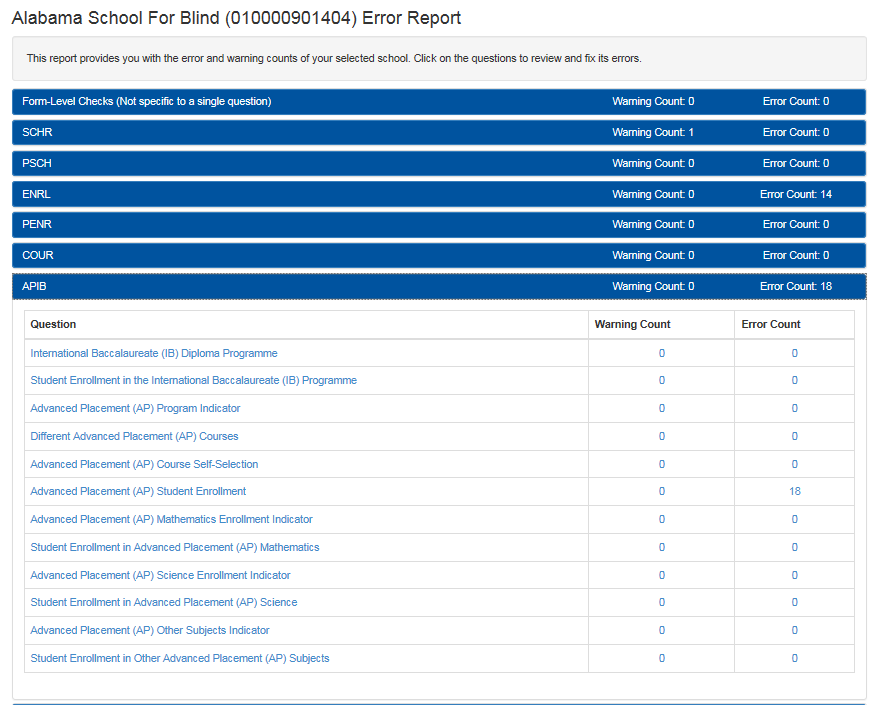
Figure 84. CRDC Survey Tool Error Report
Again, this functionality is the same regardless of whether the user is in Table Navigation or School Navigation mode in the School Form or in the District Form.
Selecting the link for a particular question shown in the Error Report takes the user to the individual data entry screen where the error or warning occurs (see figure 85).
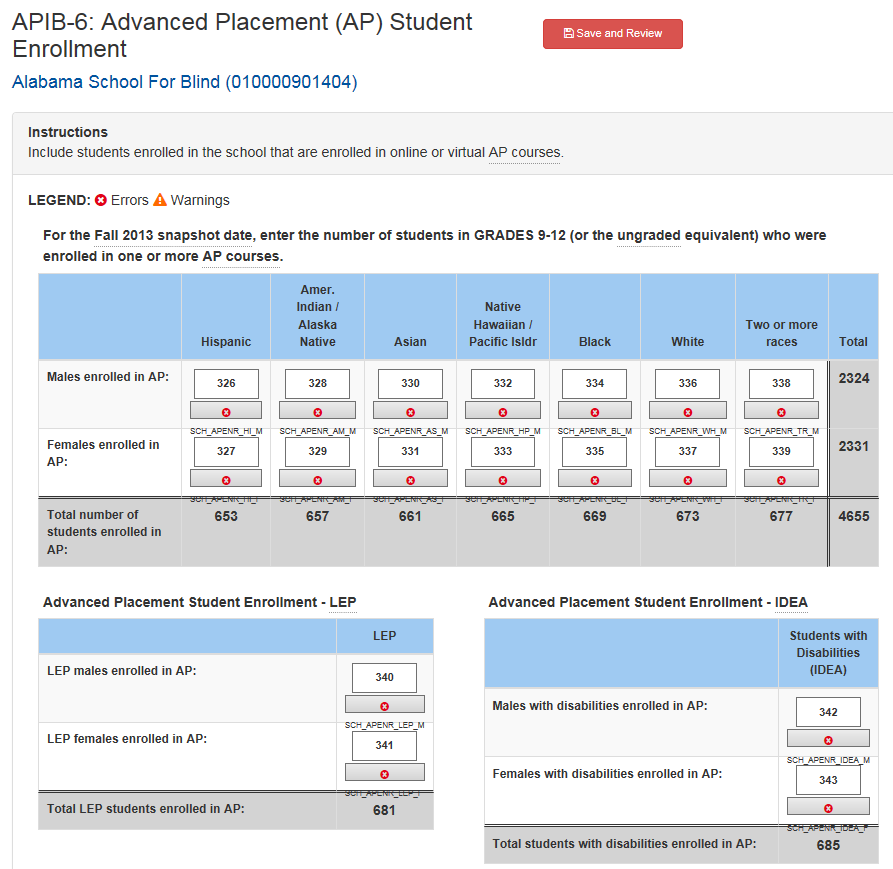
Figure 85. CRDC Survey Tool Error Report Link Destination
Once at the individual table, the individual errors and warnings will be indicated by icons (discussed earlier in section 2.3.1), and the user may address errors directly at the table level.
Collection metrics beyond the LEA Submissions downloads and the percentage complete, calculated by module, school, and LEA, are still under development.
In the context of the CRDC survey tool, “Administrative Functions” refer to those functions within the tool that are only accessible to certain users with specified administrative permissions that are assigned by CRDC, district, and school personnel with CRDC submission authority. You can view your current permissions using the User Access feature, discussed in section 2.2.3. Administrative Functions currently break down into two types: User Management and System Management.
“User Management” refers to the part of the tool in which users with administrative permissions may manage the permissions of other users within their respective domains (e.g., school, district, state).
Purpose/Function
The purpose of the User Management section of the tool is to provide a user-friendly interface for the management of user accounts and permissions.
Entering User Management
For users with the proper administrative permissions, selecting the Admin menu item toward the top right of the Home page will bring up Admin Home. Admin Home contains the User Management and System Management areas (see figure 86).
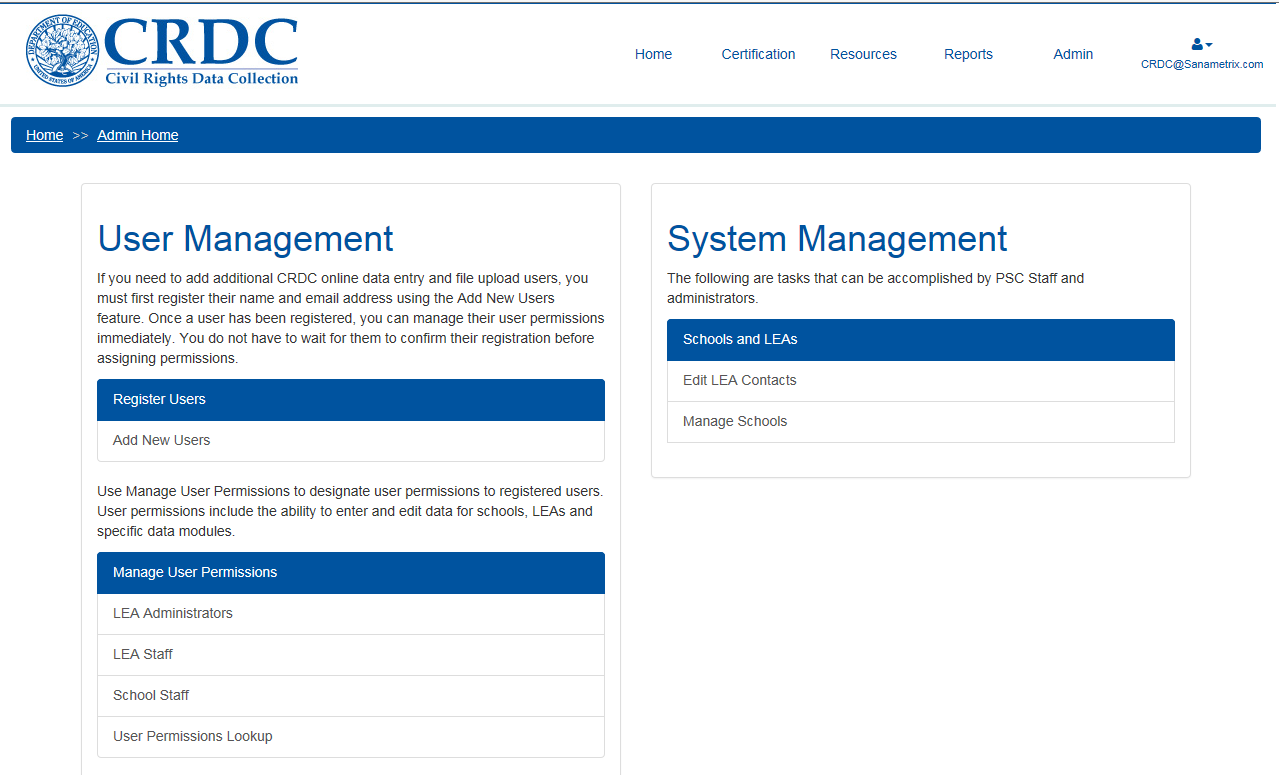
The example shown is for a user with LEA Administrator permissions, so there are User Management options for controlling the permissions of LEA and School users and a limited menu of options under System Management. School Administrators or Staff would see a more limited menu of options still, while state education agency (SEA) and Department of Education (ED) users would see different options (unless granted LEA-level permissions by an LEA Administrator).
PSC users not only have all User Management options available, but an extended System Management menu in order to allow them to help LEAs through the submission process.
Below are further details of the use of the selections under User Management.
Add New User
Selecting Add New Users under the Register Users section of User Management brings the administrator to the following screen (see figure 87).
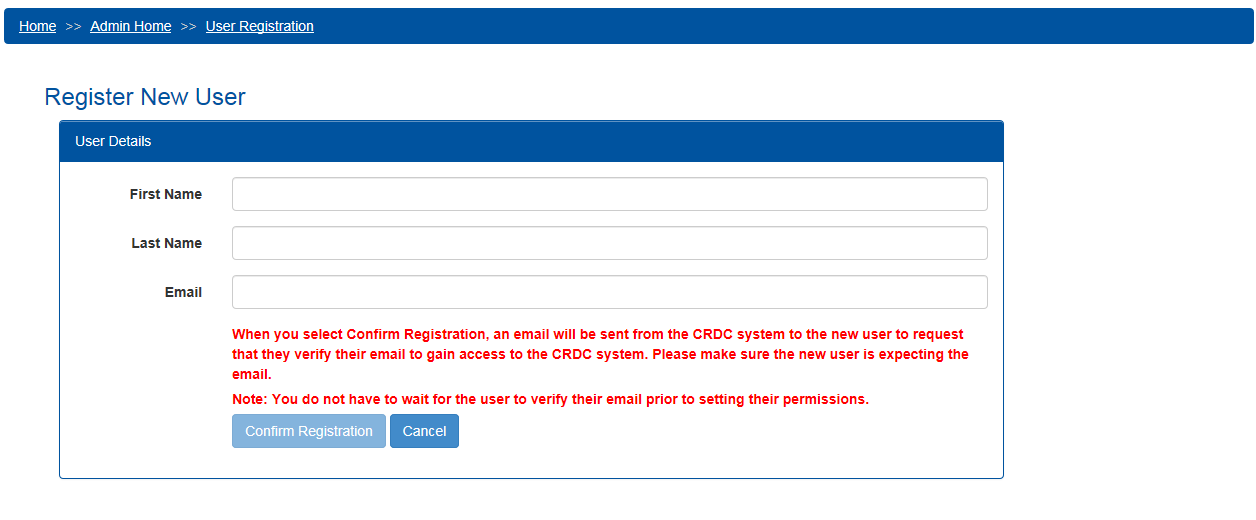
The text in red explains the email verification process and the importance of informing new users that they will be receiving confirmation emails. The administrator simply enters the new user’s information as indicated and selects Confirm Registration or, alternatively, decides to select Cancel. Upon selecting Confirm Registration, the following confirmation popup is displayed (see figure 88).
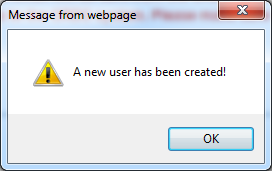
Figure 88. Register New User Confirmation
The user will not be able to access the system before following the email link to verify their email address and completing the registration process. However, the administrator does not need to wait for the new user to verify their email before setting their permissions (as shown in section 2.6.1.2.2 Manage User Permissions).
Manage User Permissions
Under the Manage User Permissions section of User Management, the administrator will see selections for each role whose user permissions they may manage. We will look first at the screens for managing user permissions for LEA (District) Staff.
For each LEA Staff user assigned to the LEA, the administrator may manage permissions for the modules within both the District and School forms or wholly remove or disable access for that user (see figure 89).
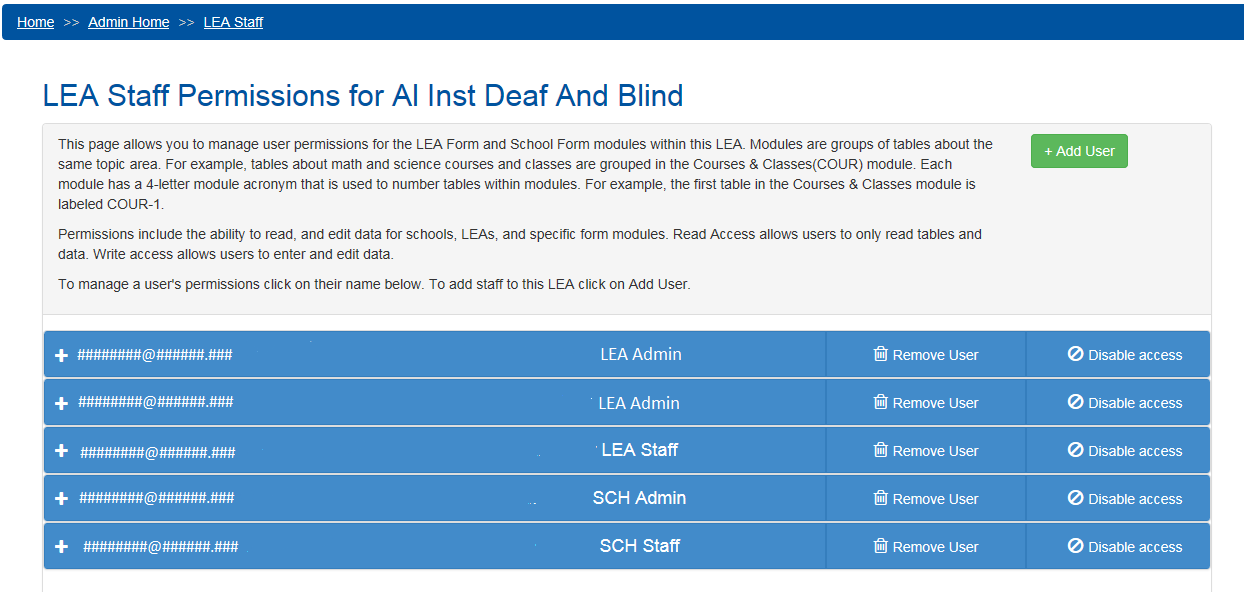
Figure 89. Manage User Permissions – LEA Staff
The administrator may also add new users to the list of LEA Staff for this LEA or change LEAs entirely. To add a user to the list of LEA Staff for a particular LEA, the administrator selects the +Add User button, bringing up the “Add user to this group” dialog box (see figure 90).
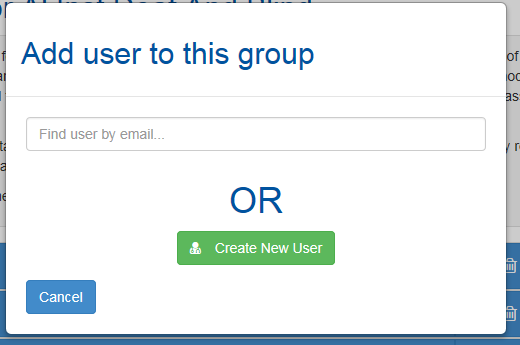
In this dialog, the administrator has the option of searching for an existing user in the CRDC survey tool by email address or, if the user cannot be found, selecting Create New User to add a new user.
Entering the beginning characters of an existing user’s email address will bring up a list of possible matching addresses in the system (see figure 91).
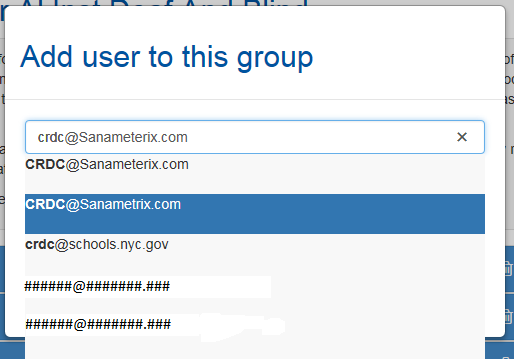
Figure 91. Add User Dialog Email Search
Selecting one of these results brings up the version of the dialog shown below (see figure 92).
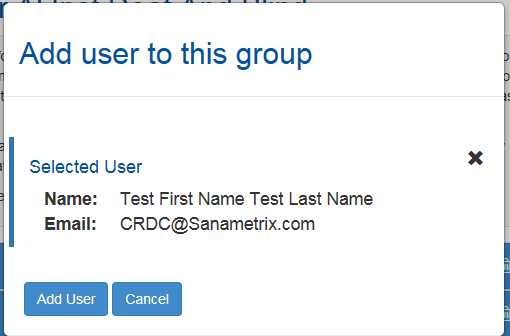
Figure 92. Add User Dialog Email Selected
From here, selecting the Add User button will add the selected user to the permissions list for the given LEA.
The added user will now show up in the list of those with LEA Staff Permissions (see figure 93).
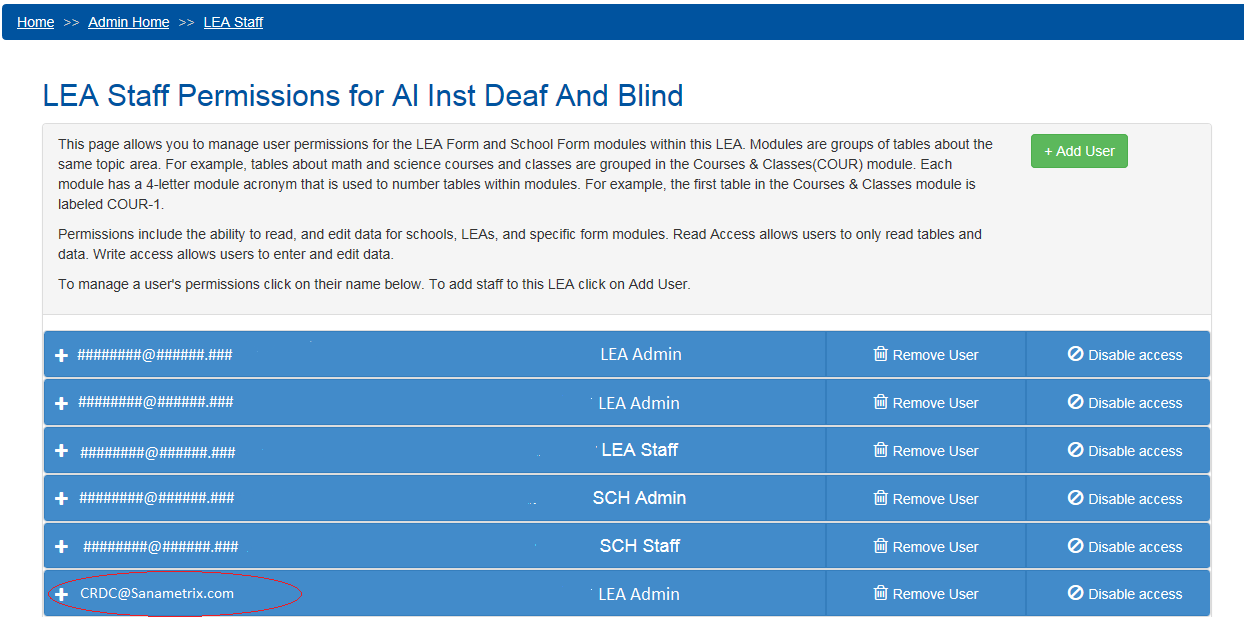
If instead the administrator selects the Create New User button from the Add User dialog, this brings up the Register New User screen previously discussed under Add New User.
In this case, once a new email address has been entered into the system, the administrator would still have to search for that email address, select it, and add the user to the LEA as shown previously. The Add User functionality works in the same manner for all Manage User Permission screens.
Once all desired users are showing in the user permissions list, the administrator must then set their permissions. First, the administrator would expand the entry for a specific user by selecting the plus (+) sign next to that user’s email address (see figure 94).
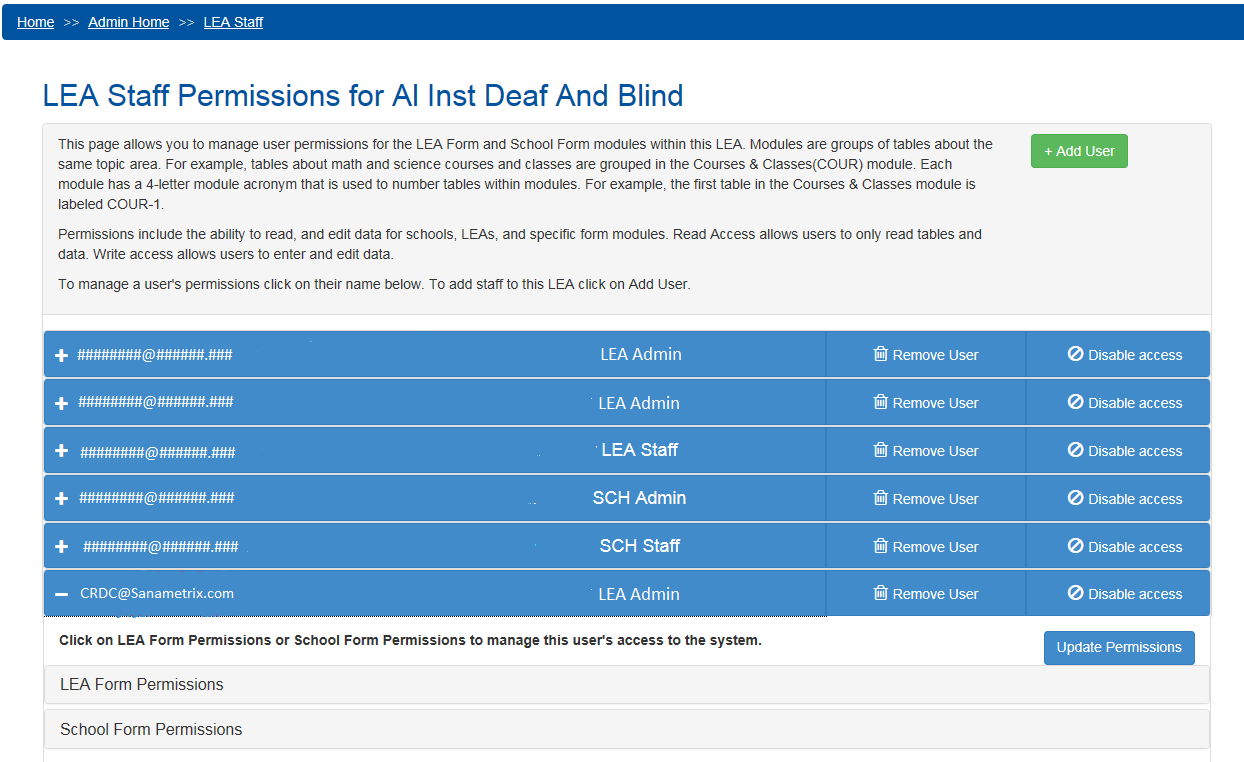
Figure 94. User Permissions Expanded
Next, the administrator would select either LEA or School Form Permissions. Selecting LEA Form Permissions expands that area of the page as shown (see figure 95).
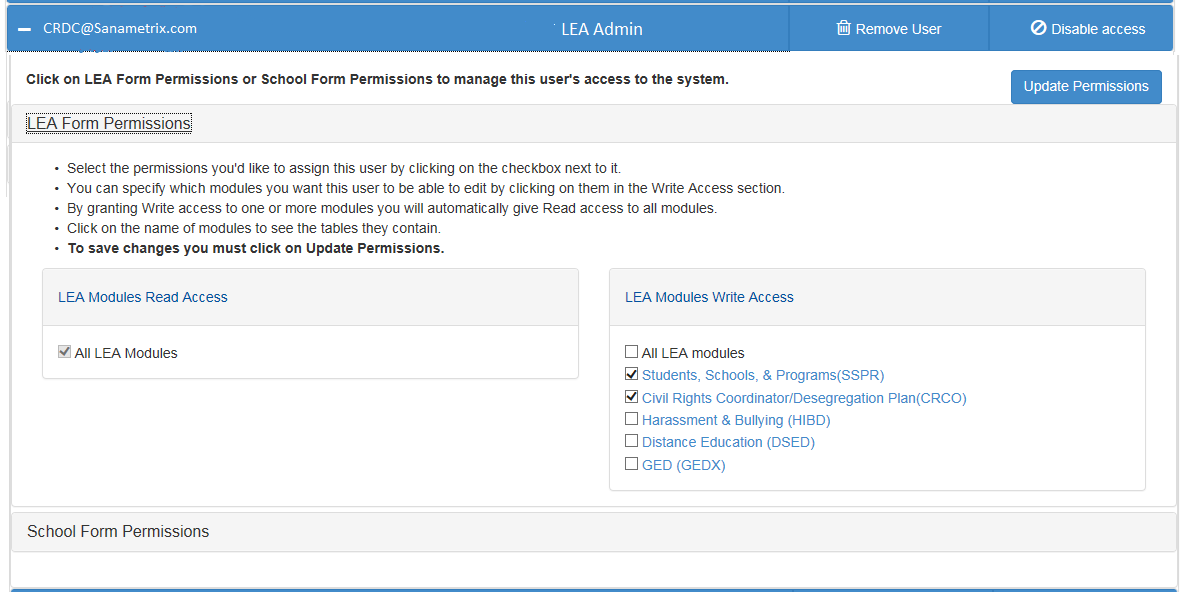
Figure 95. LEA Form Permissions Expanded
As the instructions in this view explain, here the administrator may give this user read access (the ability to view data already submitted) to all LEA modules and write access (the ability to enter new data to questions and tables) to either all, or only selected, LEA modules. “Write access” to any LEA module requires “read access” to all of them (see figure 96).
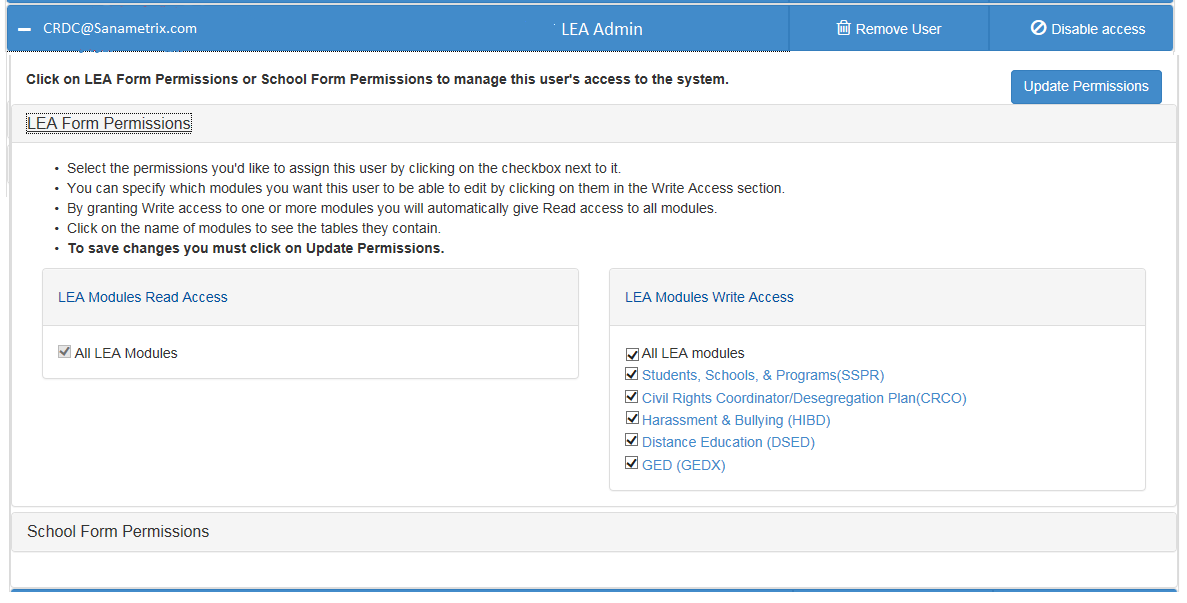
Figure 96. LEA Form All Permissions Granted
Changes to these permissions are not effective until the administrator selects the Update Permissions button and sees the following message (see figure 97).
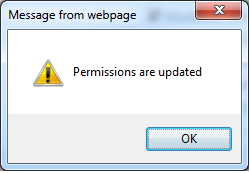
Figure 97. Permissions Updated
When the administrator selects School Form Permissions, the process is somewhat more complicated, not only because there are a greater number of modules in the School Form, but because there are multiple schools within most LEAs (see figure 98).
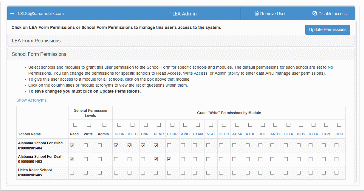
Figure 98. School Form Permissions
The School Form Permissions area allows the administrator to give the user Read, Write, or Admin permissions for all schools within the LEA or only for selected ones. Write permissions may also be given for all modules within the School Form or only for selected ones. In each case, any Write permissions for a given school, even if only for a single module, will include Read permissions for that entire School Form. In addition, Admin permissions for a given school include both Read and Write permissions.
On the following page, figure 99 displays an example in which the user is given Admin permissions for one school, full/general Write permissions for a second school, and Write permissions for one module for all schools. The gray checkmarks indicate permissions that were not manually selected by the administrator, but were automatically included in those the administrator did select.
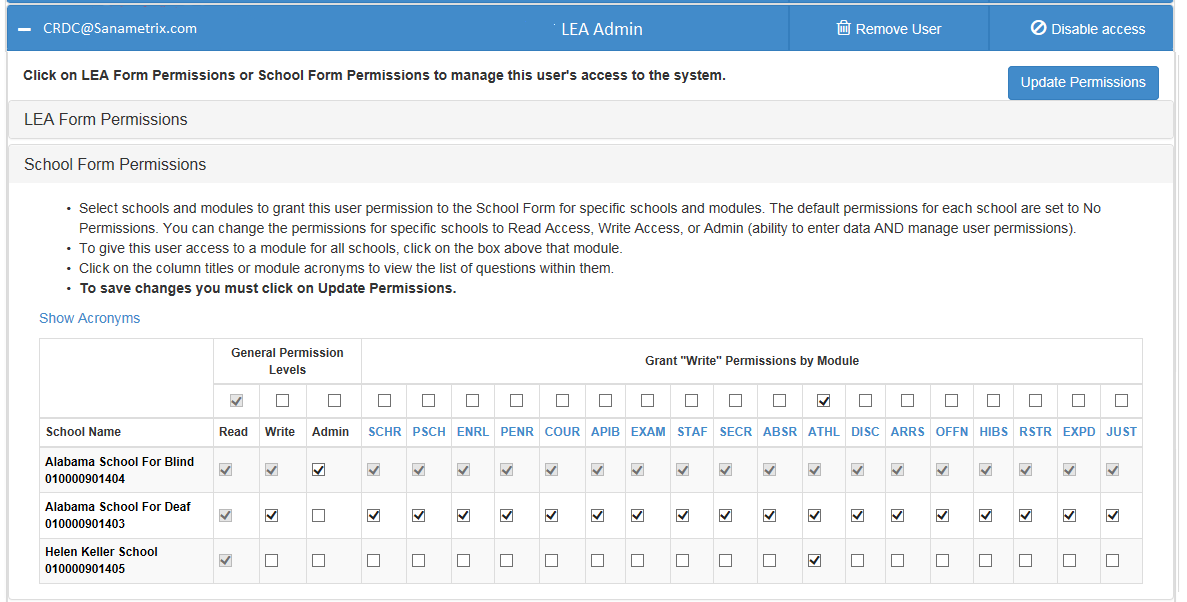
Figure 99. School Form Permissions Updated
As before, none of these changes are effective until the administrator selects the Update Permissions button.
Within the LEA Staff Permissions screen, the administrator may also opt to remove a user’s permissions for the LEA and its schools entirely or to temporarily disable a user’s access to the LEA and schools without changing permissions.
Selecting Remove User for a specific user brings up the following dialog (see figure 100).
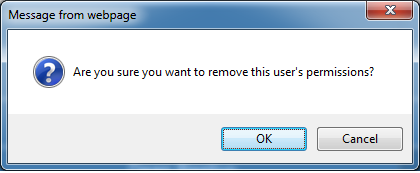
If the administrator selects OK, all user permissions for this LEA and associated schools will be erased and would have to be manually redone, through the process just covered, to be reinstated.
Selecting “Disable access” for a specific user disables that user’s permissions until reinstated, with the user email and name grayed out in this screen (see figure 101).
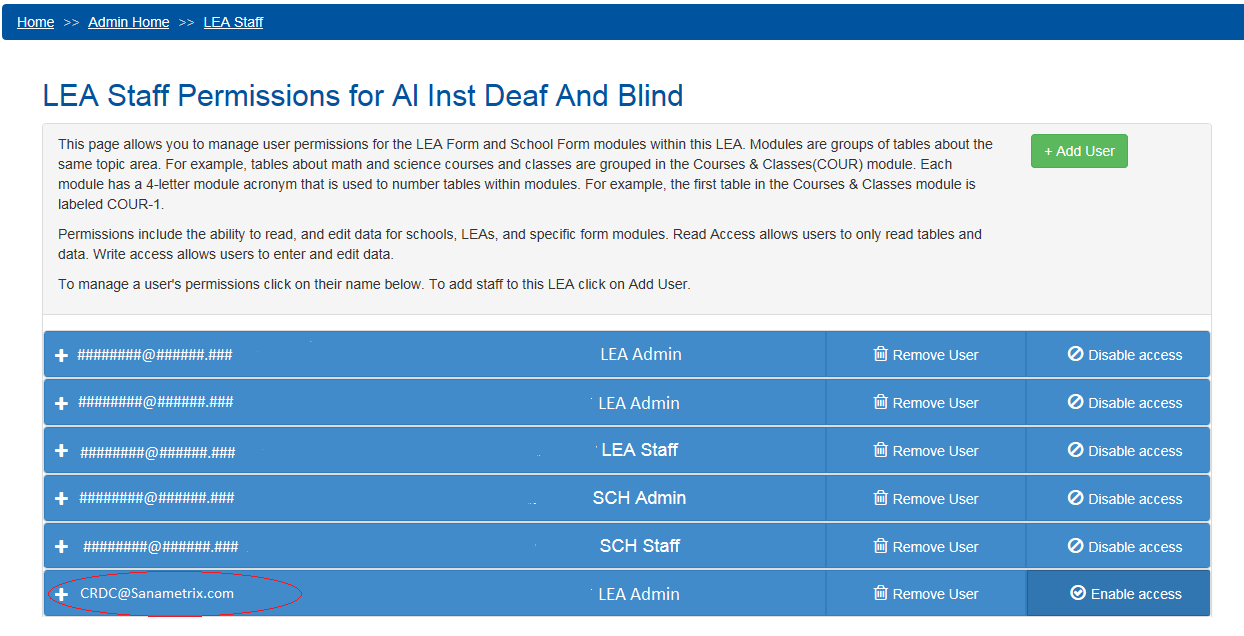
However, all the administrator needs do to reinstate this user is to select the Enable Access button in this view. No selection of the actual user permissions is required.
If an administrator wishes instead to manage user permissions for LEA Administrators, the process and screens are far simpler.
For LEA Admins for a particular LEA, the only options are to add or remove users from the list of LEA Admins. Add User works just as shown previously for LEA staff, while the Remove User(s) button applies to any users with checked boxes when it is selected. There is no need to define specific permissions, as every LEA Admin always has full Read, Write, and Admin permissions for their LEA and all schools within it (see figure 102).
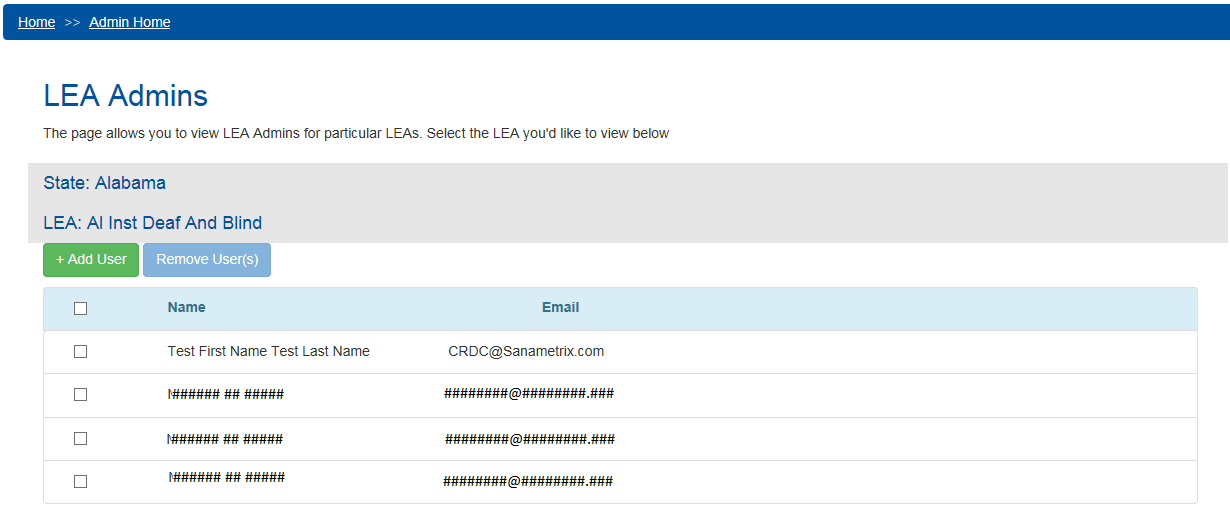
Figure 102. Manage User Permissions – LEA Admins
Managing user permissions for School Staff is likewise simpler than for LEA Staff, for the simple reason that permissions need only be defined for one school (see figure 103).

Figure 103. Manage User Permissions – School Staff
However, first the user must select the school (see figure 104).

Figure 104. Manage User Permissions – Select School
Once a school is selected, the administrator would select a user whose permissions need to be modified, then select the School Module Permissions button (see figure 105).
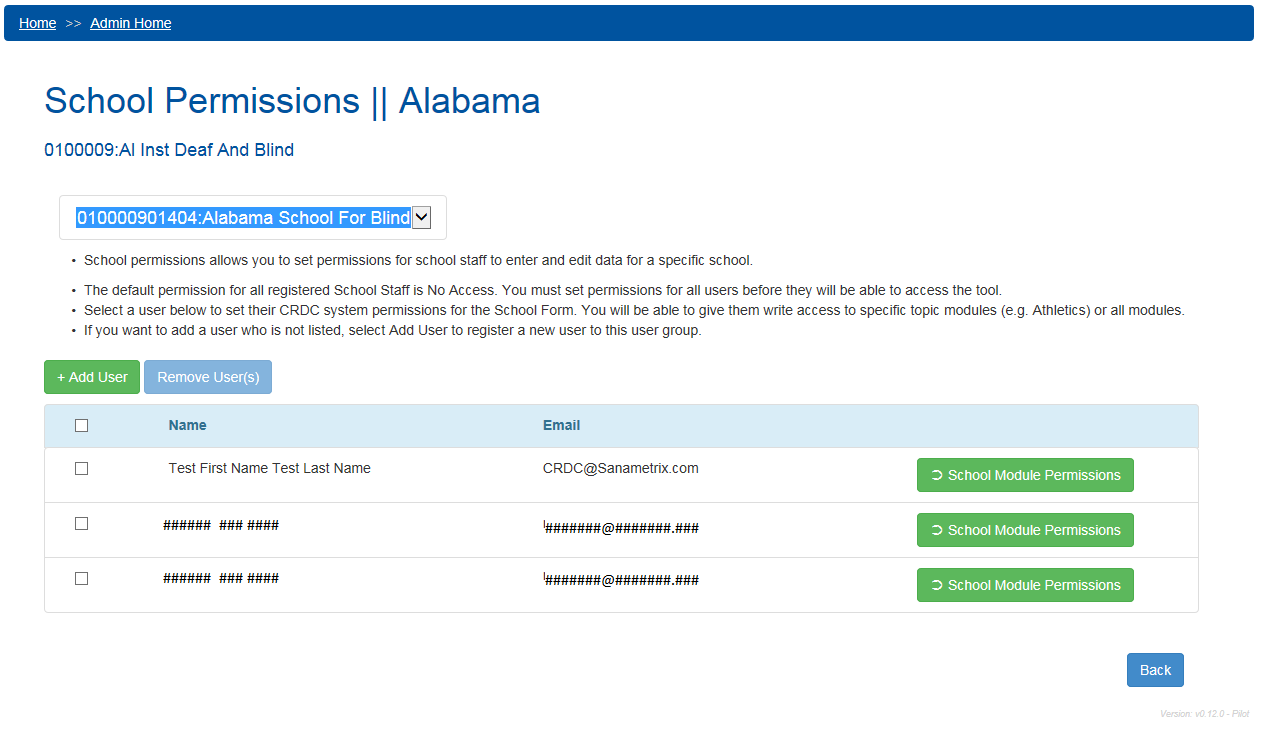
Figure 105. Manage User Permissions – Select School User
Once in this view, the administrator simply selects the modules for which the user should have data entry (Write) permissions, then selects Update Permissions to make any changes effective. Selecting the top check box selects all modules for the School Form (see figure 106).
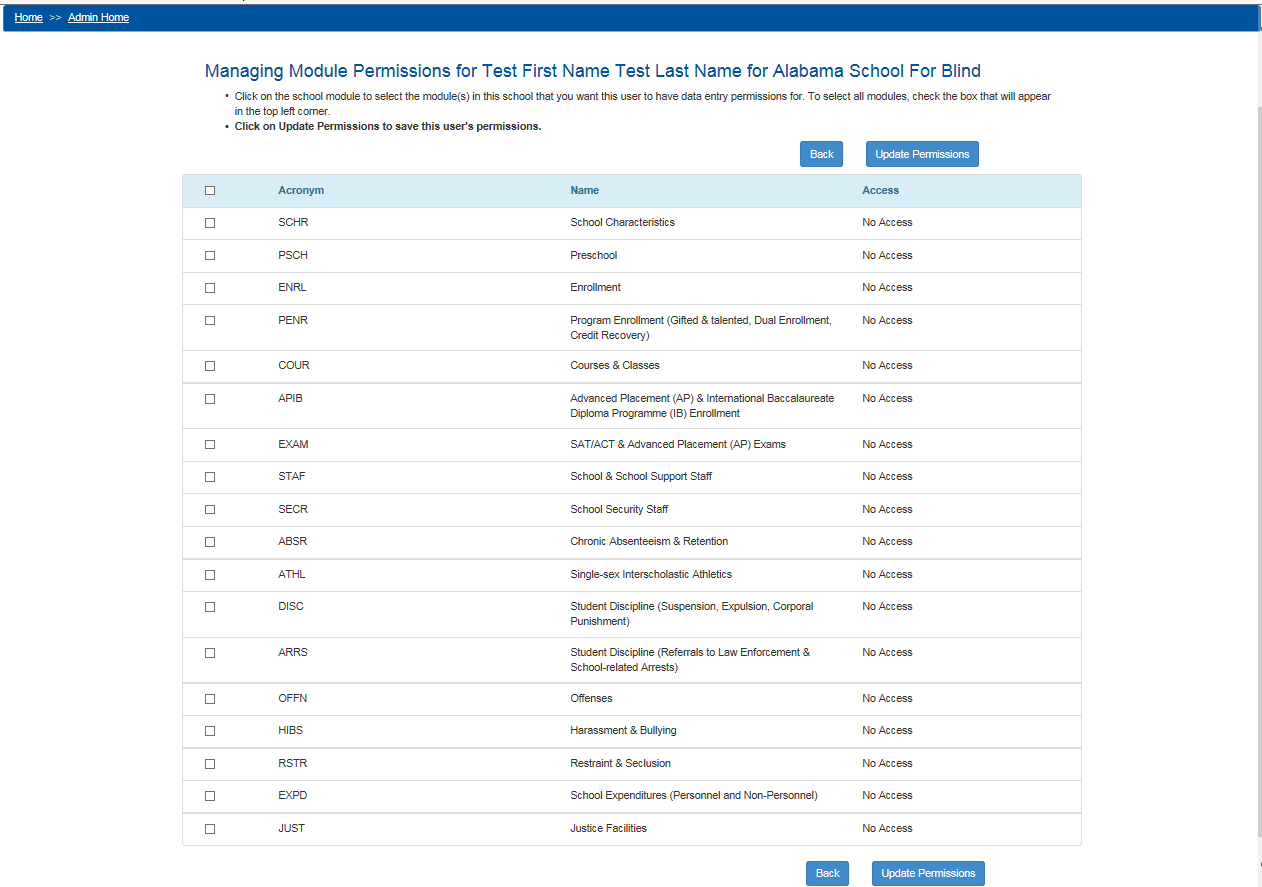
Figure 106. Manage User Permissions – School Module Permissions Selected
The User Permissions Lookup selection under Manage User Permissions brings up the following search screen (see figure 107).
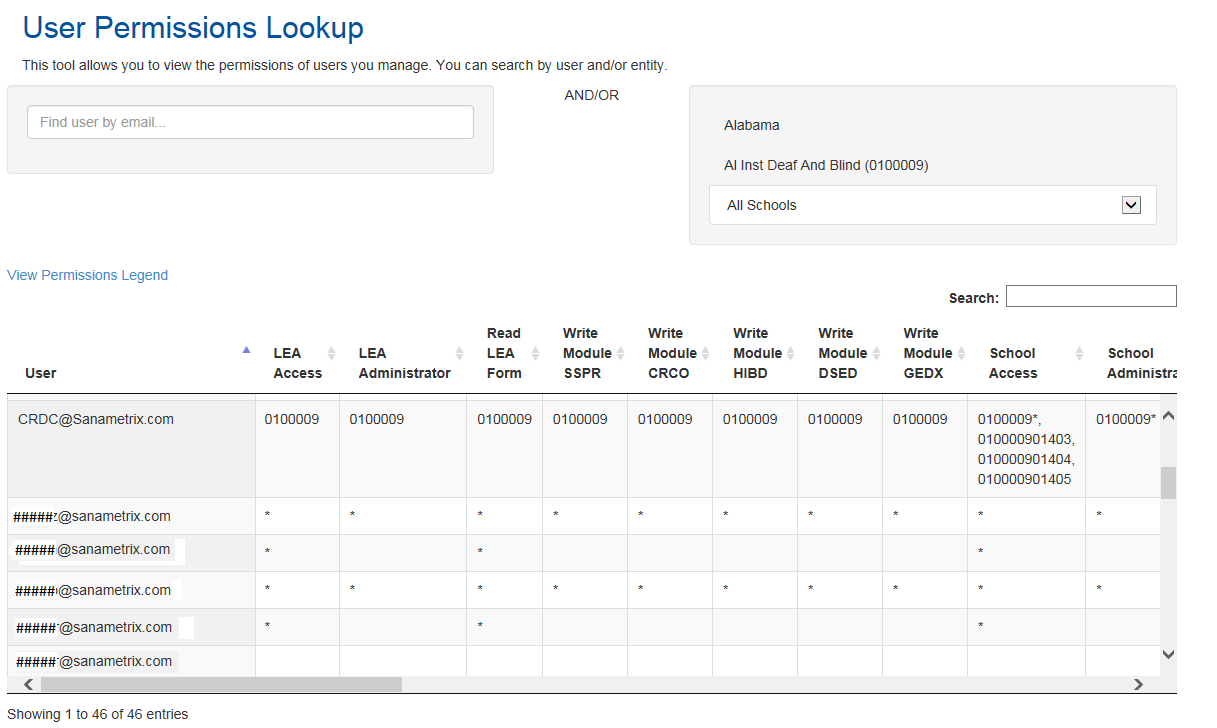
Figure 107. Manage User Permissions – User Permissions Lookup
This screen allows the administrator to search for users by email address (and optionally by State, LEA, and School) to see what user permissions they have been assigned. Leaving the school unselected allows for a search of users assigned to All Schools (and SEA and PSC users can likewise search across all LEAs or all states as well), and leaving the email address blank shows all users for the selected school(s) or larger entities. The small Search box nearest the table of results filters by any item showing up in the table, including email addresses and NCES IDs.
There is also a legend that explains how to interpret the results of
such a search (see figure 108).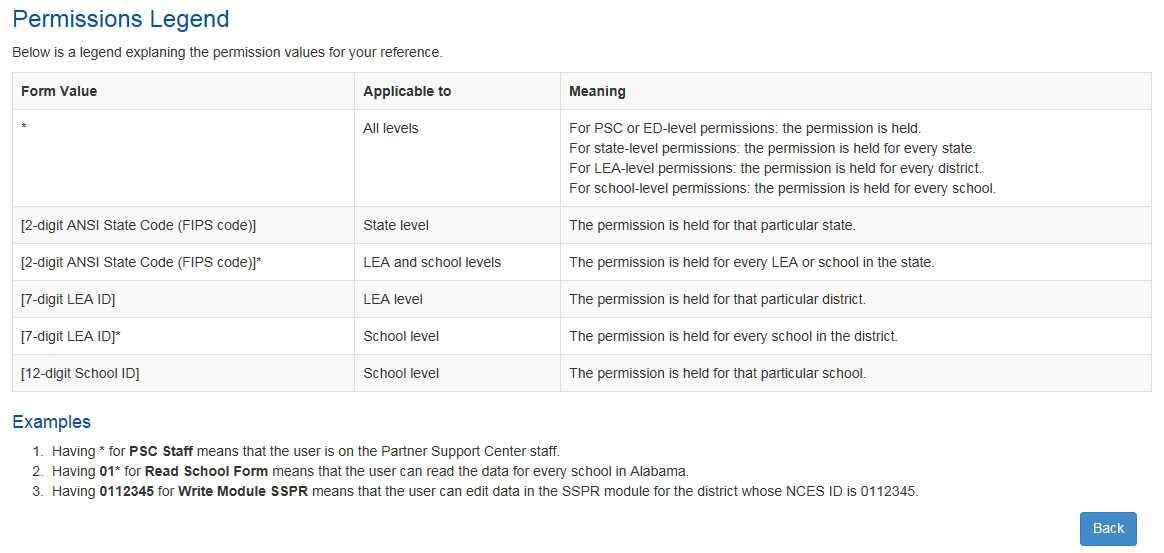
Figure 108. Manage User Permissions – User Permissions Lookup Legend
An asterisk (*) in a cell indicates that the given user has that permission globally within the search parameters, while narrower permissions are shown using FIPS codes and NCES IDs for specific LEAs and Schools.
The System Management area of the Admin Home screen contains only the limited functions that are available to LEA Administrators: Edit LEA Contacts and Manage Schools. Additional functions are available to PSC users in order to assist with the data collection.
Edit LEA Contacts
Selecting Edit LEA Contacts from Admin Home brings up the following screen (see figure 109).
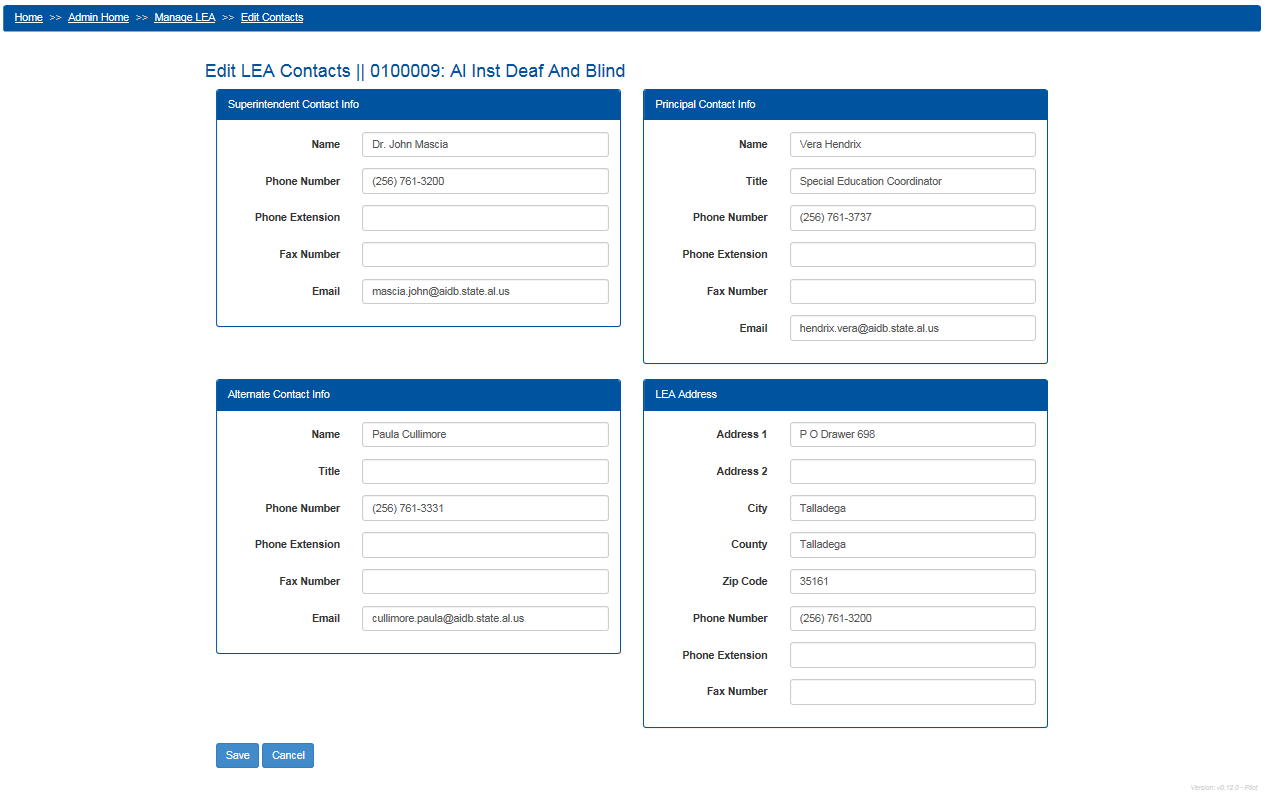
This allows the LEA Administrator to edit the LEA’s contact information for purposes of the CRDC. Changes are not effective in the system until the user selects the Save button.
Manage Schools
Selecting Manage Schools brings the LEA Administrator to the Manage Schools screen.

Since this is the view of the LEA Administrator for one LEA, the state and LEA are already selected, and it only remains to select a school to manage. This screen shows a list of schools organized by school name, as well as a Search box that could be useful to LEAs with a large number of schools.
Selecting a school’s name from the list of schools on the Manage Schools screen brings up the following screen (see figure 111).
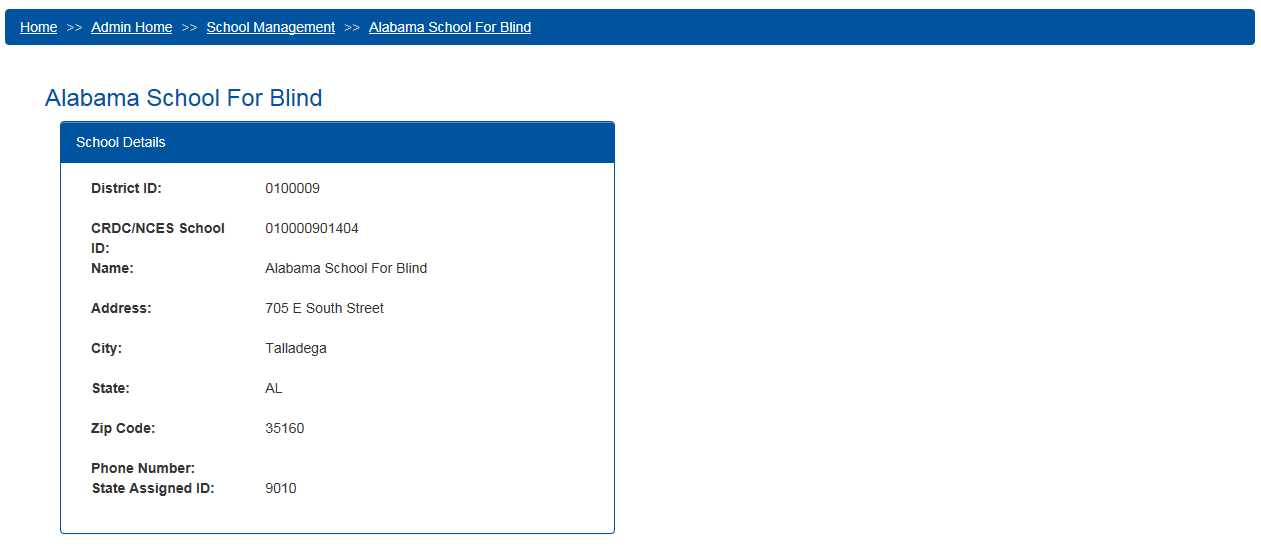
Figure 111. School Management – Manage Existing School
From here, all the LEA Administrator can do is view the current details for the school recorded in the survey universe. If any of this information needs to be edited, the LEA will need to contact the PSC, which will have access to additional functionality for editing these records.
Only certain users are authorized to certify the data submissions for their LEA by selecting the Certification menu item from the top menu appearing on every screen within the CRDC survey tool. Only users who are so authorized will even see the Certification selection within this menu.
In order to proceed to final certification of an LEA’s data submission, all required data fields must be submitted for both the District Form and all related School Forms (unless exempted by OCR), and no errors may exist for any data submitted that have not been either explained using a reason code and/or comment or overridden by the PSC.
In order to start the certification process, the user must first go to the Certification Dashboard using the Certification menu link provided in the menu at the top of every screen. Again, only those authorized to certify data for the LEA will have this item in their menus. The Certification Dashboard appears as follows (see figure 112).
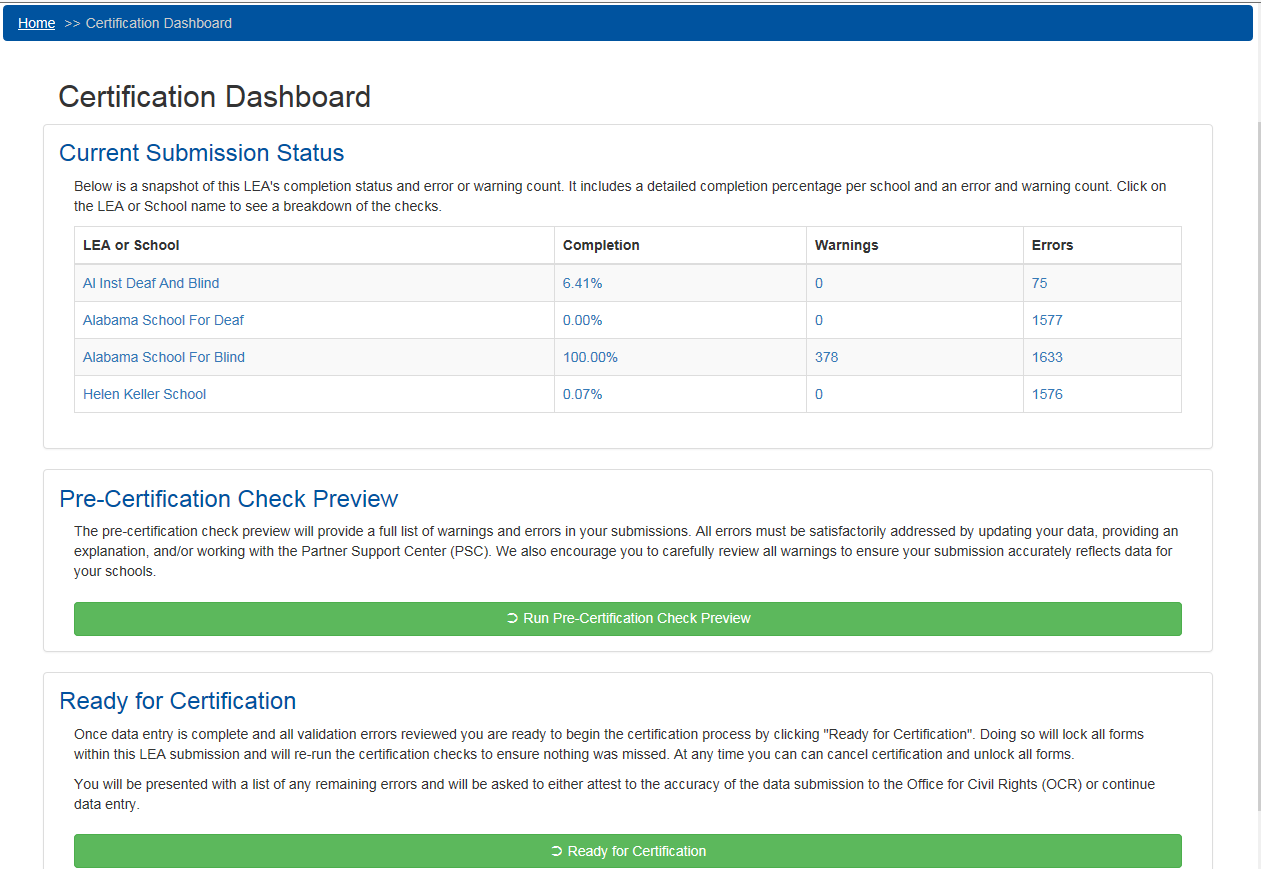
Figure 112. CRDC Survey Tool Certification Dashboard
At the top of this screen is the Current Submission Status, a table that shows a snapshot of completion status, number of errors, and number of warnings for each District (LEA) and School Form currently in the process of being submitted.
Each entry in this table may be selected in order to get an expanded view of the completion status of that LEA or School Form. For example, selecting the LEA in this case brings up an expanded table as shown in figure 113:
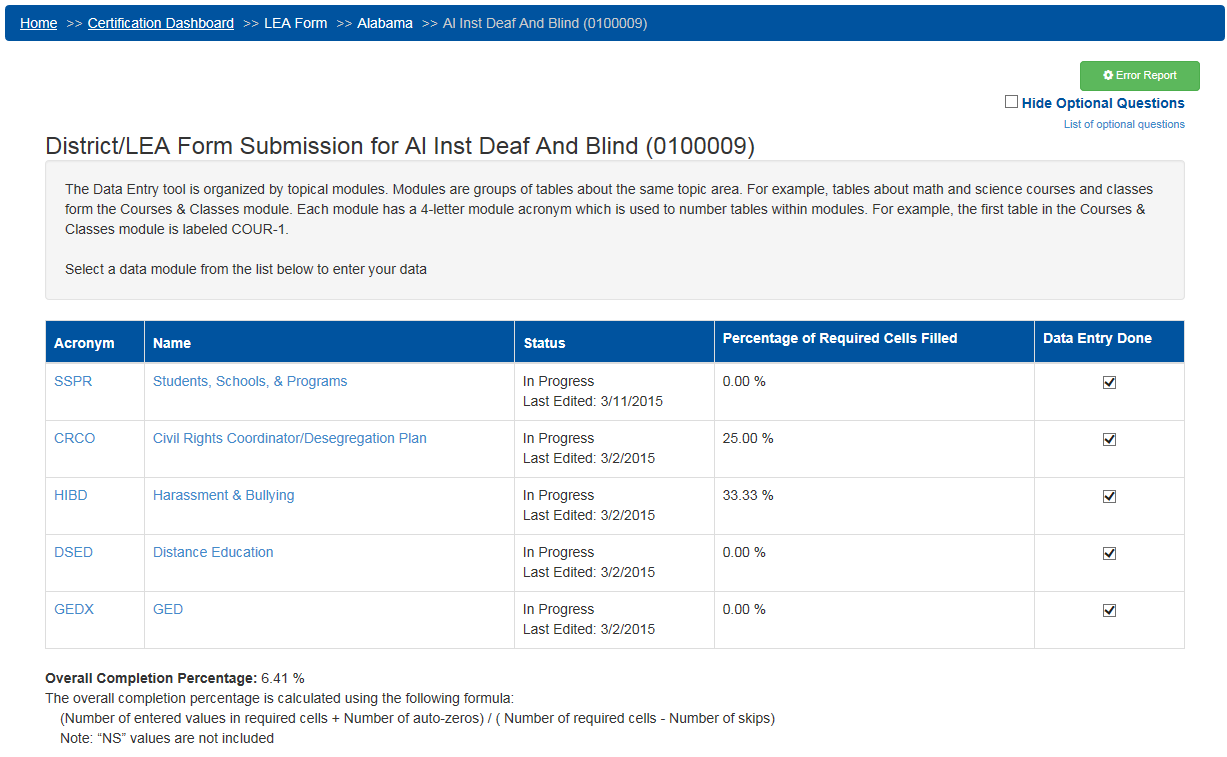
Figure 113. CRDC Survey Tool Current Submission Status LEA Detail
This is actually the same as the Module Landing page for the LEA shown in figure 41 in section 2.3.1. From here, the user can access the Error Report (to determine which tables have triggered errors or warnings) or navigate within the Data Entry & Review tool, by following the links for the various modules (to add to or correct submitted data or to provide explanatory comments at will).
Likewise, selecting one of the school entries in the Current Submission Status table will bring up the Module Landing page for the relevant school, just as has been shown several times before (see figures 30, 37, and 114 below):
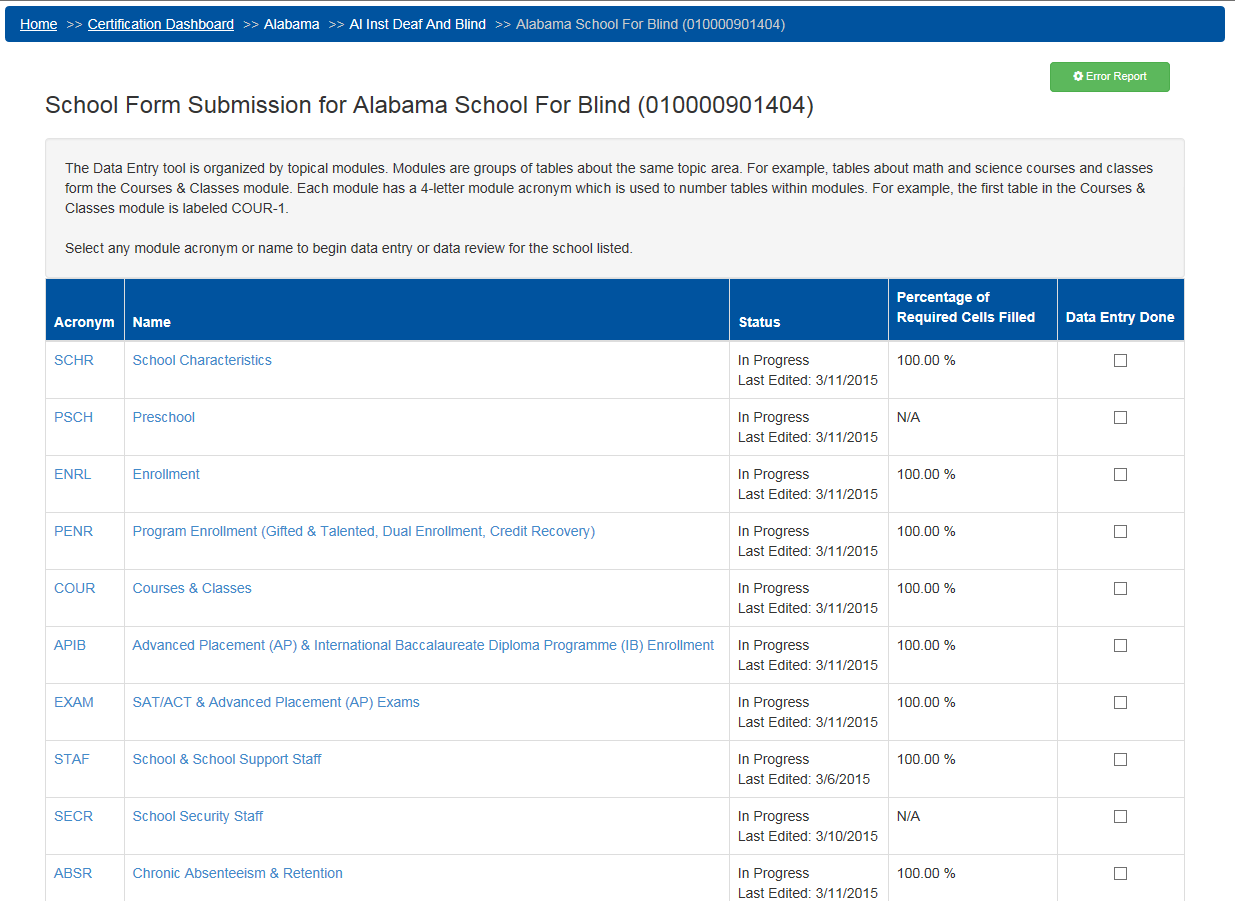
Figure 114. CRDC Survey Tool Current Submission Status School Detail
The Current Submission Status table provides an executive summary of the completion status, errors, and warnings for all forms relevant to the LEA, with links to the Data Entry & Review Tool screens relevant to working in those forms.
Next on the Certification Dashboard is the Pre-Certification Check Preview. This function allows the user to generate a comprehensive error and warning report for all data that need to be submitted prior to certification for this LEA. The user starts the process by selecting the Run Pre-Certification Check Preview button, at which point the system informs the user of the progress in running the checks (see figure 115).

Figure 115. CRDC Survey Tool Running Pre-Certification Checks
Upon completion, the results of these checks are displayed in two tables. The first one details Errors that can be resolved either by changing the data submitted, or by means of a reason code and/or comment explaining the validation check error listed in the first table (see figure 116).
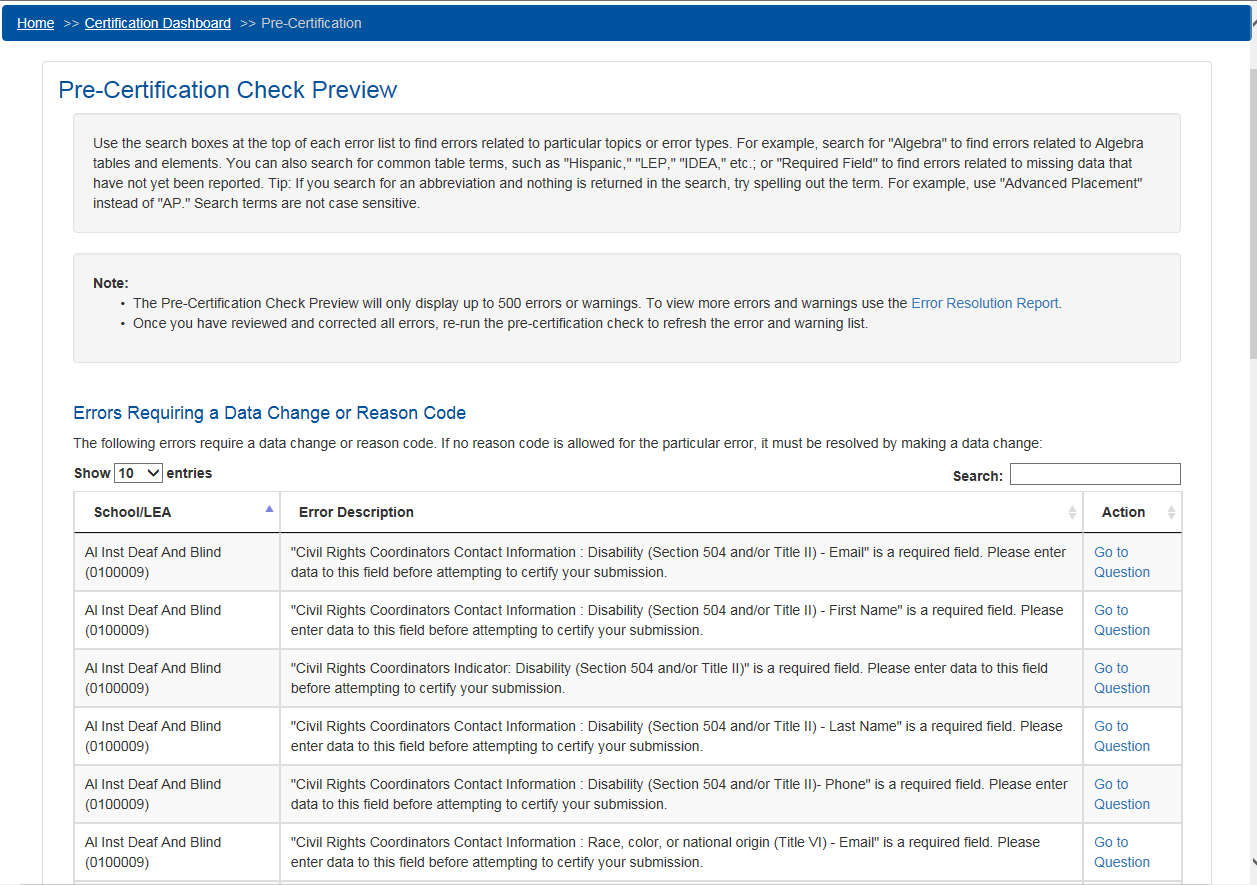
Figure 116. CRDC Survey Tool Pre-Certification Check Results (Reason Codes)
If the user scrolls down, a second table is displayed for errors that require review from the PSC if the submitted data underlying the validation check error are not going to be changed (see figure 117).
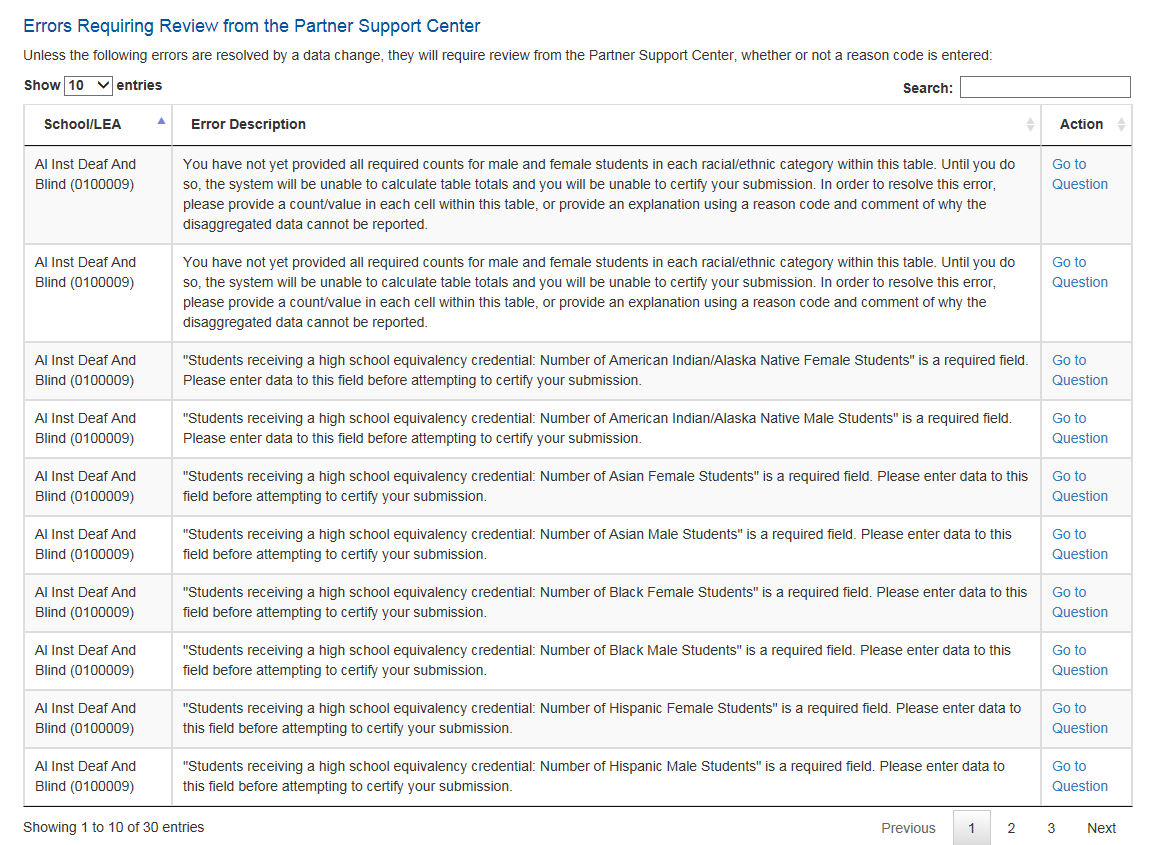
Figure 117. CRDC Survey Tool Pre-Certification Check Results (PSC Review Required)
These errors cannot be resolved simply by explaining an apparent discrepancy with a reason code and/or comment, but need to be reviewed by the PSC and, in some cases, by OCR. One common type of error that falls within this table is a lack of required data in the submission, as a lack of data in required fields will always block certification unless an exemption is granted based on a data collection plan.
Since missing data result in failed validation checks, running the Pre-Certification Check on an LEA with this level of progress will result in a large list of errors in both tables. Users can use the Search boxes to filter for specific common table topics and terms. Each error is identified by the District or School form in which it occurs and the error description, and provides an Action link allowing the user to go straight to the relevant question in the correct form in the Data Entry & Review area of the tool. There, the user may change the value of the data or enter a reason code and/or comment, as appropriate. The Pre-Certification Check therefore serves as a more global version of the Error Reports available in the Data Entry & Review area from the Module Landing pages, covering all data submitted for the LEA to date.
In order to attempt certification, the user will want to ensure that all of the errors identified in the Pre-Certification Check Preview have been eliminated, either by changing values so the errors no longer occur, by explaining them using reason codes and/or comments, or by contacting the PSC. At that point, the Ready for Certification function at the bottom of the Certification Dashboard comes into play.
If the user selects the Ready for Certification button before the submission is complete and errors have been eliminated, the system will nevertheless attempt to run the appropriate certification checks (see figure 118).

Figure 118. CRDC Survey Tool Running Certification Checks
However, once the checks have been completed, the system will inform the user that certification is blocked, that the form is unlocked to allow for further data entry, and what the specific errors involved are, duplicating the results of the Pre-Certification Check (see figure 119).
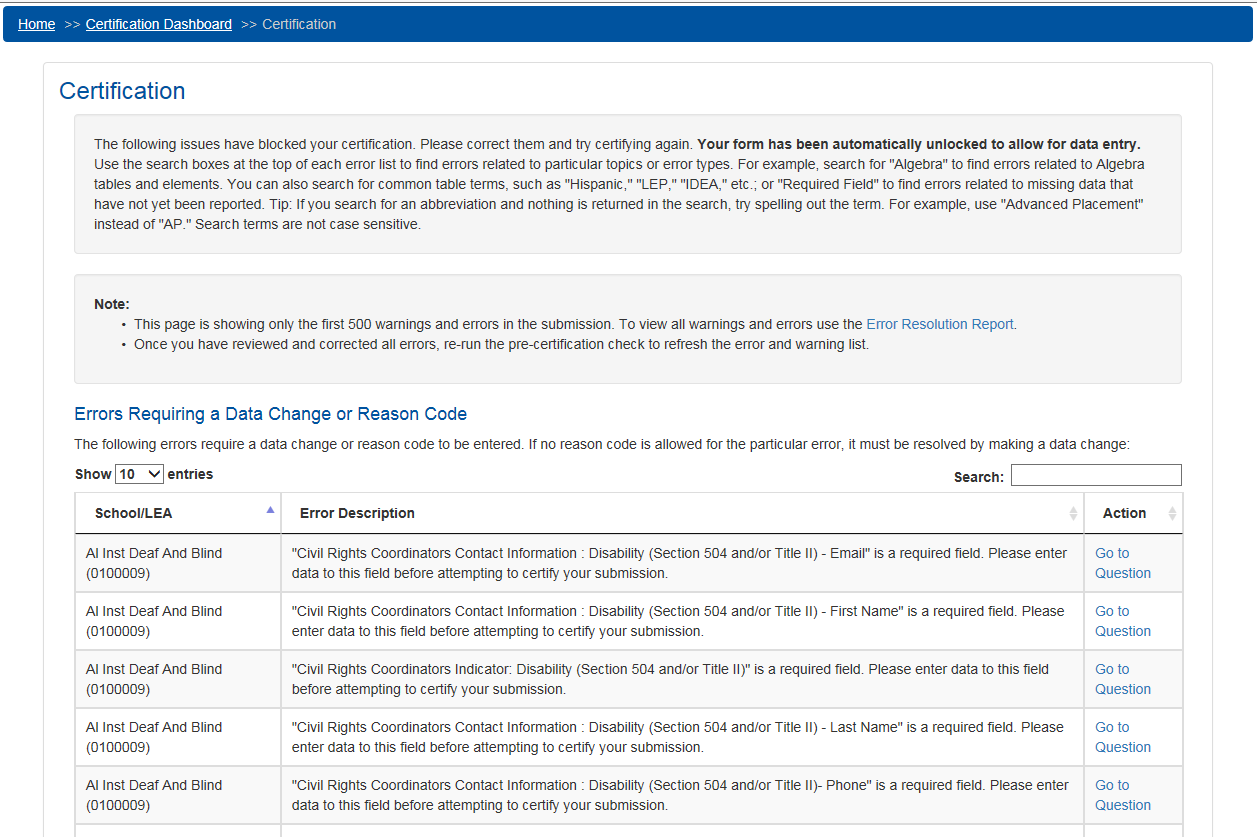
Figure 119. CRDC Survey Tool Certification Blocked
Actual locking and certification of the submission will not be possible until all required data have been entered and there are no unresolved errors. At that point, the Certification Dashboard would appear as shown below (see figure 120).
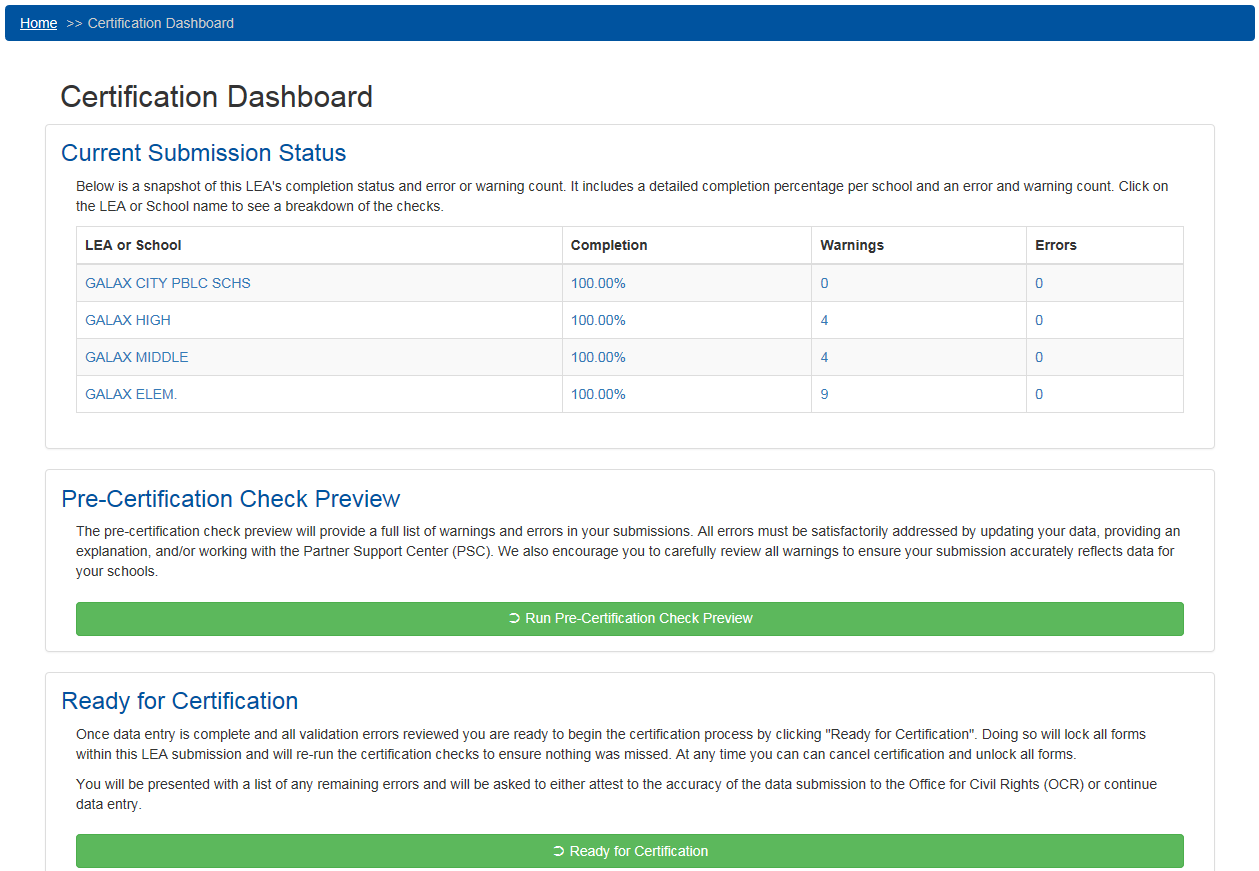
Figure 120. CRDC Survey Tool Certification Dashboard (Complete)
Note that in this case, the Current Submission Status table shows 100% completion for each form, with no unresolved Errors (although some Warnings may exist). The links for the individual forms will still take the user to the appropriate Module Landing pages, but as there are no questions remaining to answer or errors to correct, there should be no need to do so.
The user may still run the Pre-Certification Check Preview, but as there are no errors, this should be unnecessary. The Pre-Certification Check Preview will still return a list of Warnings should the certifier wish to review them.
Finally, when the user selects the Ready for Certification button this time, it will return the following screen (see figure 121).
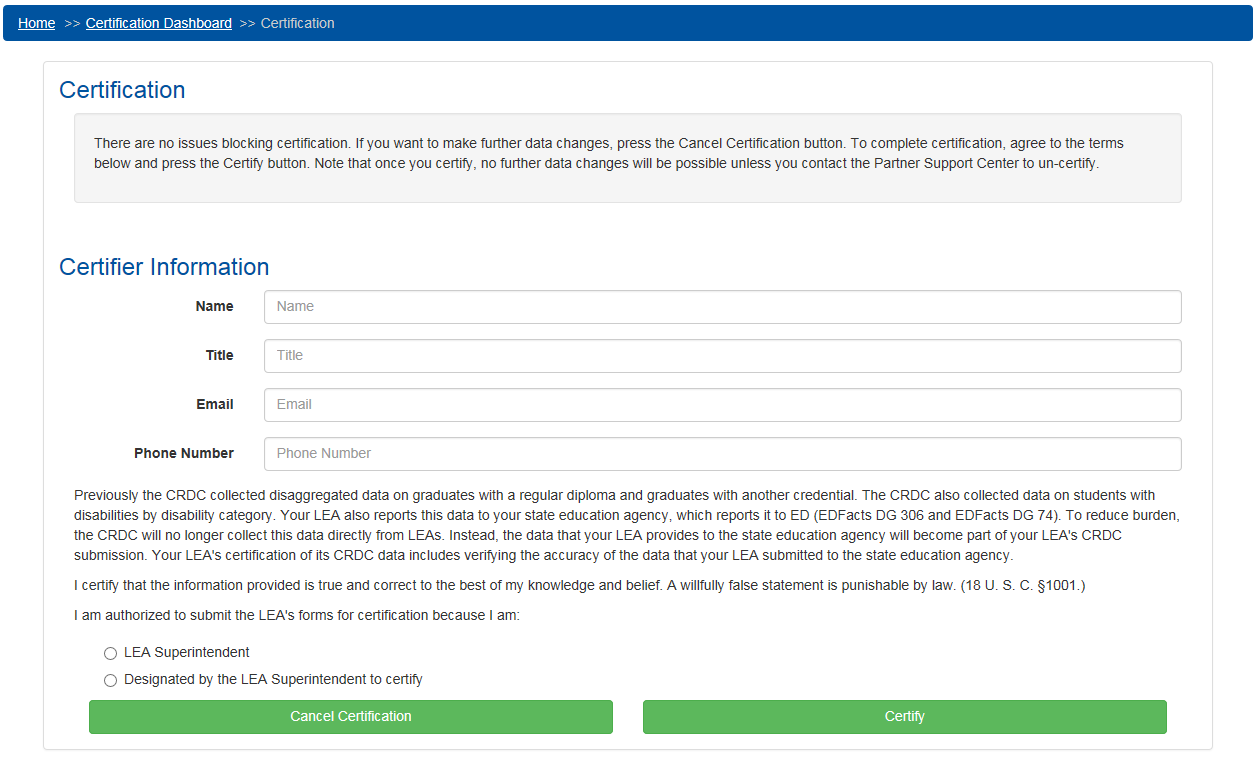
Figure 121. CRDC Survey Tool Ready for Certification (Complete)
As there are no issues blocking certification, the system presents the (authorized) user with the form used to certify the data submission. Only the LEA Superintendent, or another person designated by the LEA Superintendent, is authorized to complete this form and fully certify the LEA’s CRDC submission.
Any missing required data, or data triggering an error according to the validation checks, may prevent certification for the LEA as a whole until they are either corrected, explained using a reason code and/or comment, or overridden or exempted by the PSC or OCR.
Requesting Reversal of Certification by PSC
There can potentially be circumstances in which an LEA decides that some of its data need to be revised or updated, even after certification. In these cases, the LEA must contact the PSC in order to request that the certification be reversed and the forms unlocked to allow further editing by the LEA.
Identify the approvers of the User Manual. Approver name, signature, and date should be used.
This appendix will contain the table of all acronyms and abbreviations used within the document and within the tool itself (thereby covering abbreviations for racial/ethnic categories, special education status, English language learner status, etc.).
Acronym/Abbreviation |
Definition |
APIB |
Advanced Placement & International Baccalaureate |
CRDC |
Civil Rights Data Collection |
CSV |
Comma-Separated Value |
ED |
Department of Education |
ENRL |
Enrollment |
IES |
Institute of Education Sciences |
LEA |
Local Education Agency |
NCES |
National Center for Education Statistics |
OCR |
Office for Civil Rights |
PSC |
Partner Support Center |
SCHR |
School Characteristics |
SEA |
State Education Agency |
This appendix covers additional resources available to the respondent users in providing the data collection, including links to documents and Web sites, phone numbers, and email addresses.
| File Type | application/vnd.openxmlformats-officedocument.wordprocessingml.document |
| File Title | Software Requirements Specification (SRS) Template |
| Subject | Project Planning |
| Author | Richard J. McGee |
| File Modified | 0000-00-00 |
| File Created | 2021-01-27 |
© 2026 OMB.report | Privacy Policy