0750 3rd Party IT System Screen Shots
0750 3rd Party IT System Screen Shots.doc
Accreditation of Third Party Certification Bodies to Conduct Food Safety Audits and Issue Certifications
0750 3rd Party IT System Screen Shots
OMB: 0910-0750
Food and Drug Administration

Third Party Accreditation (TPA) Program
Screens for OMB approval
Version: 5.0
January 2016
VERSION HISTORY
Version Number |
Implemented By |
Revision Date |
Description of Change |
1.0 |
FURLS Team |
10/04/2016 |
Provided screenshots |
2.0 |
DRT Team |
10/21/2016 |
Updated with data elements definitions |
3.0 |
Peer Review |
11/29/2016 |
Review complete |
4.0 |
DRT Team |
12/18/2016 |
Updated AB and CB homepage with revised OMB language |
5.0 |
DRT Team |
1/20/2017 |
Updated to include OCC edits |
Contents
1. Create FDA Online Account 5
2. Submitting an application for recognition as an accreditation body (AB) 11
2.1. Apply for recognition and implementing FDA regulations 14
5. Add or Manage Third Party CBs 48
5.2. Update Accredited Third Party CB 58
6. Reports and Notifications 66
6.1. Notice of Accreditation of CB’ 68
6.2. Notice of Accredited CB Noncompliance in Issuing Food or Facility Certification 73
6.3. Notice of Denial of Accreditation of CB 79
6.4. Notice of Significant Change 84
6.5. Notice of Intent to Relinquish or Not to Renew Recognition 88
Legend
OCC has reviewed the contents of this document and all their edits were completed in red font.
Please note in a future release, when it noted that “All fields are mandatory unless noted as optional,” the additional statement will be added “If a mandatory field does not apply to you, please indicate that the field is not applicable.”
An accreditation body (AB) seeking to be recognized by the FDA needs to first create an online account. The AB can sign up for an account by clicking on “Create New Account” on the FDA Unified Registration and Listing Systems (FURLS) Online Account Administration (OAA) page (Figure 1.1).
Once the account has been created, the AB can log into the FURLS OAA page with valid account credentials to apply for recognition by the FDA.
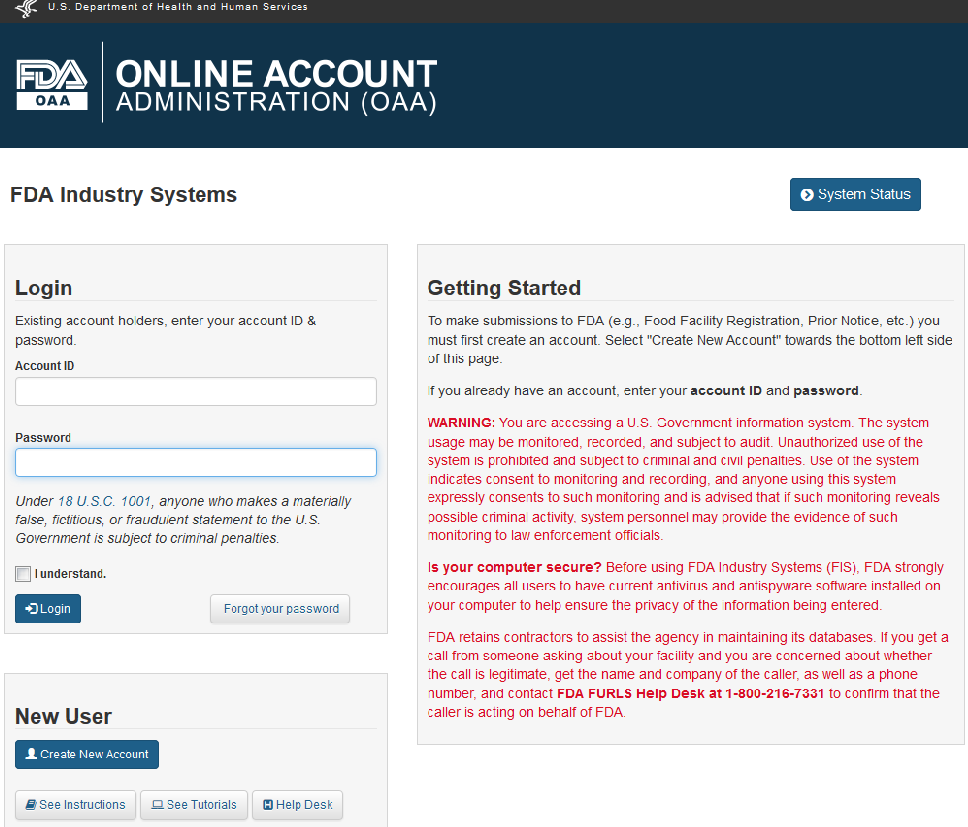
Figure 1.1 – FDA OAA Page
The system displays the “Create New Account” screen. The user can select the option “Center for Food Safety & Applied Nutrition” (CFSAN) under the first section “Step 1: Select Applicable Center for Account Creation”. (Figure 1.2)
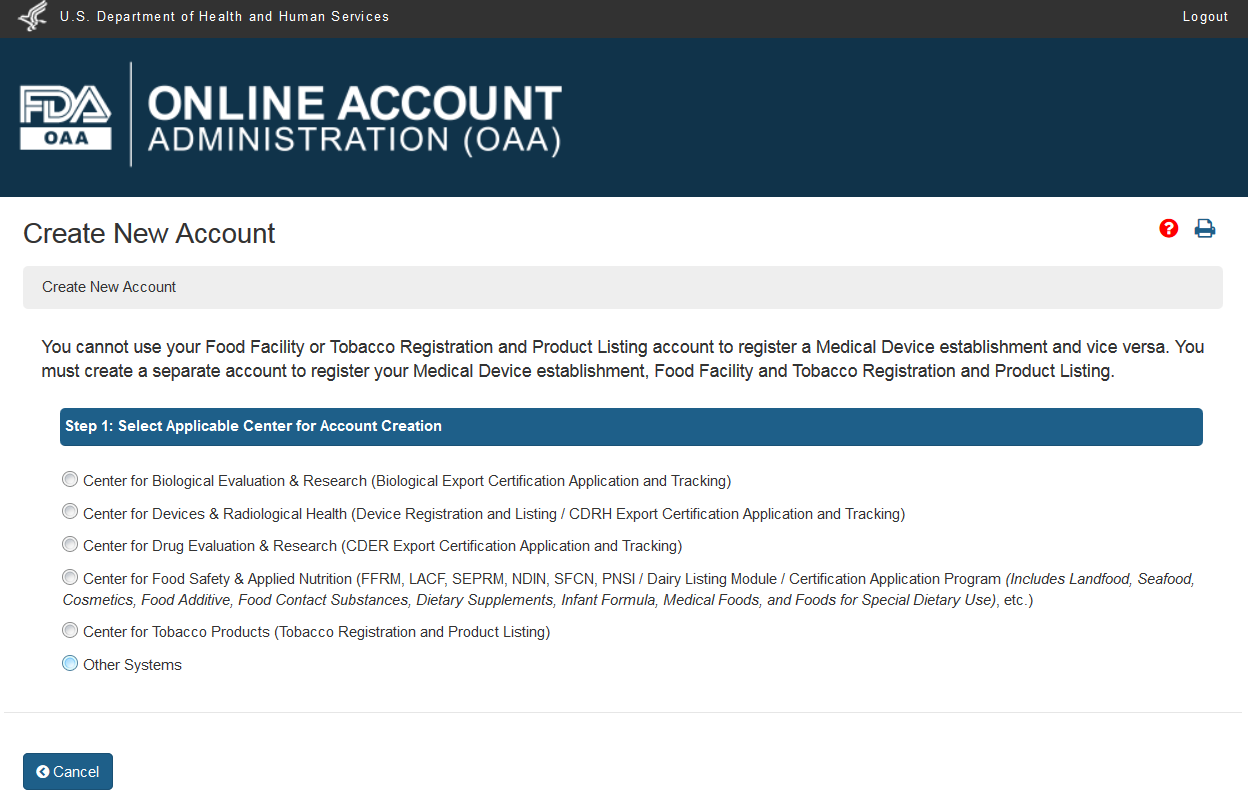
Figure 1.2 – Create New Account Page
The system displays the various programs available in CFSAN. The AB user can select “Third Party Program - Accreditation Body" under the FSMA Programs. (Figure 1.3)
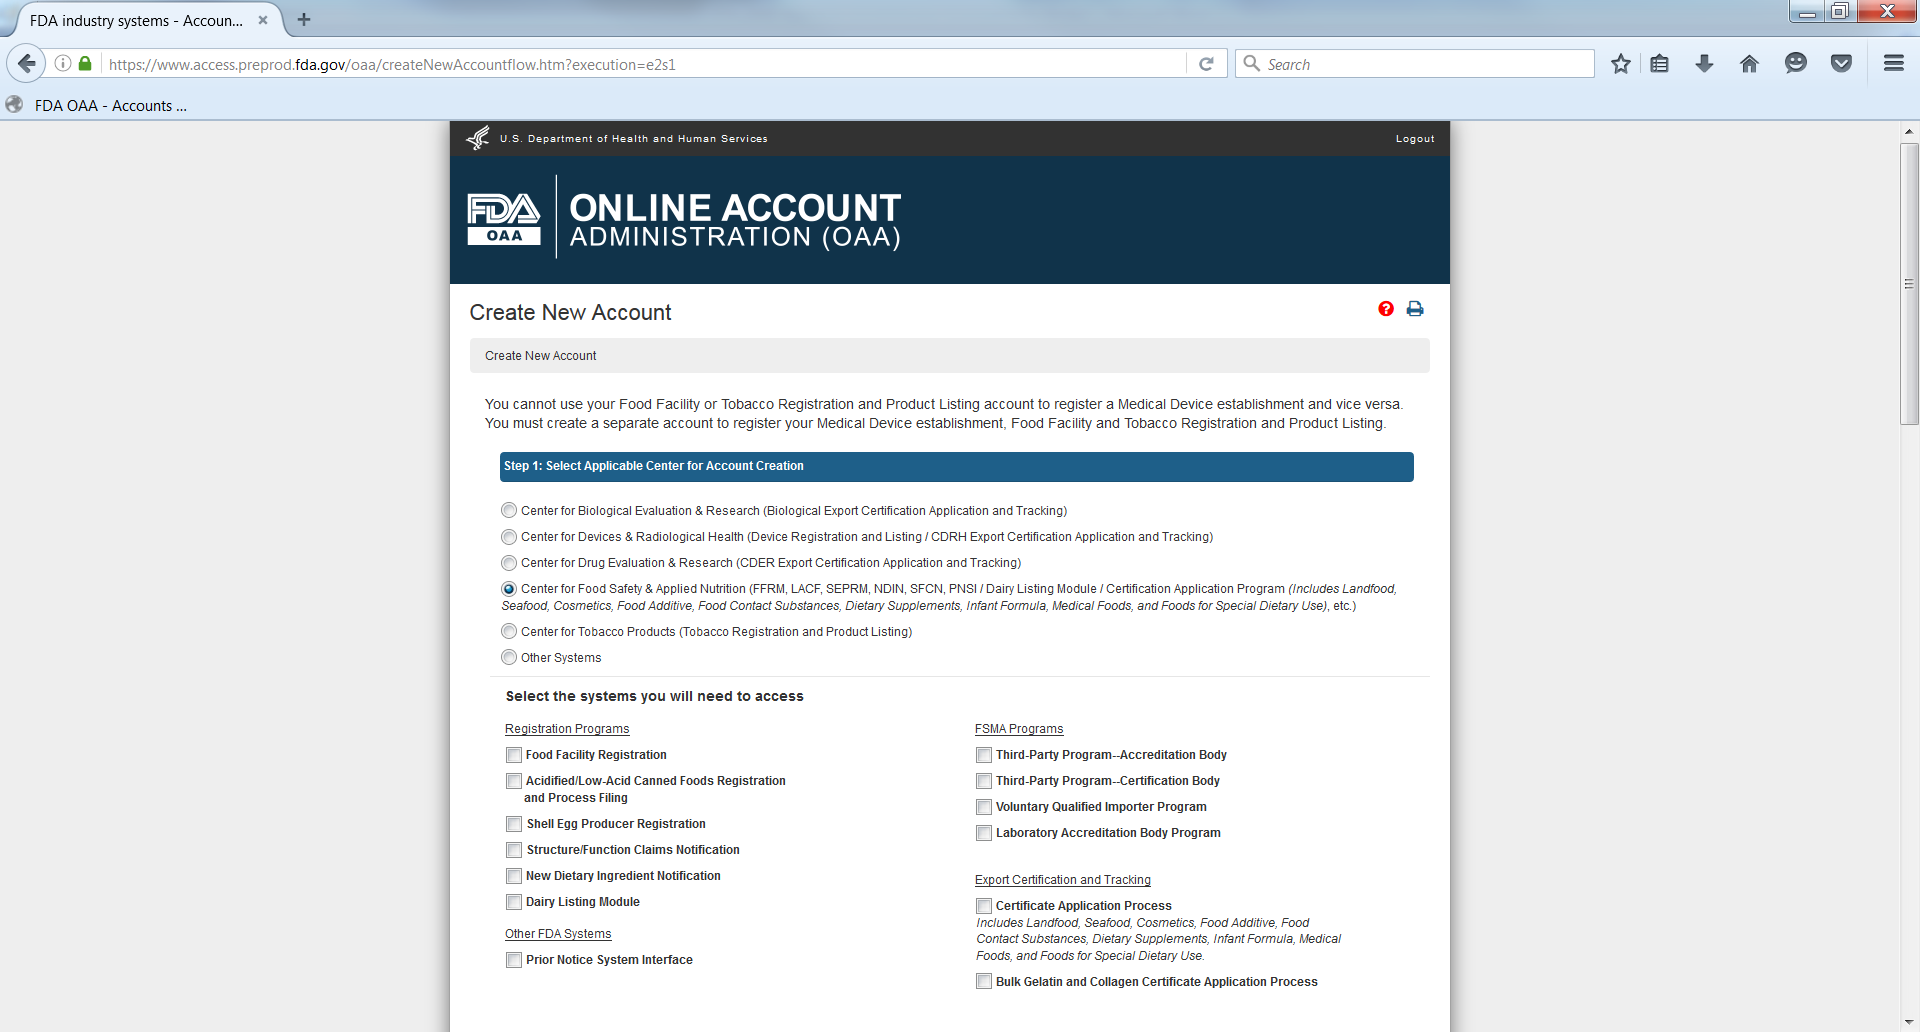
Figure 1.3 – Create New Account Page Contd.
The next section includes the “Account Information” that an AB applicant can enter all their information into. (Figure 1.4)
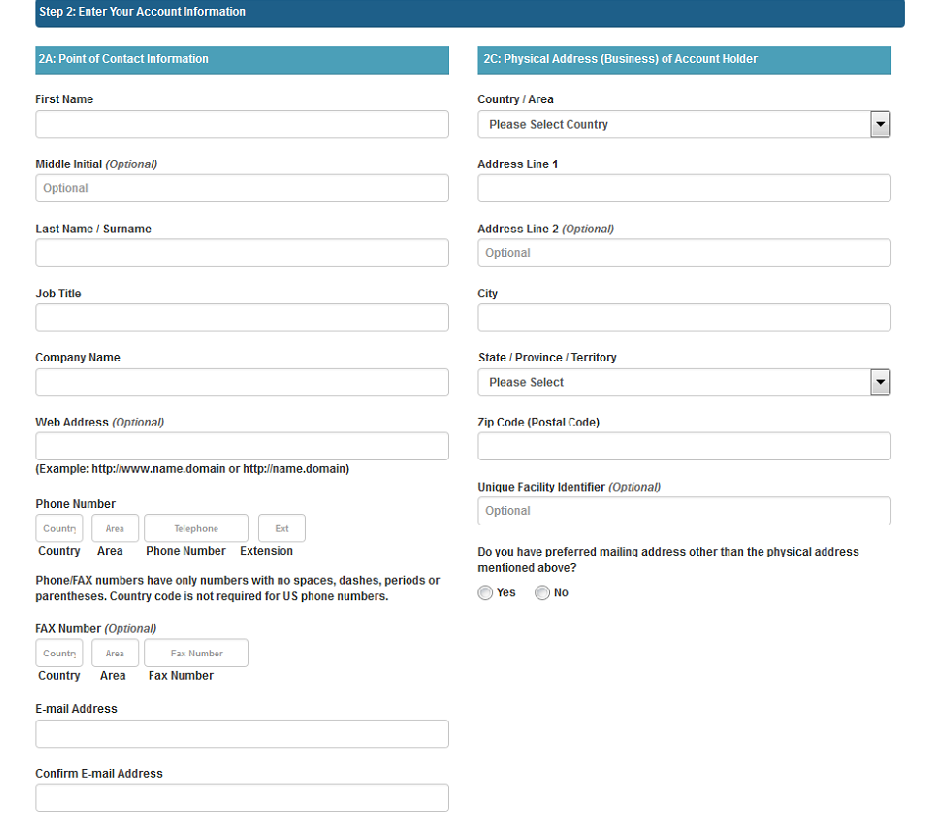
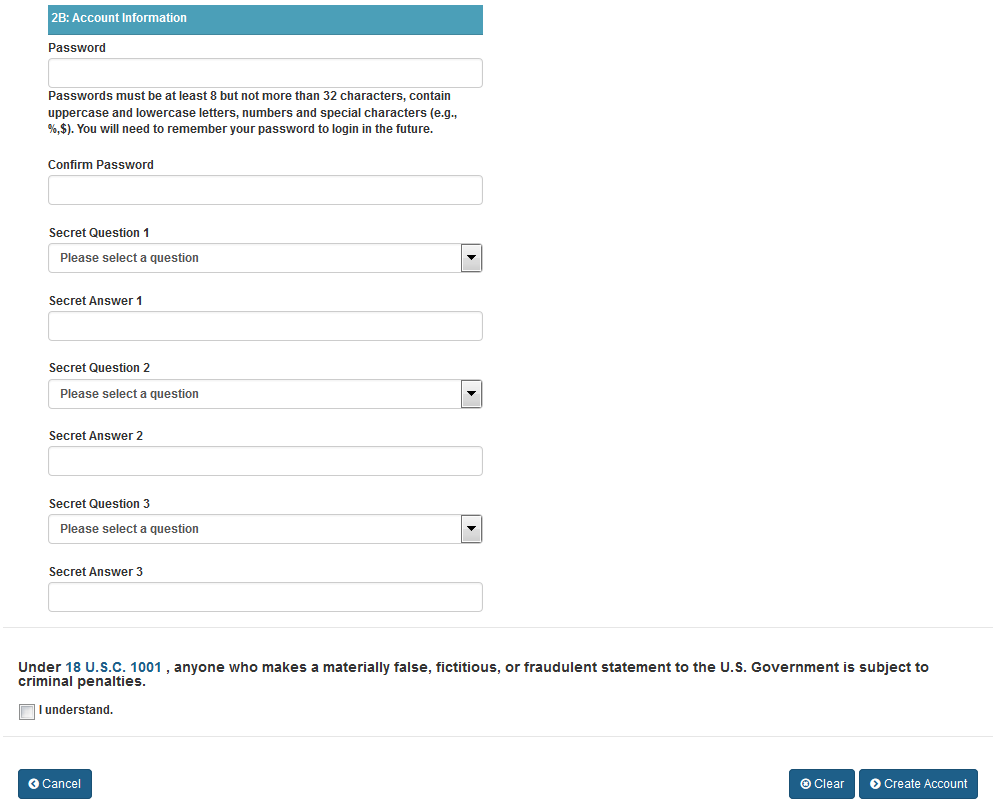
Figure 1.4 – Create New Account Page – Enter Account Information
The data fields in the Enter Account Information section include:
Point of Contact Information
First Name – the first name of the point of contact
Middle Initial – (Optional field)
Last Name/Surname – the last name of the point of contact
Job Title – the job title of the point of contact
Company Name – the name of the company to which the point of contact represents
Web Address – (Optional field)
Phone Number ( Country/Area/Phone Number/Extension) – the telephone number of point of contact
Fax Number (Country/Area/Fax Number) – the fax number of the point of contact
E-mail Address – the e-mail address of the point of contact
Confirm E-mail Address – the second entry of the e-mail address of the point of contact to confirm e-mail address is correct
Account Information
Password – the password for the point of contact’s account
Confirm Password – the second entry of the password for the point of contact’s account
Secret Question 1 – the first secret question to protect the account for the point of contact
Secret Answer 1 – the answer to the first secret question to protect the account for the point of contact
Secret Question 2 - the second secret question to protect the account for the point of contact
Secret Answer 2 - the answer to the second secret question to protect the account for the point of contact
Secret Question 3 - the third secret question to protect the account for the point of contact
Secret Answer 3 - the answer to the third secret question to protect the account for the point of contact
Physical Address (Business) of Account Holder
Country/ Area – the country or area where the business is located
Address Line 1 – the address (number, street etc.) where the business is located
Address Line 2 – (Optional field)
City – the city where the business is located
State/ Province/ Territory – the state/province/territory where the business is located
Zip Code (Postal Code) – the zip code (domestic) or Postal Code (foreign) of the business
Unique Facility Identifier – (Optional field)
After the user has completed filling out all the mandatory account information, the user can click on “Create Account” which will display the “Account Review” screen (Figure 1.5). The user can click on “Submit” to create an account or click on “Modify” to edit the profile information.
Please note in a future release, when it noted that “All fields are mandatory unless noted as optional,” the additional statement will be added “If a mandatory field does not apply to you, please indicate that the field is not applicable.”
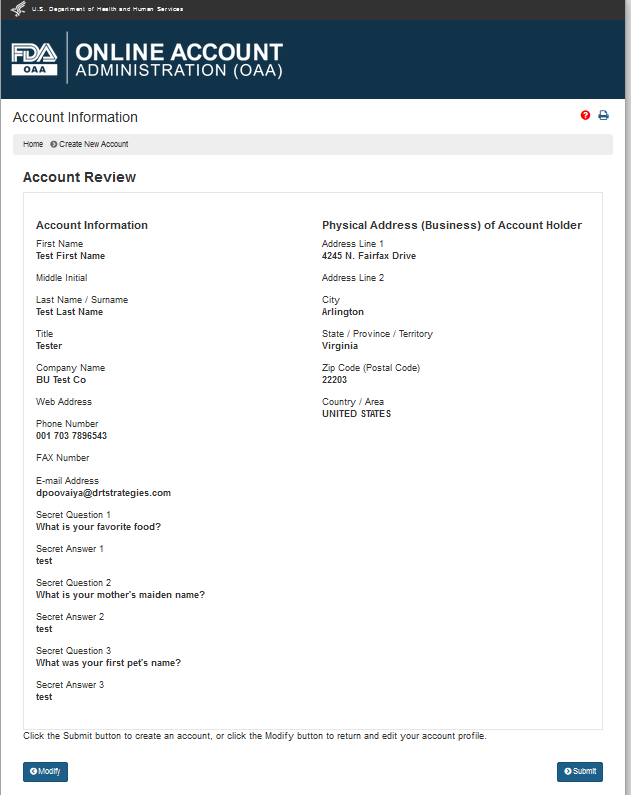
Figure 1.5 –Account Review Page
When the user clicks on “Submit”, the system displays a page with a message that account was created successfully and also the account ID that the user can use to log into the application and submit an application for recognition as an accreditation body. (Figure 1.6)

Figure 1.6 –Account Created Successfully Message Page
After the AB has signed into the FDA OAA page, the FURLS homepage (Figure 2.1) is displayed where the AB can then select the link "Third-Party Program - Accreditation Body" from the list of systems available in the “FSMA Programs” section. This will take the AB to the “AB Home” webpage with the banner “Accreditation Body (AB) Program” (Figure 2.2).

Figure 2.1 – FURLS Homepage
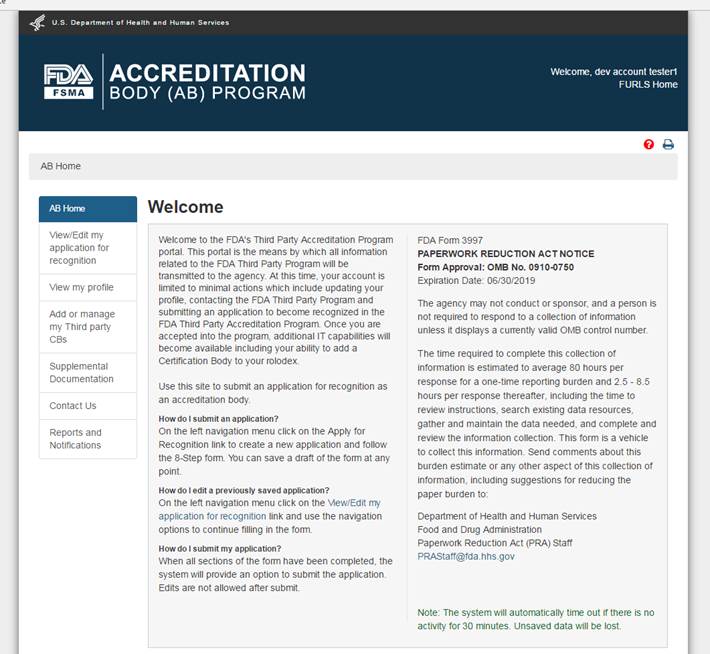
Figure 2.2 – AB Homepage
Each screen in the AB electronic submission process has the banner “Accreditation Body (AB) Program”. The link “FURLS Home” on the right side of the banner will take the user to the FURLS Homepage, from where the user will be able to log out of the program
To create a new application for recognition as an accreditation body, the AB can select the link “Apply for Recognition” from the left navigation menu which will take the user to the next page, the “Applicant Information” (Figure 2.1.1). This page displays read-only information from the user’s profile.
"AB Home" will take the user to the Main Menu on AB Home page.
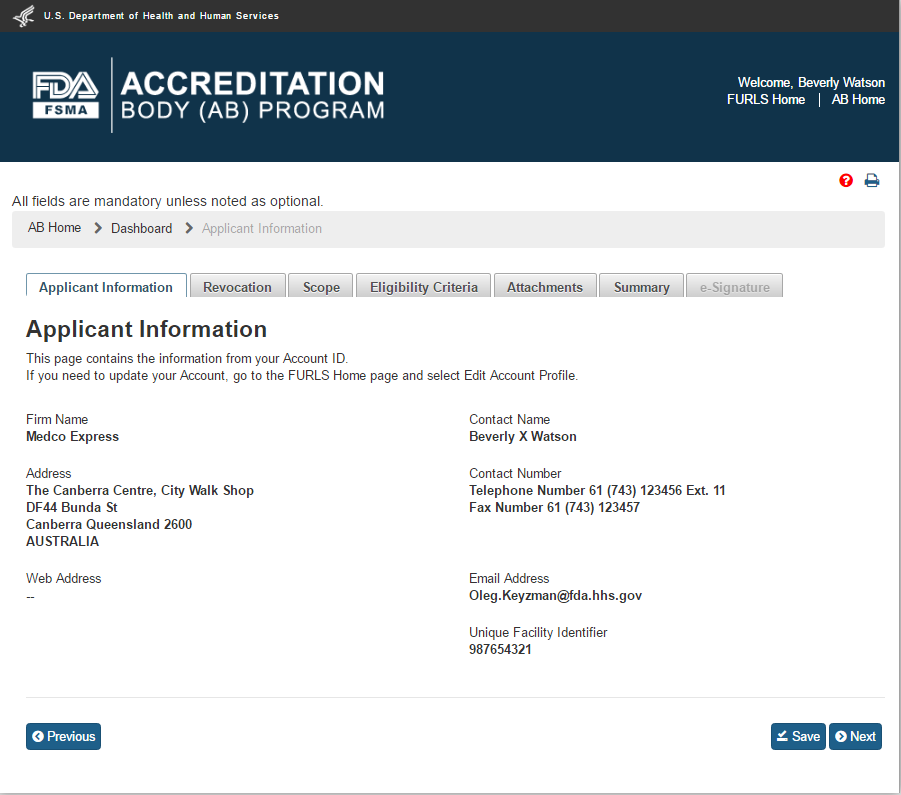
Figure 2.1.1 – Applicant Information
The user can click on the Scope tab to navigate to the “Scope” page (Figure 2.1.2). This page contains a list of all original source scopes. The user needs to select at least one scope from the “List of Original Source Scopes” and move it to the “List of Selected Scopes” using button “->”. Alternatively, the user can use button “->|” to move all scopes from the original list.
Similarly, the user can use button labeled “<-” to move one scope back to the original list or use the button “|<-” to move all scopes back to the original list.
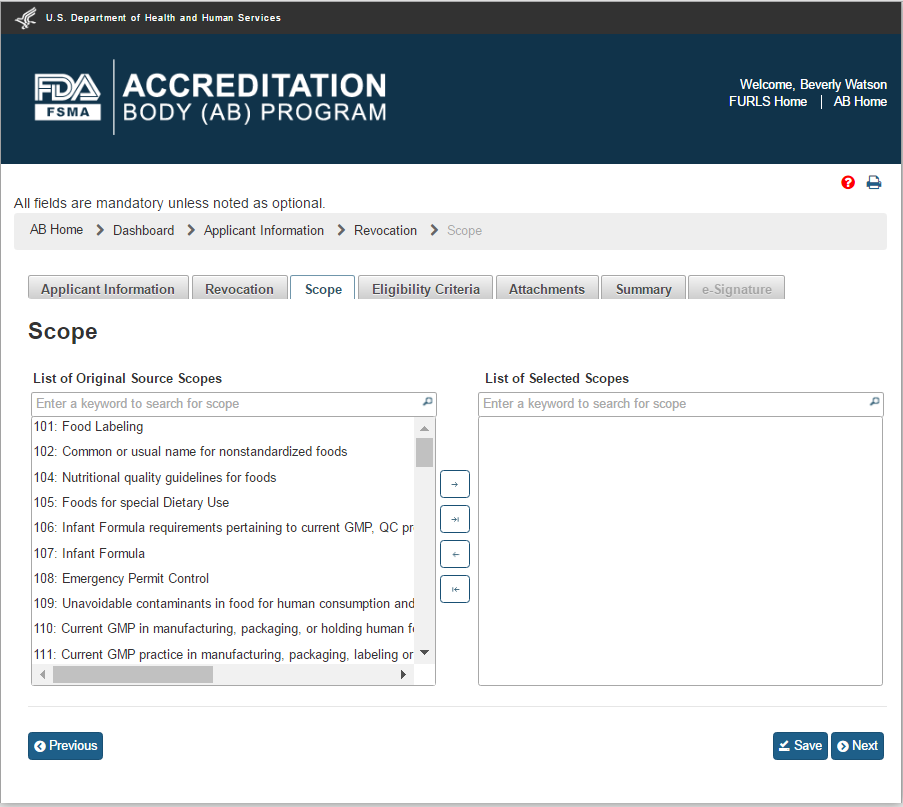
Figure 2.1.2 – Scope – Please note, in a future release the scope list will be updated to reflect changes made by the OCC.
After the user clicks “Save” and then “Next” button or “Eligibility” tab, the system will bring up the “Eligibility” page (Figure 2.1.3).
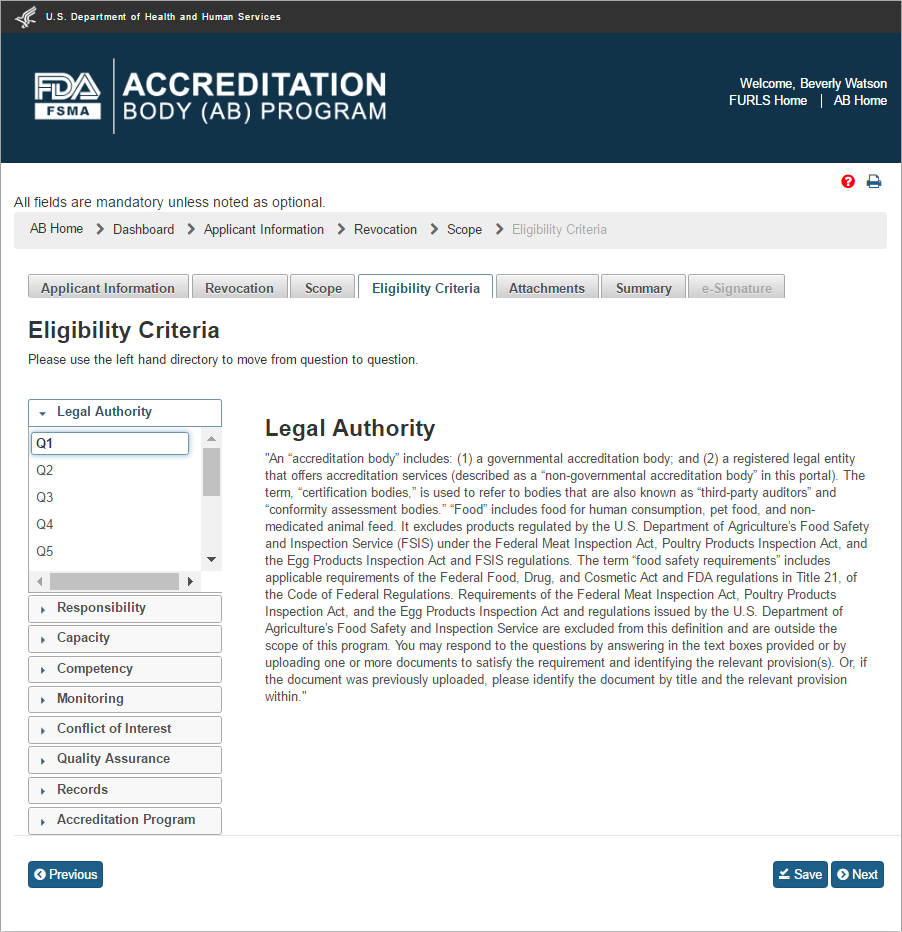
Figure 2.1.3 – Eligibility Criteria page - Please note in a future release, the “Eligibility Criteria” tab will be renamed to “Eligibility” tab
The “Eligibility” page allows the AB user to answer questions, and attach supporting files, for the following 9 standards:
Legal Authority
Responsibility
Capacity
Competency
Monitoring
Conflict of Interest
Quality Assurance
Records
Accreditation Program
The user clicks a question’s number e.g. Q1 in the “Legal Authority” standard and provides an answer in the textbox on the right. To upload an attachment, user clicks “Attachments” button and the system will display a pop-up window (Figure 2.1.4).
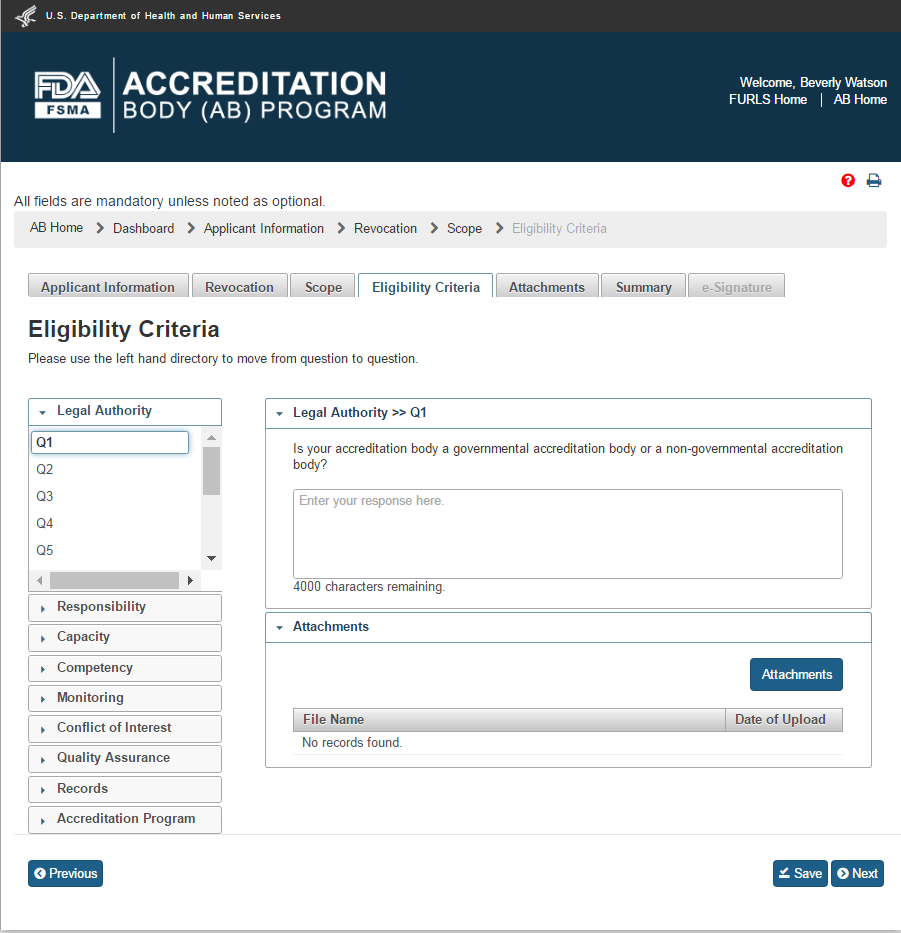
Figure 2.1.4 – Eligibility Criteria – Q&A - Please note in a future release, the “Eligibility Criteria” tab will be renamed to “Eligibility” tab
The user clicks Browse button in the “Attachments” window to select a file. The “Upload” button will become enabled after a file has been chosen to attach. The user will click on the “Upload” button to complete the attachment (Figure 2.1.5).

Figure 2.1.5 – Attachments window
The system will confirm when the file is uploaded. A confirmation message with the file name will be displayed in the “Attachments” window (Figure 2.1.6).
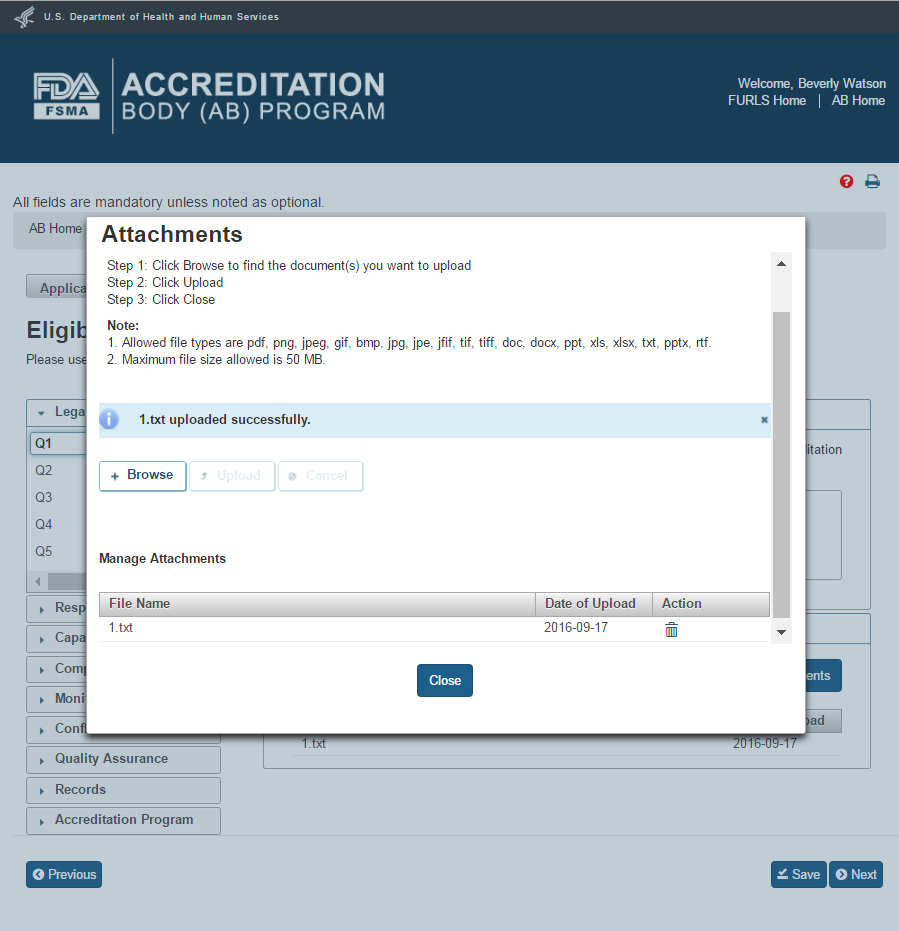
Figure 2.1.6 – Attachments to Eligibility Criteria questions
The user can close the “Attachments” window and then click “Save” and “Next” button on the “Eligibility Criteria” page. The user can also click on the “Attachments” tab. This will bring up the optional “Attachments” page. This page allows the user to upload additional files. The user can follow the 4-step instructions provided on the page (Figure 2.1.7). If the user selects ‘Other’ value from the dropdown options, the system will provide a text box labeled “Additional Description”, in which the user must enter a short meaningful description.
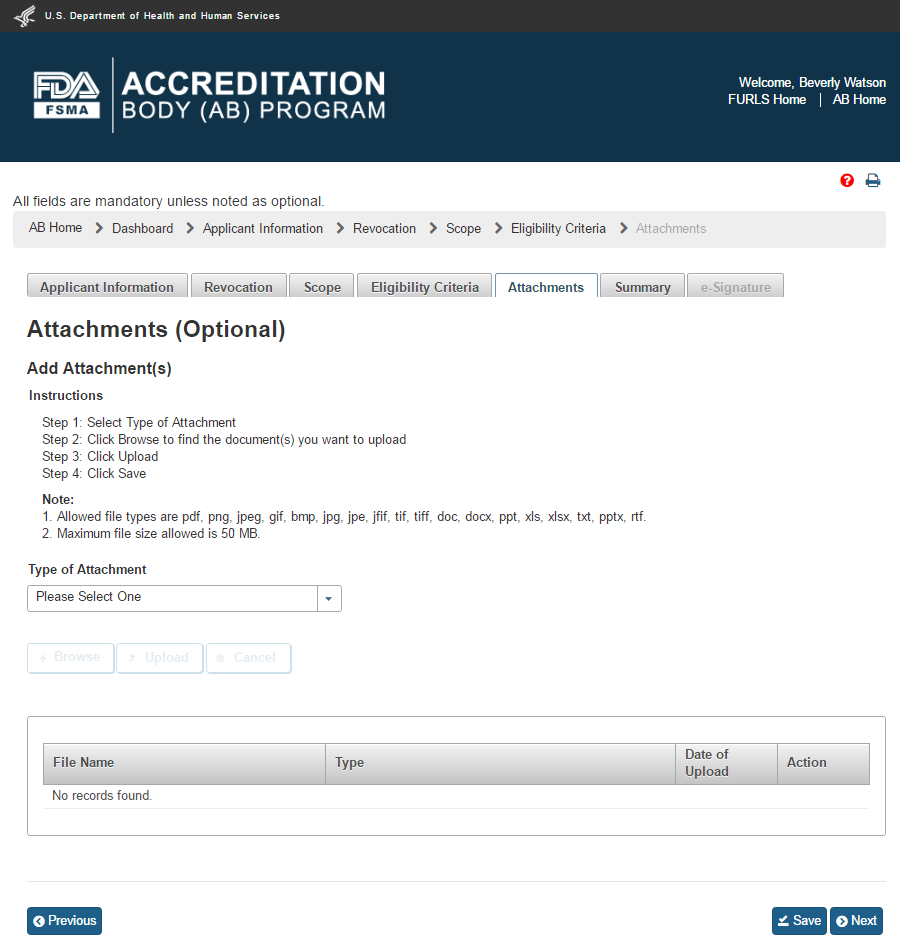
Figure 2.1.7 – Optional Attachments page
After the additional files have been uploaded, the user can click on the “Save” and “Next” button or the user can click on “Summary” tab. The system will display the “Summary” page (Figure 2.1.8). This page allows the user to review the data entries for completeness.
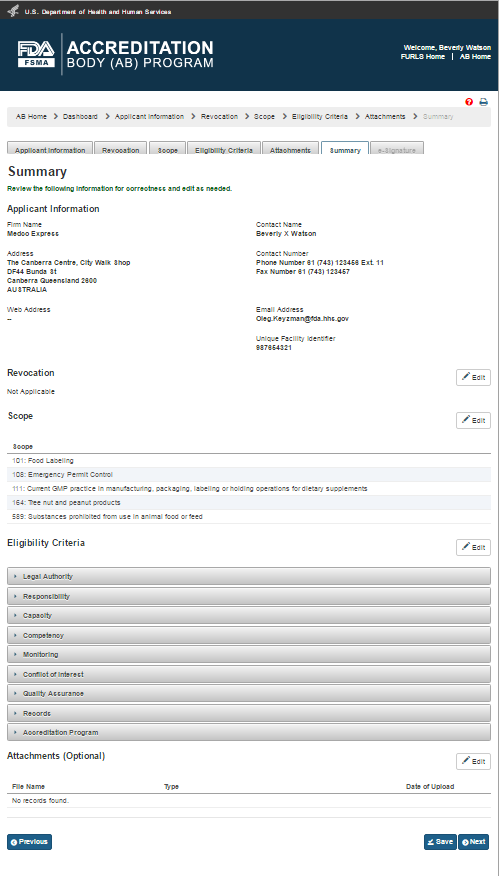
Figure 2.1.8 – Summary page
The user can click on “Save” and “Next” button after reviewing the “Summary” page. The system validates all the information entered by the user into AB application. If a violation is found, the system will post a relevant error message. To be able to submit the application, the user has to correct any issues that were found. If there are no violations, the system brings up the “e-Signature” page (Figure 2.1.9).
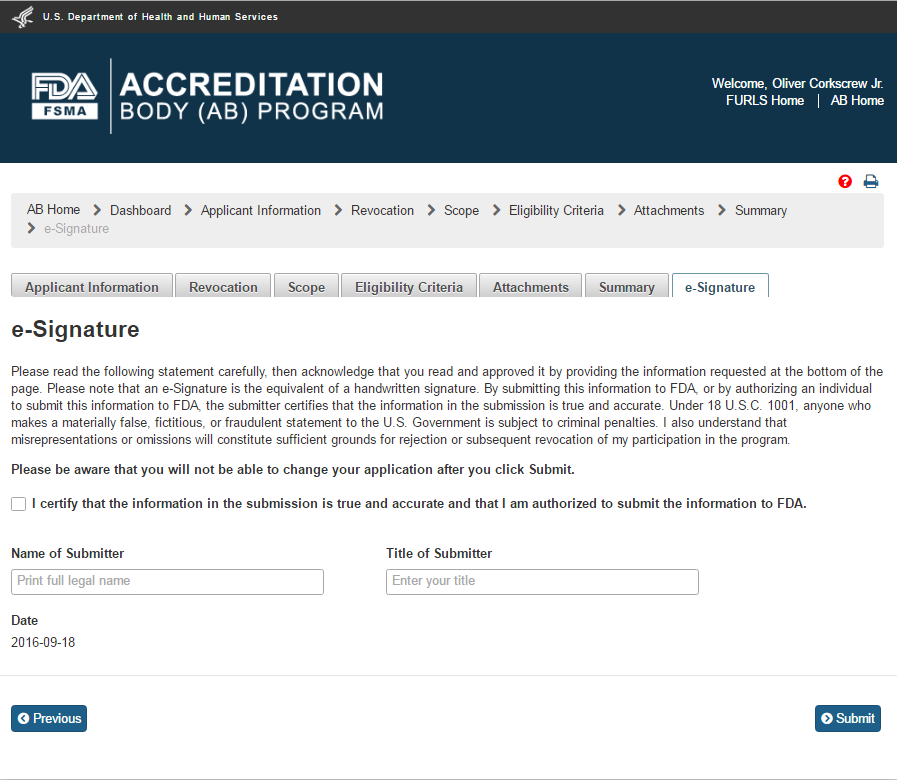
Figures 2.1.9 – e-Signature page - Please note in a future release, language will be changed to say “may constitute sufficient grounds” instead of “will constitute sufficient grounds.”
The user can follow the directions provided on the “e-Signature” page and fill the following data fields and then click the ‘Submit’ button:
Name of Submitter - the first and last name of the application submitter
Title of Submitter - the titles of the application submitter
The system will post a “Confirmation” message on the page (Figure 2.1.10).
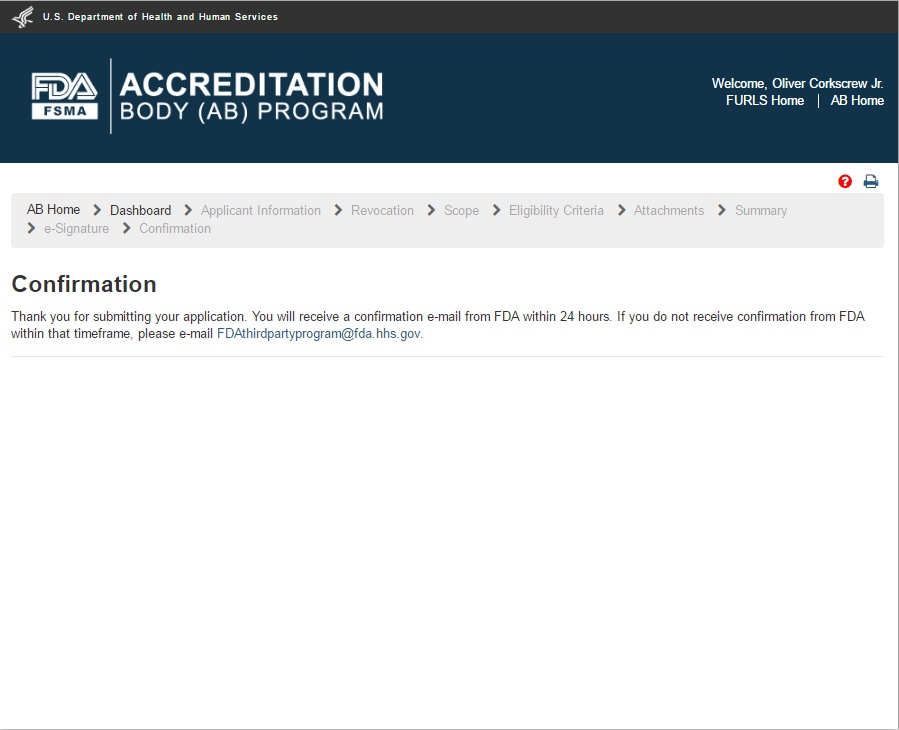
Figure 2.1.10 – Confirmation message
After the application has been submitted, it gets an Application Number and has “Pending” status on the Dashboard (Figure 2.1.11).
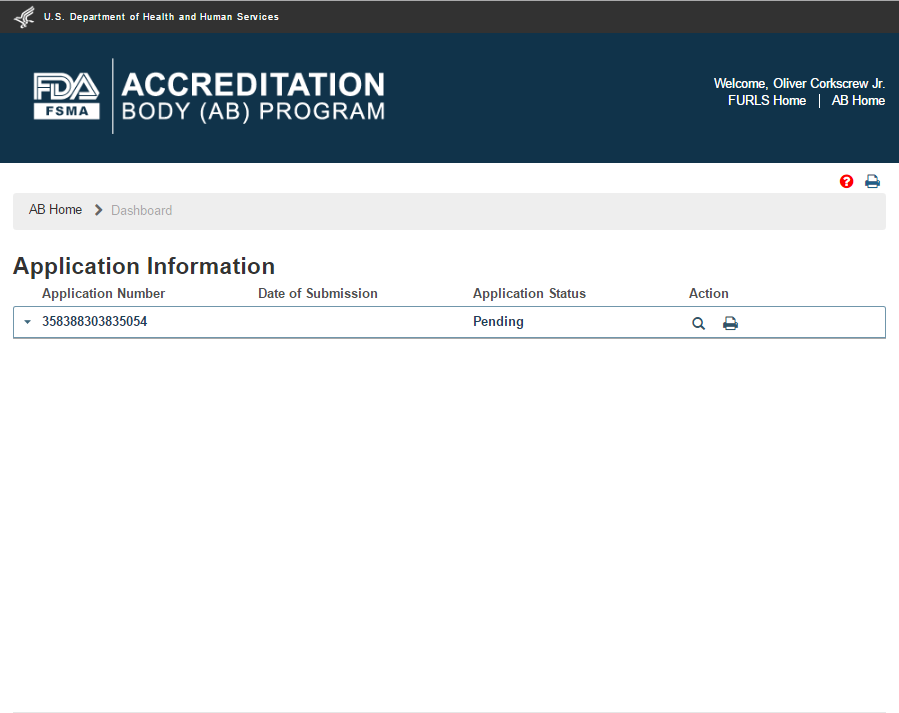
Figure 2.1.11 – Application ‘Pending’ status
As soon as CMS (FDA) receives the application, the status on the dashboard changes to “Submitted” (Figure 2.1.12).
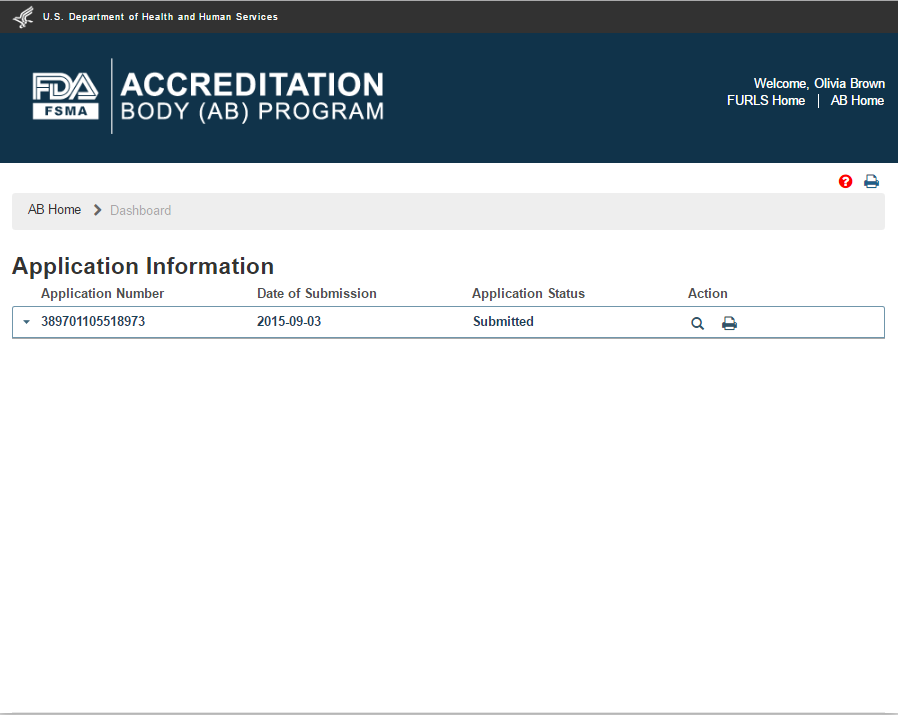
Figure 2.1.12 – Application ‘Submitted’ status
FDA reviews the submitted AB application to consider for recognition. FDA may return the application to the applicant with some questions that need to be answered, for FDA to continue with the review process. The AB application is placed in “In-Process” status on the Dashboard (Figure 3.1).
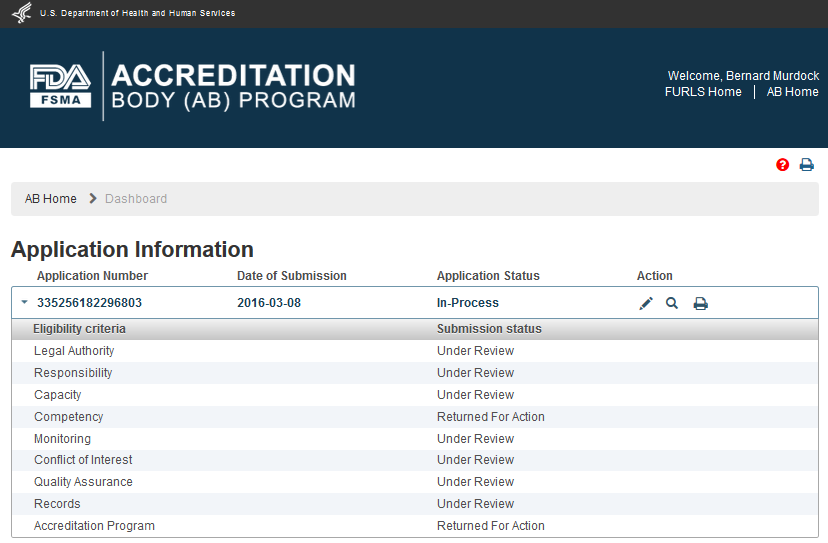
Figure 3.1 – Application ‘In-Process’ status
To address the questions from FDA, AB user clicks “Edit” (“Pencil”) icon in the ‘Action’ column. The system will open the “Eligibility Criteria” page (Figure 3.2). This page allows AB user to go directly to the flagged standard(s) in ‘red’ which require answers and/or attachments to be provided.
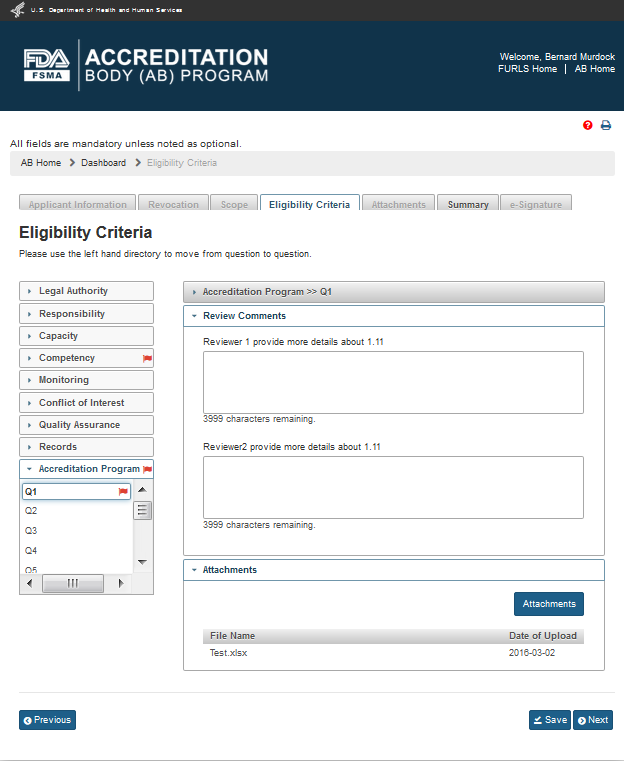
Figure 3.2 – Eligibility Criteria Page with red flags
After all the questions have been answered, the questions and their standards are flagged by a green checkmark (Figure 3.3)

Figure 3.3 – Eligibility Criteria Page with green flags
Once all the questions have been answered, the user can go to the “Summary” page (Figure 3.4), by clicking ‘Save’ and ‘Next’ buttons or clicking the ‘Summary’ tab.
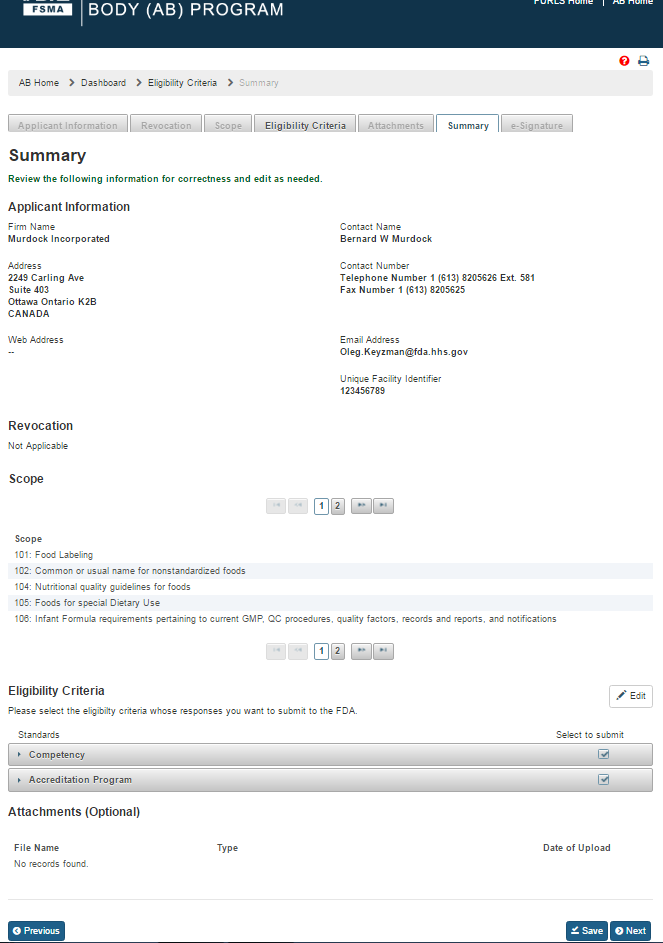
Figure 3.4 – Summary Page
The user can verify the application information and re-submit the application. The user then clicks the ‘Save’ and ‘Next’ buttons. The system validates all the information and if no violations are found, the “e-Signature” page is displayed (Figure 3.5). If a violation is found, the system will post a relevant error message. To be able to submit the application, the user has to correct any issues that were found.
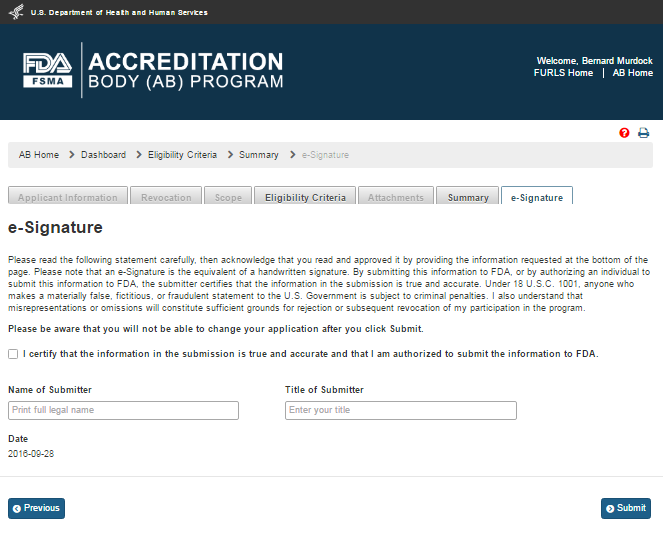
Figure 3.5 – e-Signature Page - Please note in a future release, language will be changed to say “may constitute sufficient grounds” instead of “will constitute sufficient grounds.”
The user can follow the directions provided on the “e-Signature” page and fill the following data fields and then click the ‘Submit’ button:
Name of Submitter - the first and last name of the application submitter
Title of Submitter - the titles of the application submitter
The system will post a “Confirmation” message on the page (Figure 3.6).
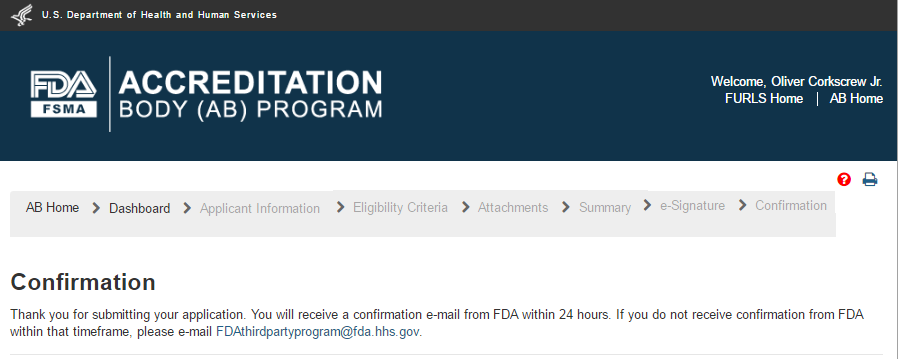
Figure 3.6 – Confirmation message
After the application has been submitted, the Dashboard application status displays “Pending” (Figure 3.7).

Figure 3.7 – Application ‘Pending’ Status
As soon as CMS (FDA) receives the application, the status on the dashboard changes to “Submitted” (Figure 3.8).

Figure 3.8– Application ‘Submitted’ Status
An AB user can apply for reconsideration on the AB Home page by selecting ‘Reconsideration Request’ option on the left navigation menu (Figure 4.1). The system will open the “Reconsideration” page (Figure 4.2).
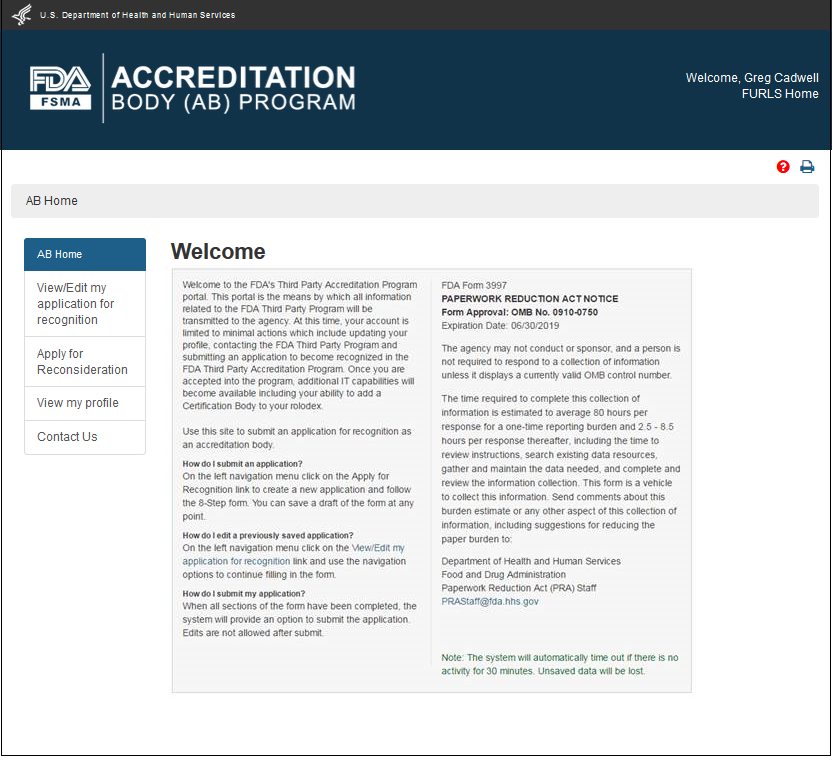
Figure 4.1 – AB Homepage with ‘Reconsideration Request’ menu option - Please note in a future release, language will be changed to say “Reconsideration Request” instead of “Apply for Reconsideration.”
The AB user is provided with two options ‘Yes’ or ‘No’, on the “Reconsideration” page. The user can select one of the two options to prefill the application information (Figure 4.2).
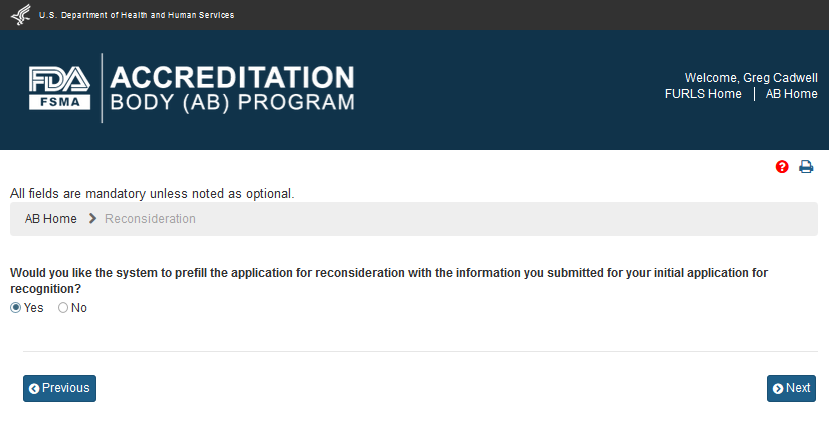
Figure 4.2 – Reconsideration page
The user can then click the ‘Next’ button to go to the next page “Applicant Information” (Figure 4.3). The information on this page is ‘Read only’. The user can review the information and go to the next page.

4.3 – Applicant Information page
The AB user can click the ‘Next’ button to go to the next “Revocation” page (Figure 4.4).

4.4 – Revocation page
The user can directly go the “Scope” page by clicking the ‘Scope’ tab. The user can also click the ‘Next’ button on the “Revocation” page to get to the “Scope” page (Figure 4.5). This page provides the user with the list of original scopes (left box). The user can select the scopes from this list and move them between the two boxes using the 4 buttons.
Note: Even though the user selected ‘Yes’ option on the “Reconsideration” page (Figure 4.2), the system will not prefill the scopes from the initial application because that selection was different from the one for reconsideration.

4.5 – Scope page - Please note, in a future release the scope list will be updated to reflect changes made by the OCC.
The user can click ‘Next’ button and go to the “Eligibility Criteria” page (Figure 4.6). This page will be filled out with the information from the initial application. AB user can update the page, as needed.
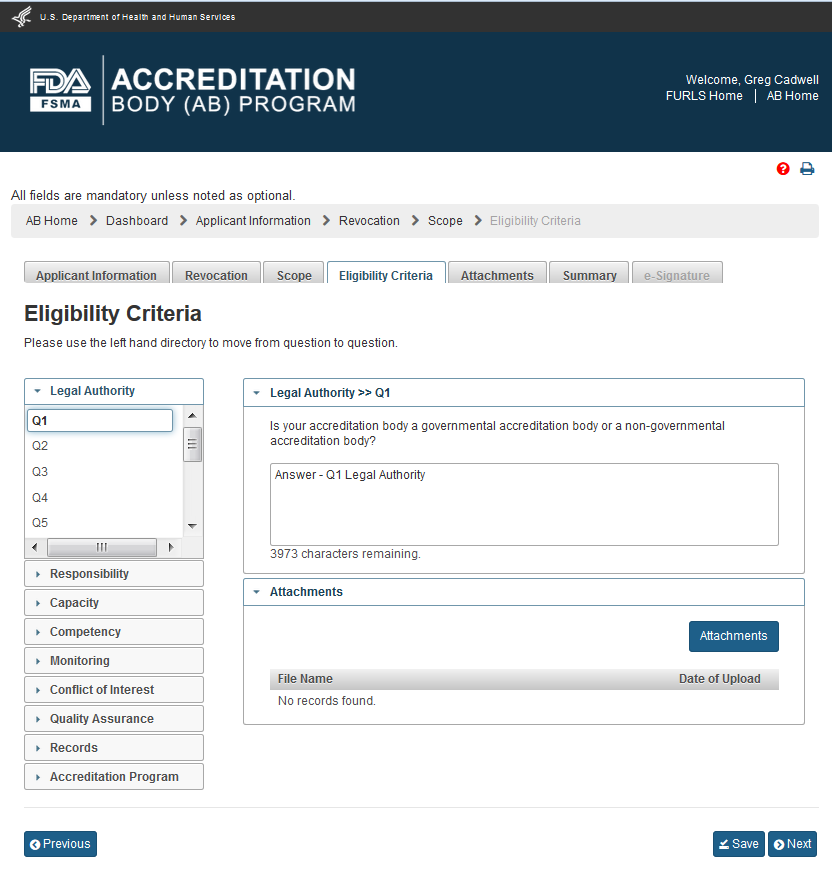
4.6 – Eligibility Criteria page
The AB user can click ‘Next’ to go to the “Attachments” page (Figure 4.7). The AB user can upload files in the “Attachments” by following the 4-step process outlined on the page. The system displays uploaded files in the table at the bottom of the page.

4.7 – Attachments page
The “Attachments” page is optional so the user may choose to click ‘Save’ button on the “Eligibility Criteria” page (Figure 4.6), and then select ‘Summary’ tab, which will open the “Summary” page (Figure 4.8). The user can review the application information and make any edits, if needed.
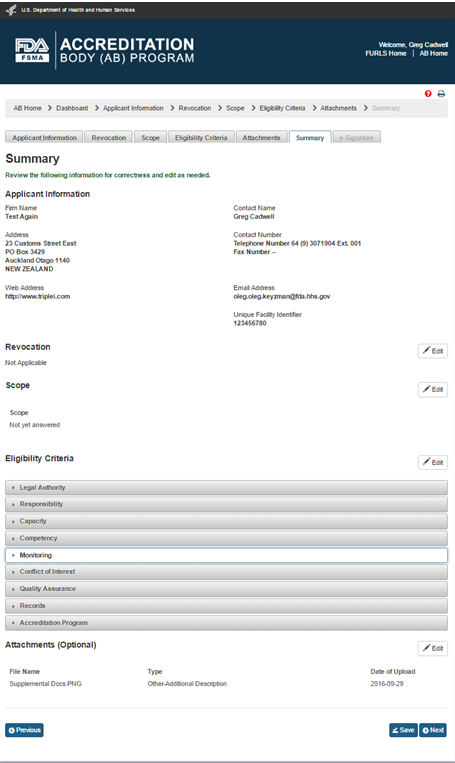
4.8 – Summary page
The user clicks ‘Next’ button and the system validates all the information provided by the user. If no violations are found, the system opens the “e-Signature” page (Figure 4.9). If a violation is found, the system will post a relevant error message. To be able to submit the application, the user has to correct any issues that were found.

4.9 – e-Signature page - Please note in a future release, language will be changed to say “may constitute sufficient grounds” instead of “will constitute sufficient grounds.”
The user can follow the directions provided on the “e-Signature” page and fill the following data fields and then click the ‘Submit’ button:
Name of Submitter - the first and last name of the application submitter
Title of Submitter - the titles of the application submitter
The system will post a “Confirmation” message on the page (Figure 4.10).

Figure 4.10 – Confirmation message
After the application has been submitted, the Dashboard application status displays “Pending” (Figure 4.11).

Figure 4.11 – Application ‘Pending’ Status
As soon as CMS (FDA) receives the application, the status on the dashboard changes to “Submitted” (Figure 4.12).

Figure 4.12– Application ‘Submitted’ Status
The AB user can select ‘Add or manage my Third party CBs’ option from the left navigation menu on the AB homepage (Figure 5.1).
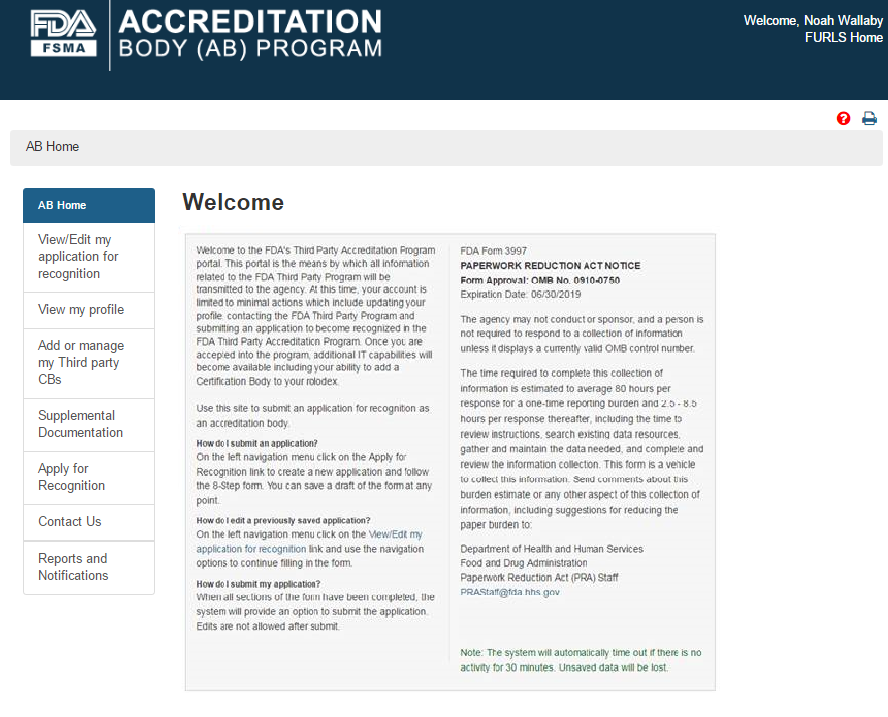
Figure 5.1 – AB Homepage with ‘Add or manage my Third party CBs’ menu option
The system will display the “Add or manage Third party CBs” page (Figure 5.1.1). The AB user can click ‘Add CB’ button to add a new CB.
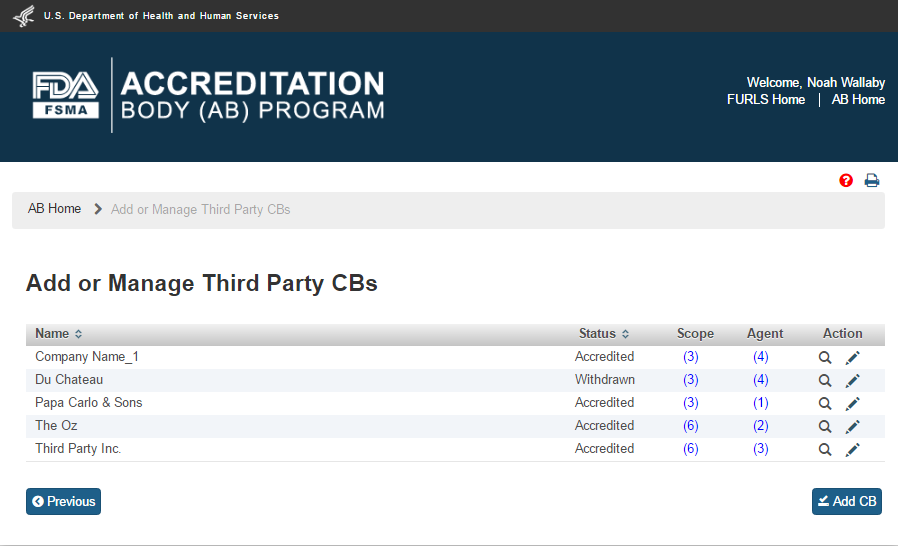
Figure 5.1.1 – Add or manage Third party CBs page
The system will display the “Add Accredited Third Party CB” page (Figure 5.1.2). The AB user can enter the email address of the new CB and click “Search” button.
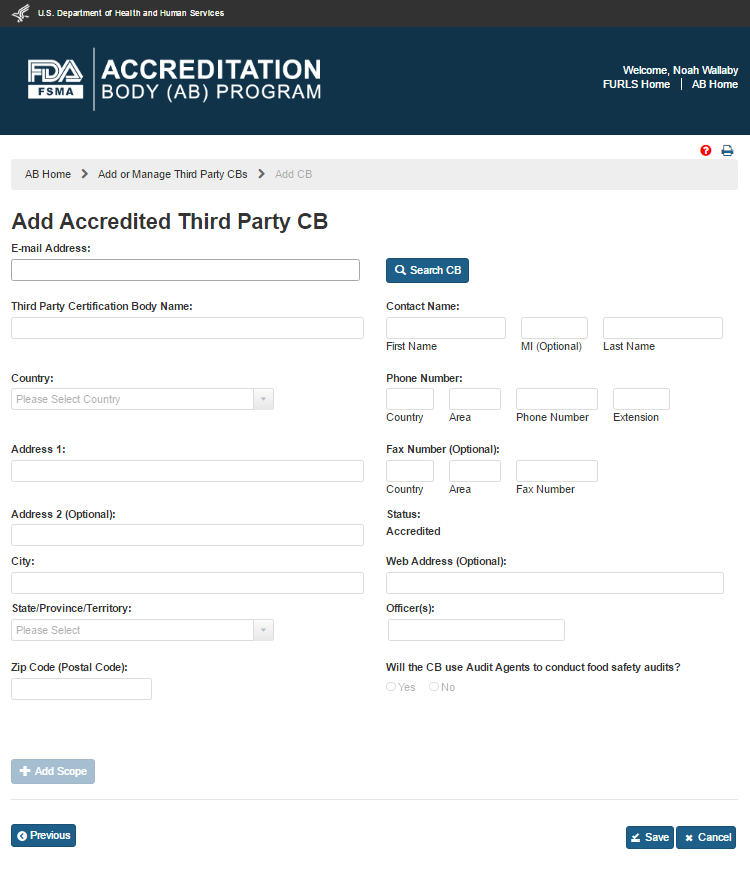
Figure 5.1.2 – Add Accredited Third Party CB
If the system finds the email address in the database, it populates the relevant fields with the CB information (Figure 5.1.3). If the address does not exist, the user can fill the fields manually.
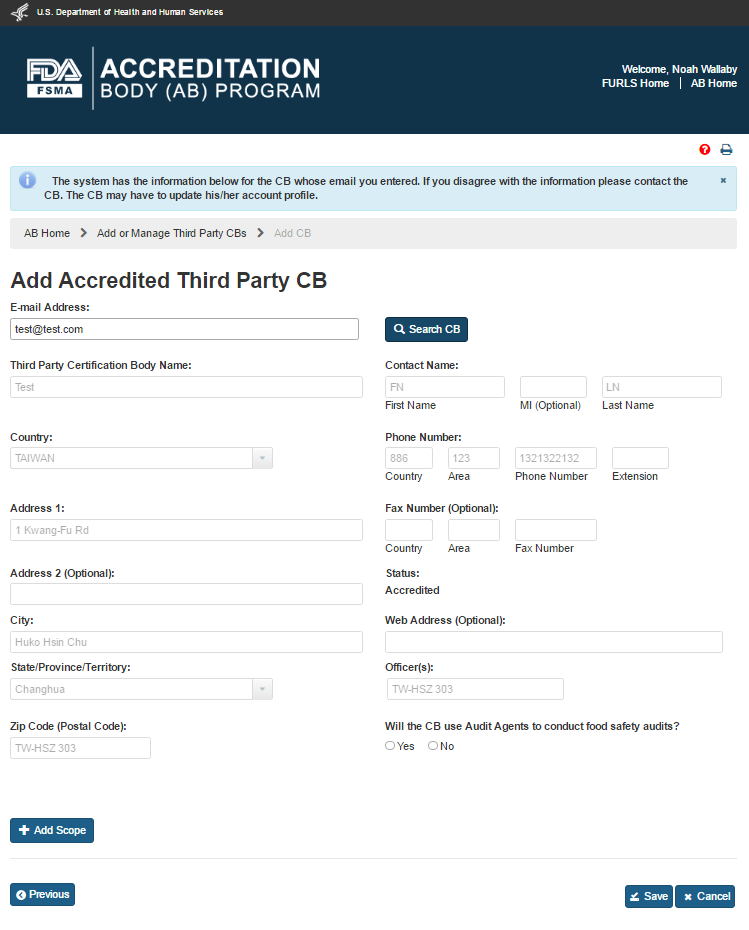
Figure 5.1.3 – Add Accredited Third Party CB with CB information
The data fields in the “Add Accredited Third Party CB” page that AB user can complete are:
Third Party Certification Body Name – the name of the certification body that the accreditation body would like to add
Country – the country of residence of the certification body
Address 1 – the street address of the certification body
Address 2 - (Optional field)
City – the city of residence of the certification body
State/ Province/ Territory – the State/ Province/ Territory of the certification body
Zip Code (Postal Code) – the postal code of the certification body
Contact Name -
First Name – the first name of the point of contact
MI - (Optional field)
Last Name – the last name of the point of contact
Phone Number
Country – the country code of the point of contact
Area – the area code of the point of contact
Phone Number – the phone number of the point of contact
Extension – the extension number of the point of contact
Fax Number -(Optional field)
Country - (Optional field)
Area - (Optional field)
Fax Number - (Optional field)
Web Address - (Optional field)
Officer(s) – the officer(s) of the certification body
Agent(s) – the agent(s) of the certification body
After the CB information has been populated by the system, or entered manually, the AB user can clicks ‘Add Scope’ button. The system will display “Add Scope” window (Figure 5.1.4). AB user can select a scope from the list. The system enables the ‘Accreditation Date’ and ‘Expiration Date’ fields. The user enters the dates and clicks ‘Save’ button. The system closes the “Add Scope” window and returns to the main page.
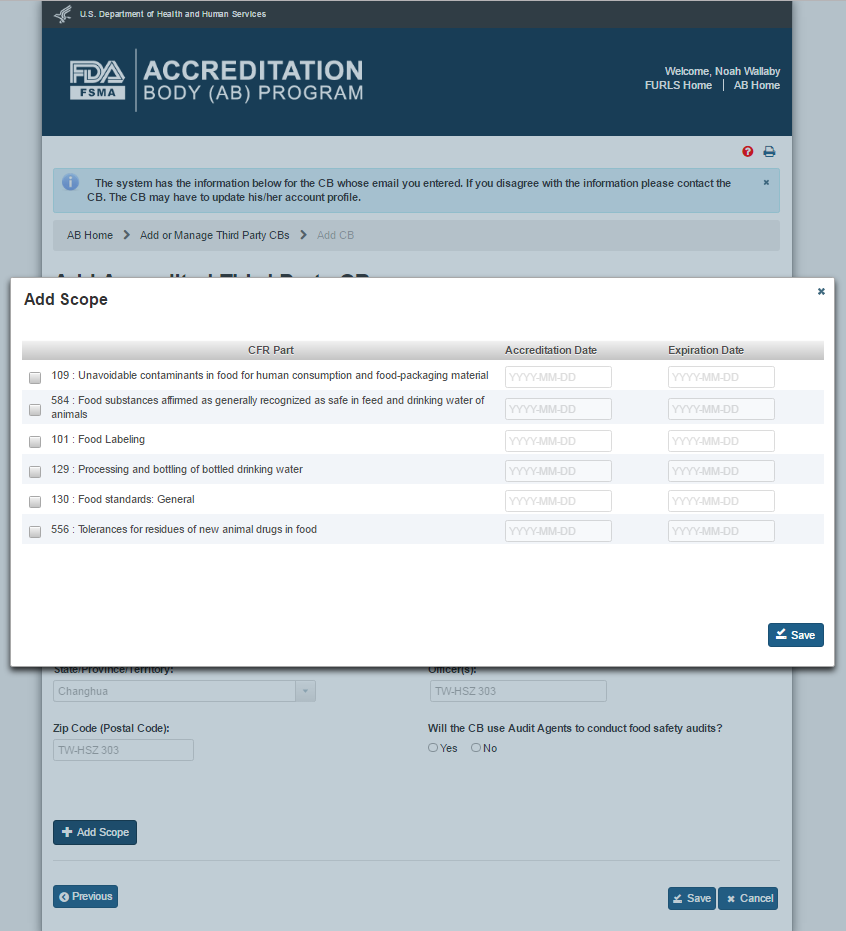
Figure 5.1.4 – Add Scope window
The newly added scopes are displayed in the “Scopes of Accredited Third Party Certification Body” table (Figure 5.1.5).
The user can also select one of the options for the question “Will the CB use Audit Agents to conduct food safety audits?” If AB user selects ‘No’, the system displays the “Agent(s)” field and pre-populates it with the CB’s name. If the user selects ‘Yes’ option, the system provides the following additional text fields to enter the relevant information manually (Figure 5.1.6).
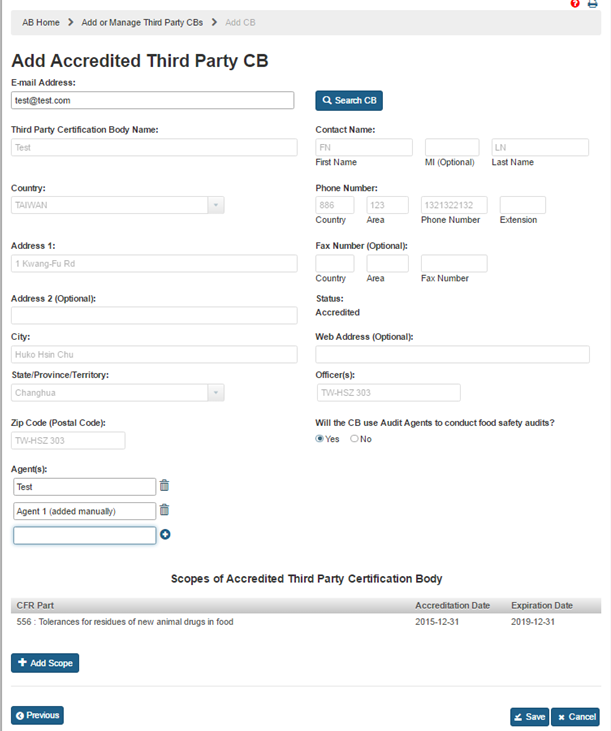
Figure 5.1.6 – Scope table and Add Audit Agent
The AB user can click ‘Save’ button after entering all mandatory information. The system displays a confirmation message (Figure 5.1.7). The user can ‘OK’ on the Confirmation message and the system will add the newly added CB to a table on the “Add or Manage Third Party CBs” page (Figure 5.1.8).
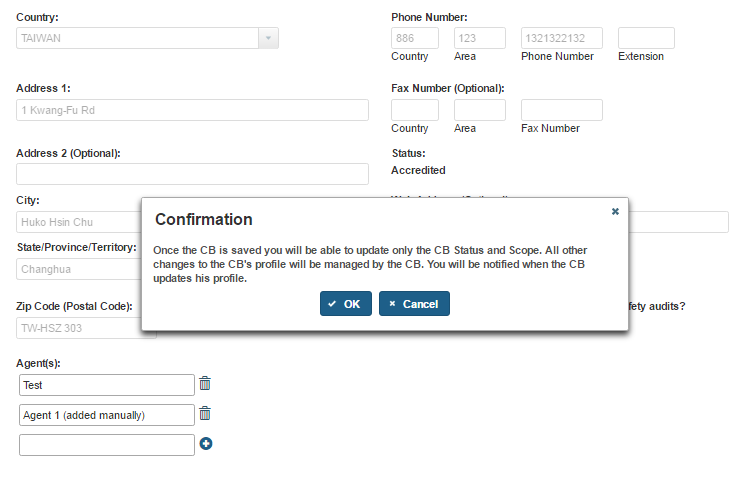
Figure 5.1.7 – Confirmation message
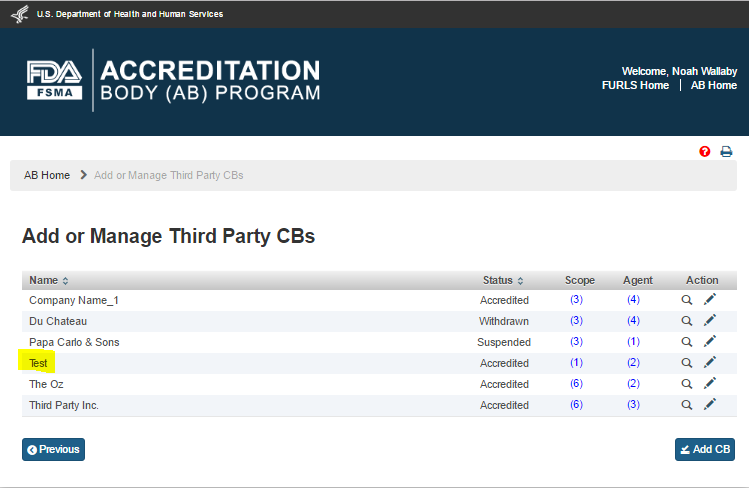
Figure 5.1.8 – Add or Manage Third Party CBs page
The AB user can update an accredited third party CB by clicking Edit (‘Pencil’) icon in the ‘Action’ column on the “Add or Manage Third Party CBs” page (Figure 5.2.1).

Figure 5.2.1 – Add or Manage Third Party CBs page
The system displays the “Update Accredited Third Party CB” page (Figure 5.2.2). The AB user can view information about the scopes, agents and officers. The AB user can update the CB(s) status. The AB user can also add or update the scopes.
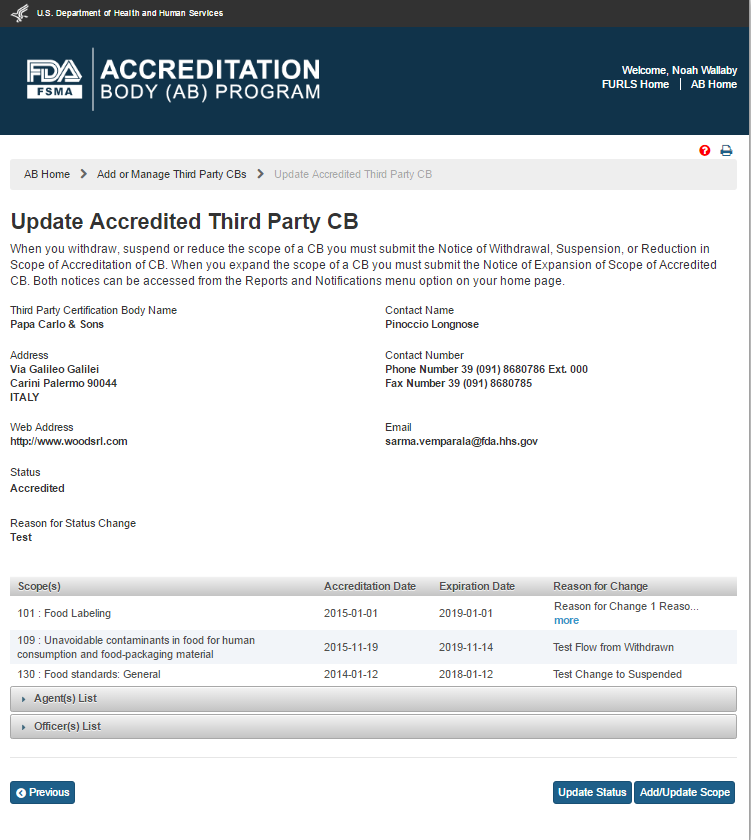
Figure 5.2.2 – Update Accredited Third Party CB page
The AB user can update the CB(s) status by clicking the ‘Update Status’ button. The system displays an “Update Status” window (Figure 5.2.3).
If the CB’s status is ‘Accredited’, the dropdown in the ‘Status’ field will have the following two values to choose from: ‘Suspended’ and ‘Withdrawn’. The AB user completes the following data fields:
Status - the dropdown options of ‘Suspended’; ‘Withdrawn’
Effective Date of Status Change – the effective date of the status change
Reason for change - the reason for status change
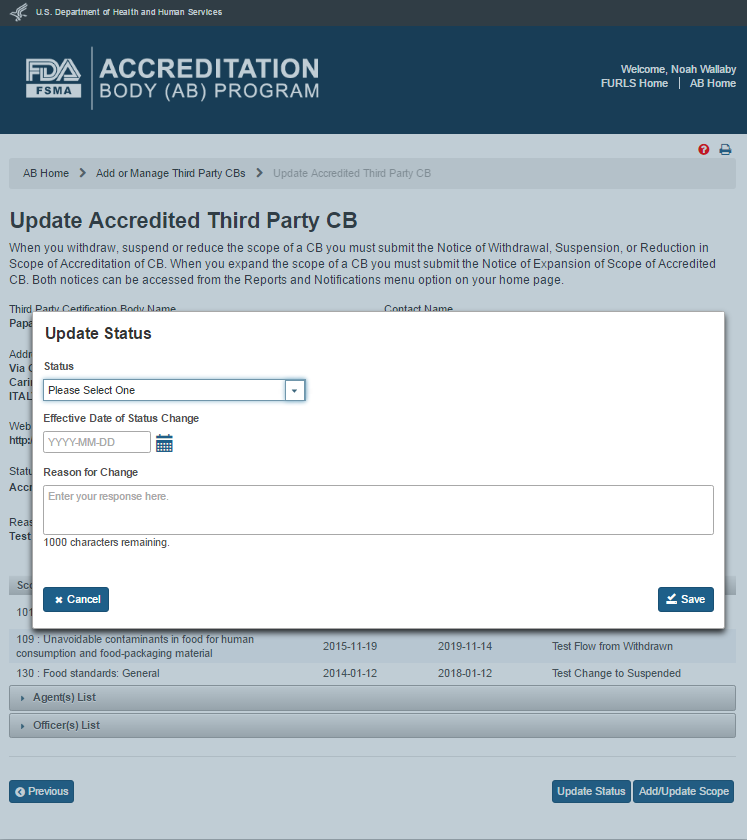
Figure 5.2.3 – Update Status window
The AB user clicks the ‘Save’ button. The system closes the “Update Status” window and returns to the “Update Accredited Third Party CB” page. The updated CB status and the reason for change will be displayed (Figure 5.2.4).
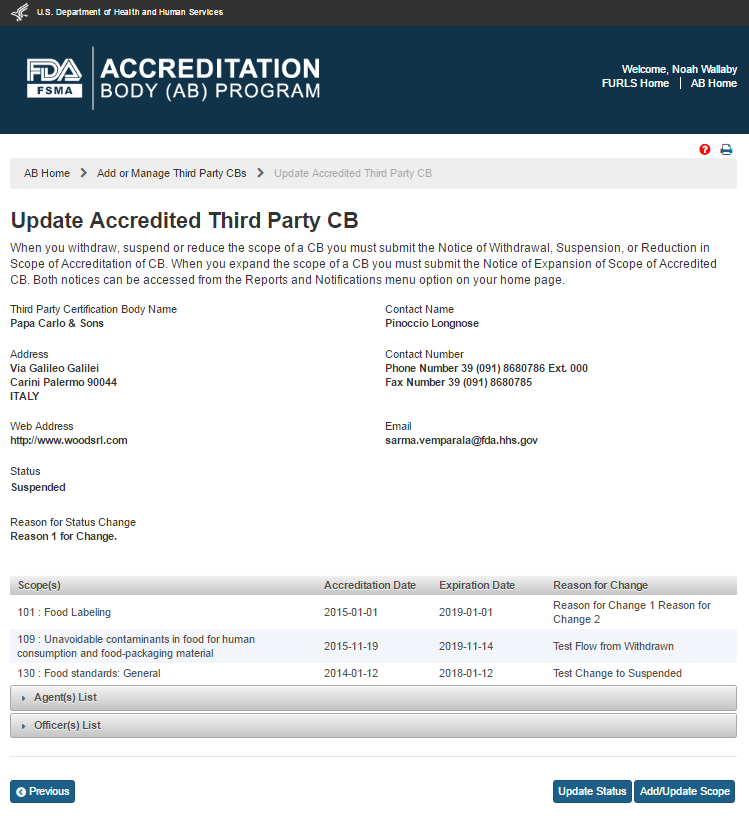
Figure 5.2.4 – Update Accredited Third Party CB page with updated CB status
The AB user can add and/or update the scopes by clicking the ‘Add/Update Scope’ button. The system displays the “Add/Update Scope” page (Figure 5.2.5).

Figure 5.2.5 – Add/Update Scope page
The AB user can update the scopes by selecting a scope on the “Add/Update Scope” page that has accreditation and expiration dates (e.g., scope 130 in Figure 5.2.5). The system displays an ‘Add/Update Scope’ window (Figure 5.2.6). The AB user completes the following data fields:
Status – the dropdown option of ‘Suspended’ or ‘Withdrawn’
Expiration date – the expiration date of the added or updated scope
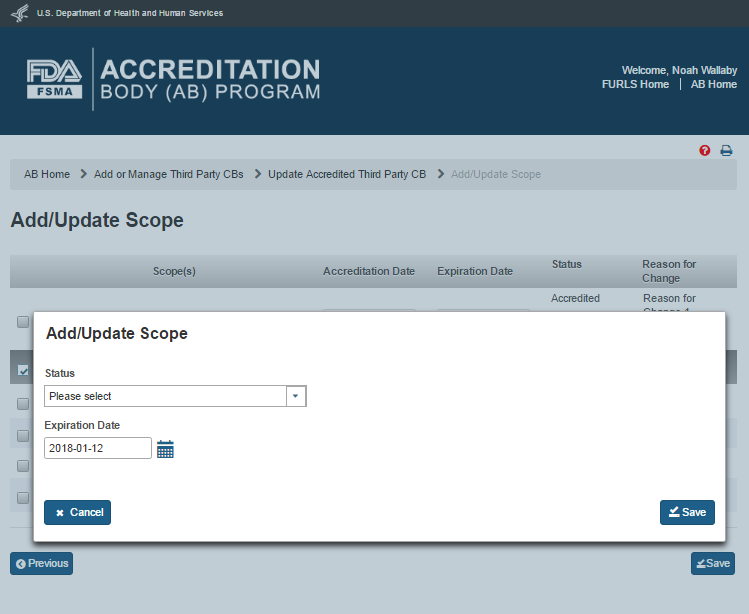
Figure 5.2.6 – Add/Update Scope window
When the AB user selects a ‘Status’ in the ‘Add/Update Scope’ window, the system refreshes to display the following data fields (Figure 5.2.6.1) that the AB user can complete:
Effective date - the effective date of the added or updated scope
Reason for change - the reason for the addition or updating of scope change
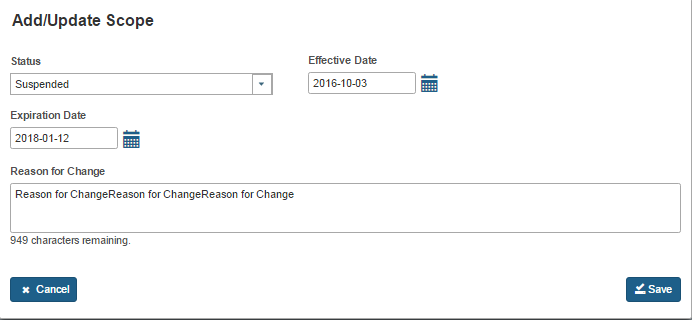
Figure 5.2.6.1 – Add/Update Scope window with Effective date and reason for change fields
The AB user clicks ‘Save’ button. The system closes the ‘Add/Update Scope’ window and returns to the main “Add/Update Scope” page (Figure 5.2.5).
The AB user can add a scope by selecting a scope on the “Add/Update Scope” page that does not have any accreditation and expiration dates (e.g., scope 584). The system displays an ‘Add/Update Scope’ window (Figure 5.2.7). The AB user can complete the following data fields:
Accreditation Date – the date of the accreditation of the certification body
Expiration date – the date of expiration for the accreditation of the certification body
Reason for change – the reason for the addition or updating of scope change
The AB user clicks ‘Save’ button. The system closes the ‘Add/Update Scope’ window and returns to the main “Add/Update Scope” page.
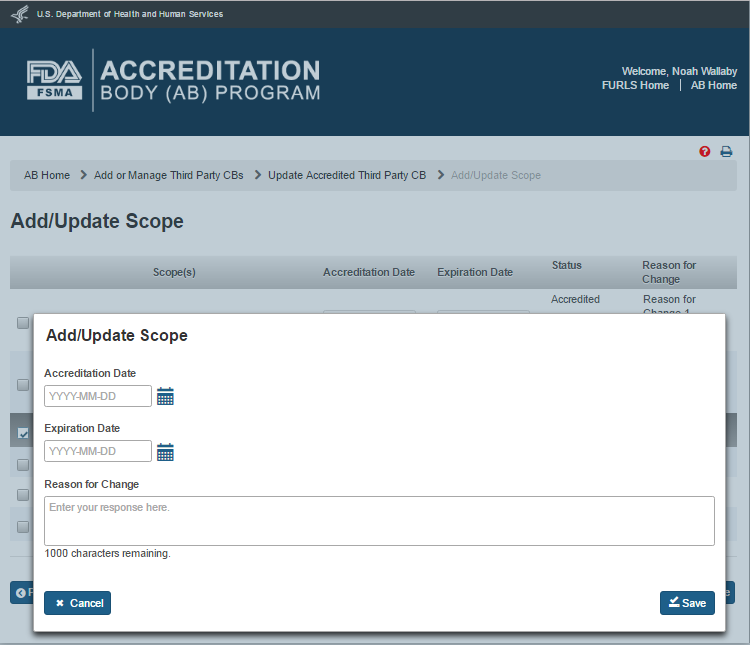
Figure 5.2.7 – Add/Update Scope window with Effective date and reason for change fields
The AB user can select ‘Reports and Notifications’ option from the left navigation menu on the AB homepage (Figure 6.1).

Figure 6.1 – AB Homepage with ‘Reports and Notifications’ menu option
The system will display the “Reports and Notifications” page (Figure 6.2) with the list of Reports and Notices. Currently, there are six Notices available to the user.
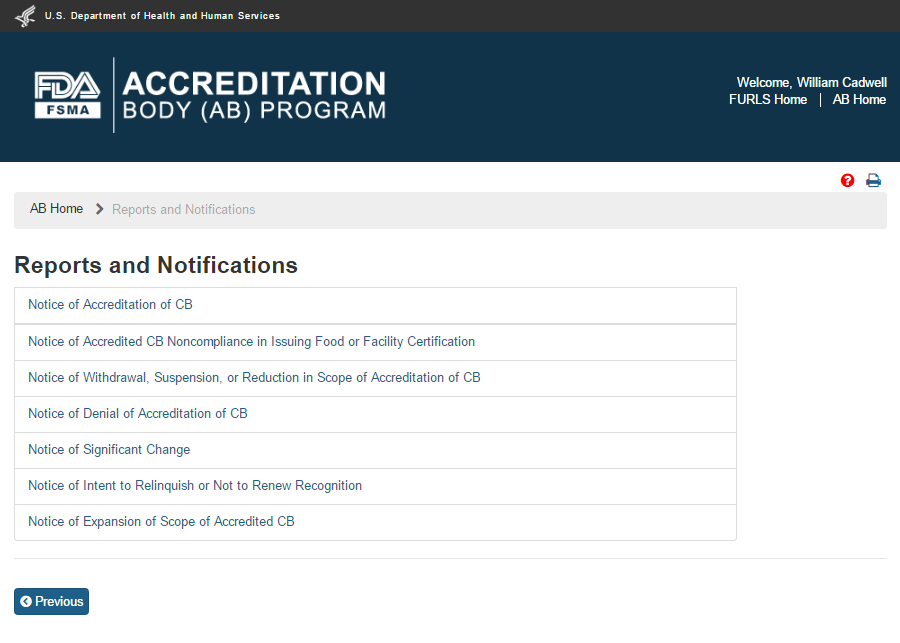
Figure 6.2 – ‘Reports and Notifications’ page
The AB user can select ‘Notice of Accreditation of CB’ in the “Reports and Notifications” page. The system displays the “Notice of Accreditation of CB” page (Figure 6.1.1). The user can select the CB that the user would like to send the notice to.
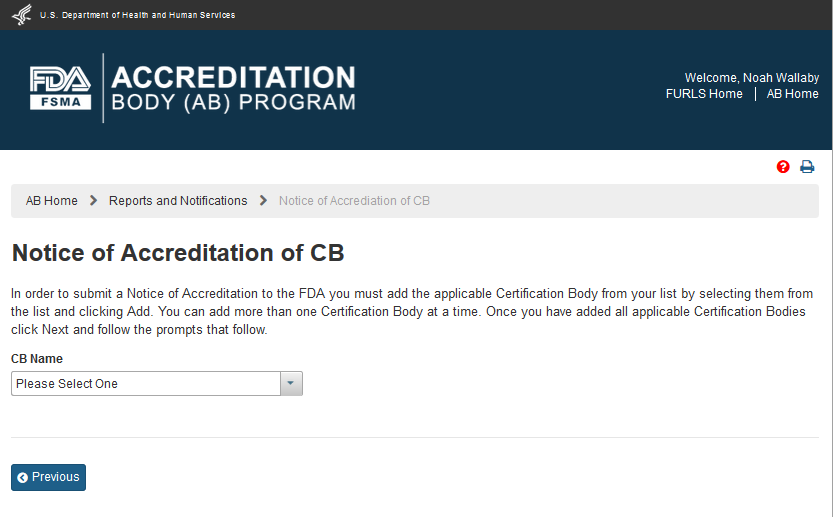
Figure 6.1.1 – Notice of Accreditation of CB page
The AB user can select a CB from the ‘CB Name’ dropdown options. These options include the names of all CBs working with the AB.
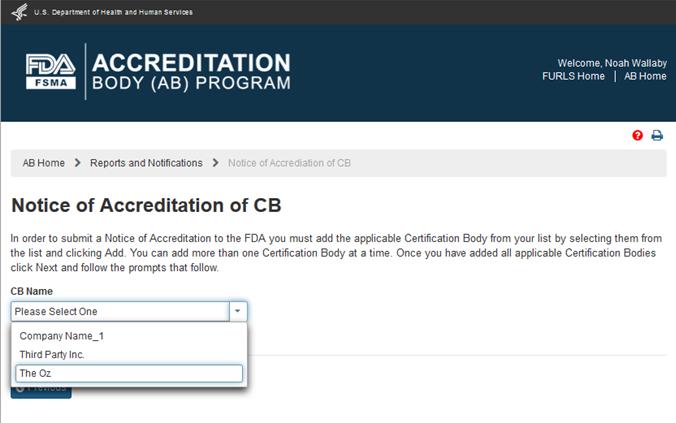
Figure 6.1.2 – Notice of Accreditation of CB page with CB name options
The system expands the page (Figure 6.1.3) when the AB user selects a CB from the drop down list. This page displays the CB information and accredited scopes. The user can click ‘Add’ button to add the CB to the Notice of Accreditation.

Figure 6.1.3 – Notice of Accreditation of CB page with CB and scope information
The system confirms that the CB has been added to the Notice of Accreditation (Figure 6.1.4). The CB’s name that was added to the notice is removed from the ‘CB Name’ dropdown list (compare Figures 6.1.2 and 6.1.4).
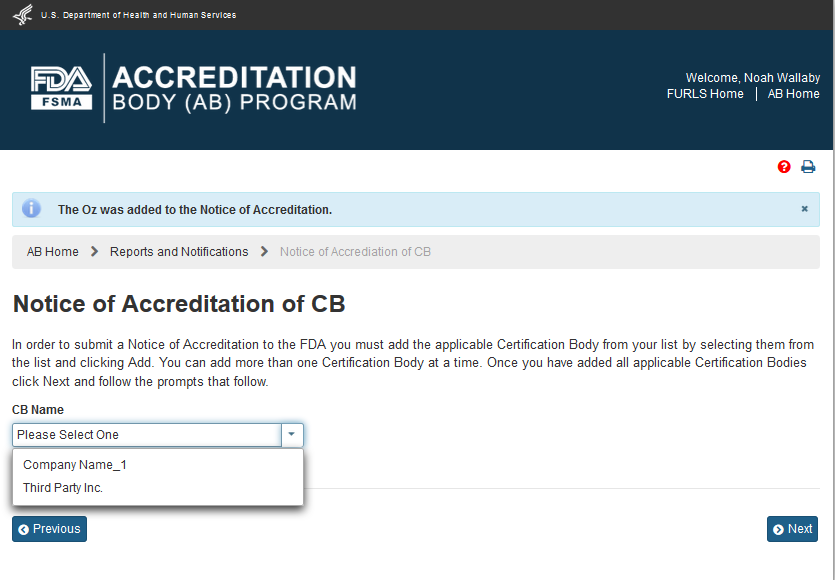
Figure 6.1.4 – Message that CB was added to Notice of Accreditation
The AB user can click ‘Next’ button and the system will display a confirmation message (Figure 6.1.5). The user can choose to Cancel the action, and return to the “Notice of Accreditation of CB” page or proceed with the notice, by clicking ‘OK’ button.
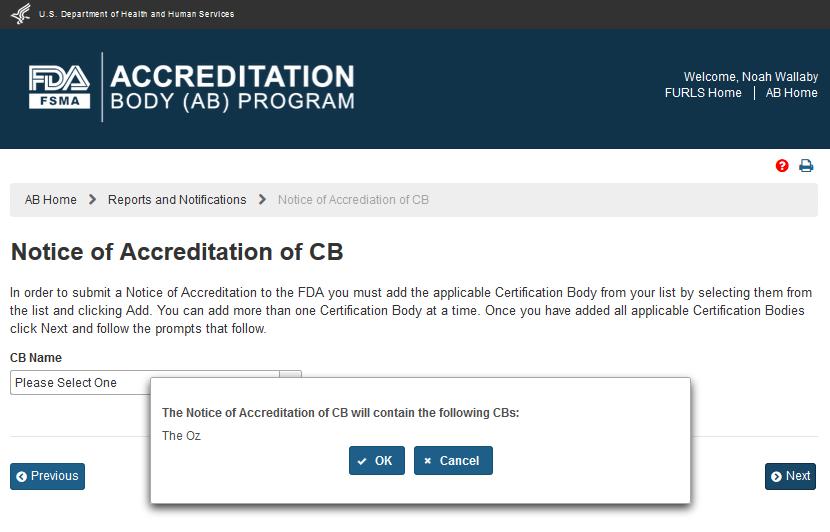
Figure 6.1.5 – Confirmation Message
The AB user can clicking ‘OK’ button to confirm the addition of the CB to the Notice of Accreditation. The system displays the “e-Signature” page (Figure 6.1.6). The user fills out the following data fields:
Name of Submitter - the first and last name of the application submitter
Title of Submitter - the titles of the application submitter
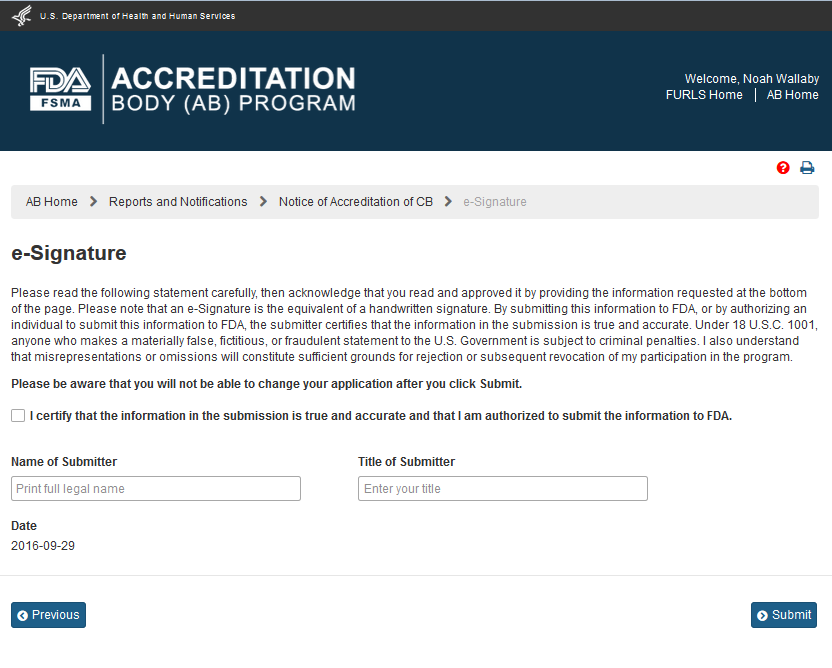
Figure 6.1.6 – e-Signature page - Please note in a future release, language will be changed to say “may constitute sufficient grounds” instead of “will constitute sufficient grounds.”
The AB user can click ‘Submit’ button and the system will display the ‘Confirmation’ message (Figure 6.1.7)
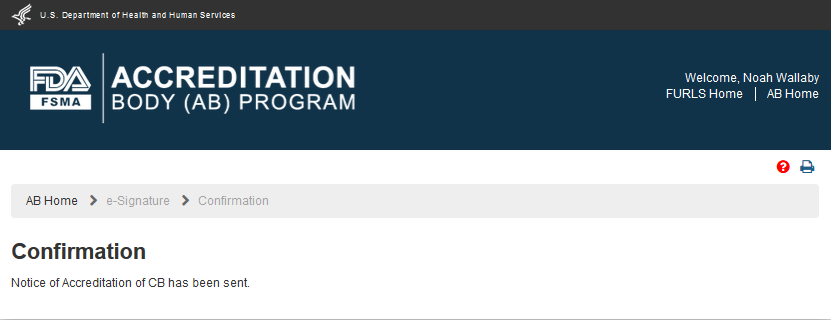
Figure 6.1.7 – Confirmation message page
An email is also sent to the AB user indicating the Notice of Accreditation was received by FDA (Figure 6.1.8).

Figure 6.1.8 – Email sent to AB user
The AB user can return to the “Reports and Notifications” page via ‘AB Home’ link on the top of the Banner or by selecting the “Reports and Notifications” menu.
The AB user can select ‘Notice of Accredited CB Noncompliance in Issuing Food or Facility Certification’ in the “Reports and Notifications” page (Figure 6.2.1).

Figure 6.2.1 – ‘Reports and Notifications’ page
The system displays the “Notice of Accredited CB Noncompliance in Issuing Food or Facility Certification” page (Figure 6.2.2).

Figure 6.2.2 – ‘Notice of Accredited CB Noncompliance in Issuing Food or Facility Certification’ page
The AB user can select a CB from the ‘Certification Body’ dropdown options. The system displays the information about the CB’s address and the scopes (Figure 6.2.3).
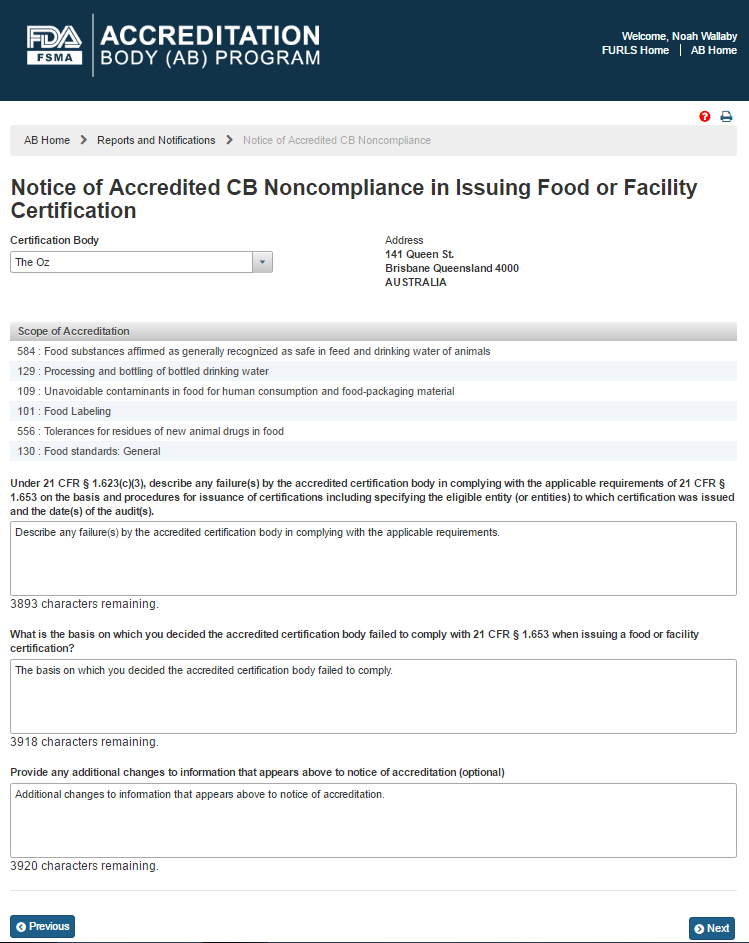
Figure 6.2.3 – CB Address and Scope Information
The AB user completes the following questions in the data fields:
Describe any failures by the accredited certification body in complying with the applicable requirements
What is the basis on which you decided the accredited certification body failed to comply
Provide additional changes to information that appears above to notice of accreditation (optional)
The user then clicks ‘Next’ button and the system displays the “e-Signature” page (Figure 6.2.4). The user fills out the following data fields:
Name of Submitter - the first and last name of the application submitter
Title of Submitter - the titles of the application submitter
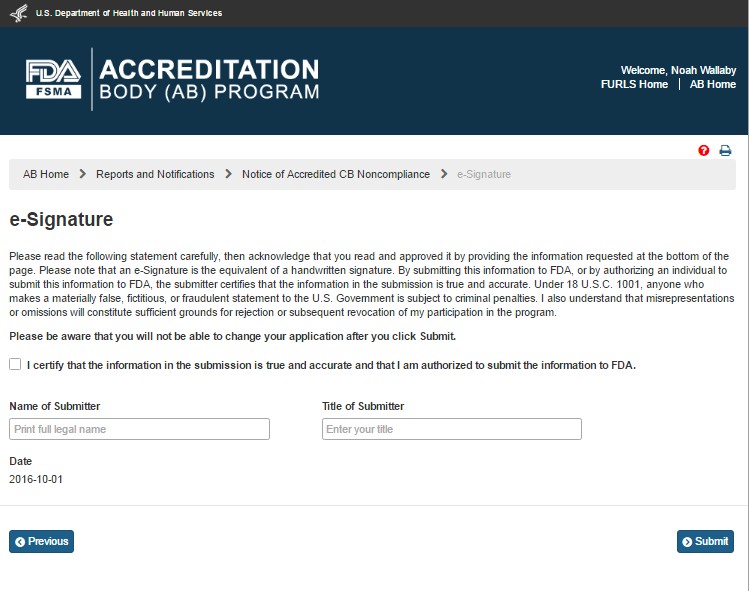
Figure 6.2.4 – e-Signature page - Please note in a future release, language will be changed to say “may constitute sufficient grounds” instead of “will constitute sufficient grounds.”
The AB user can click ‘Submit’ button and the system will display the ‘Confirmation’ message (Figure 6.2.5)
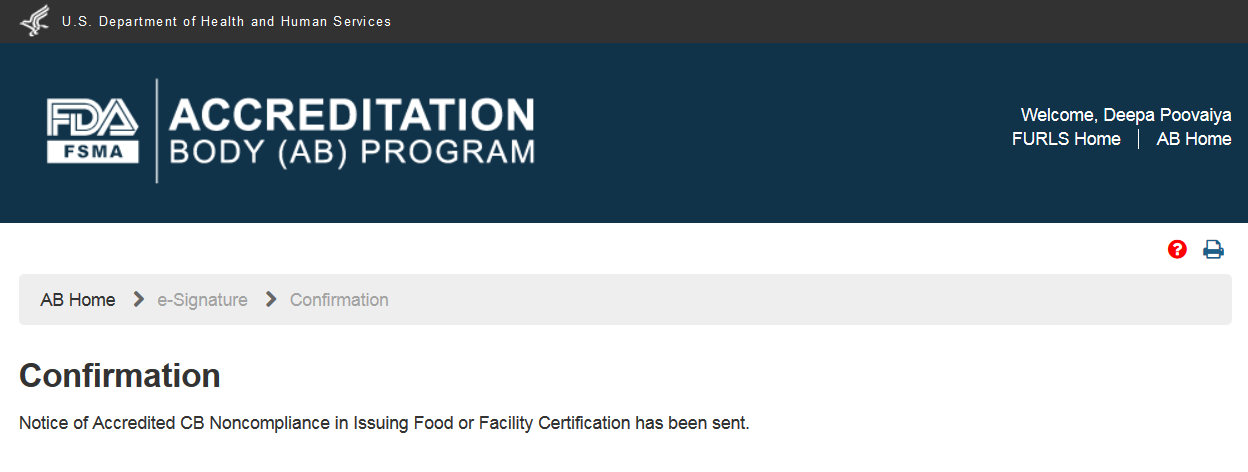
Figure 6.2.5 – Confirmation message
An email is also sent to the AB user indicating the Notice of Accredited CB Noncompliance in Issuing Food or Facility Certification was received by FDA (Figure 6.2.6).

Figure 6.2.6 – Email to AB user
The AB user can return to the “Reports and Notifications” page via ‘AB Home’ link on the top of the Banner or by selecting the “Reports and Notifications” menu.
The AB user can select ‘Notice of Denial of Accreditation of CB’ in the “Reports and Notifications” page (Figure 6.3.1).

Figure 6.3.1 – ‘Reports and Notifications’ page
The system displays the “Notice of Denial of Accreditation of CB” page (Figure 6.2.2).
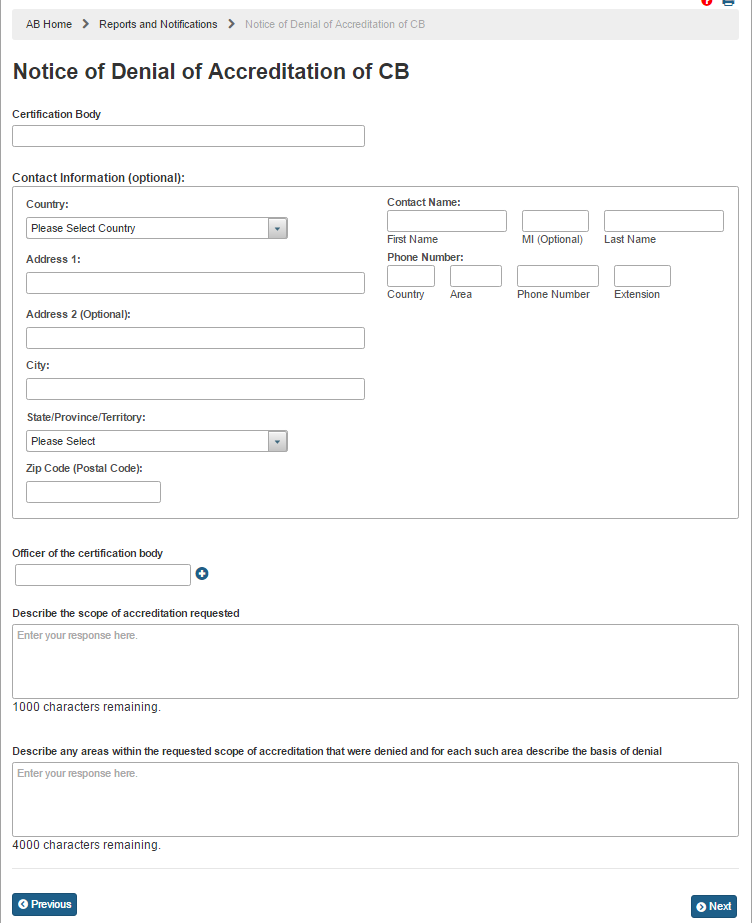
Figure 6.3.2 – ‘Notice of Denial of Accreditation of CB’ page
The AB user completes the following data fields:
Certification Body – the name of the certification body that the accreditation body would like to add
Contact Information (Optional)
Country – the country of residence of the certification body
Address 1 – the street address of the certification body
Address 2 (Optional)
City – the city of residence of the certification body
State/ Province/ Territory – the State/ Province/ Territory of the certification body
Zip Code (Postal Code) – the postal code of the certification body
Contact Name
First Name– the first name of the point of contact
MI(Optional)
Last Name– the last name of the point of contact
Phone Number
Country – the country code of the point of contact
Area – the area code of the point of contact
Phone Number – the phone number of the point of contact
Extension – the extension number of the point of contact
Officer of the Certification Body – the officer(s) of the certification body
Describe the scope of accreditation requested – a description of the scope of accreditation being included in the notice
Describe any areas within the requested scope of accreditation that were denied and for each such area describe the basis of denial – a description of the areas within the scope of accreditation that were denied and the basis of denial
The AB user can click ‘Next’ button. The system displays the “e-Signature” page (Figure 6.3.3). The user fills out the following data fields:
Name of Submitter - the first and last name of the application submitter
Title of Submitter - the titles of the application submitter

Figure 6.3.3 – e-Signature page - Please note in a future release, language will be changed to say “may constitute sufficient grounds” instead of “will constitute sufficient grounds.”
The AB user can click ‘Submit’ button and the system will display the ‘Confirmation’ message (Figure 6.3.4)
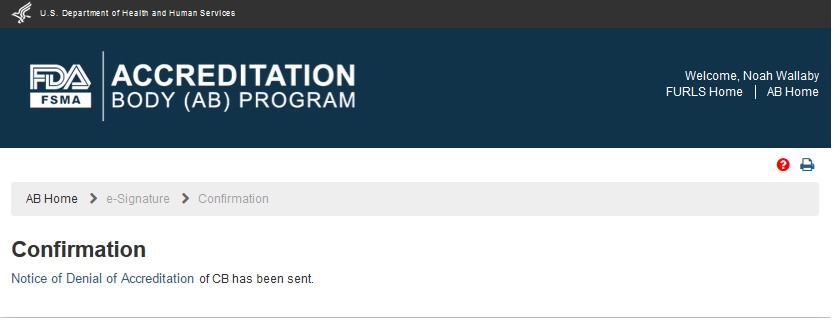
Figure 6.3.4 – Confirmation message page
An email is also sent to the AB user indicating the Notice of Denial of CB was received by FDA (Figure 6.3.5).

Figure 6.3.5 – Email sent to AB user
The AB user can return to the “Reports and Notifications” page via ‘AB Home’ link on the top of the Banner or by selecting the “Reports and Notifications” menu.
The AB user can select ‘Notice of Significant Change’ in the “Reports and Notifications” page (Figure 6.4.1).

Figure 6.4.1 – ‘Reports and Notifications’ page
The system displays the “Notice of Significant Change” page (Figure 6.4.2).

Figure 6.4.2 – ‘Notice of Significant Change’ page
The AB user completes the following data fields:
Describe any change(s) that would affect the manner in which you comply with the applicable requirements of 21 CFR Part 1, Subpart M.
Explain the purpose of the change(s)
The AB user can click ‘Next’ button. The system displays the “e-Signature” page (Figure 6.4.3). The user fills out the following data fields:
Name of Submitter - the first and last name of the application submitter
Title of Submitter - the titles of the application submitter

Figure 6.4.3 – e-Signature page - Please note in a future release, language will be changed to say “may constitute sufficient grounds” instead of “will constitute sufficient grounds.”
The AB user can click ‘Submit’ button and the system will display the ‘Confirmation’ message (Figure 6.4.4)
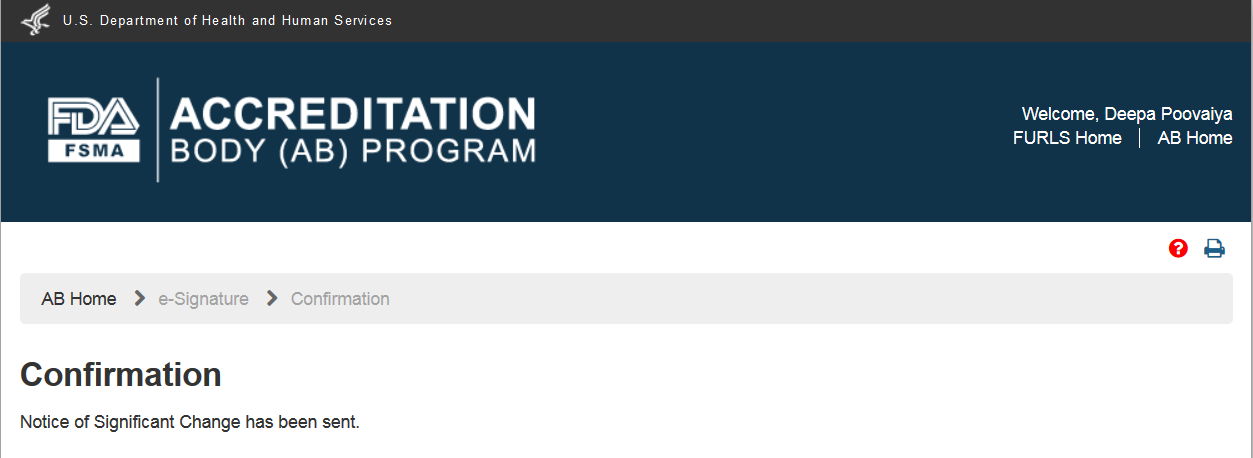
Figure 6.4.4 – Confirmation message page
An email is also sent to the AB user indicating the Notice of Significant Change was received by FDA (Figure 6.4.5).

Figure 6.4.5 – Email sent to AB user
The AB user can return to the “Reports and Notifications” page via ‘AB Home’ link on the top of the Banner or by selecting the “Reports and Notifications” menu.
The AB user can select ‘Notice of Intent to Relinquish or Not to Renew Recognition’ in the “Reports and Notifications” page (Figure 6.5.1).

Figure 6.5.1 – ‘Reports and Notifications’ page
The system displays the “Notice of Intent to Relinquish or Not to Renew Recognition” page (Figure 6.5.2).

Figure 6.5.2 – ‘Notice of Intent to Relinquish or Not to Renew Recognition’ page
The AB user can answer the question, “Do you intend to relinquish your recognition prior to its expiration date?” by selecting one of the two options ‘Yes’ or ‘No’. If the user selects ‘Yes’ the system displays the calendar feature and the user can pick or enter the ‘Intended Date of Relinquishment or Date of Expiration of Recognition’ (Figures 6.5.3).
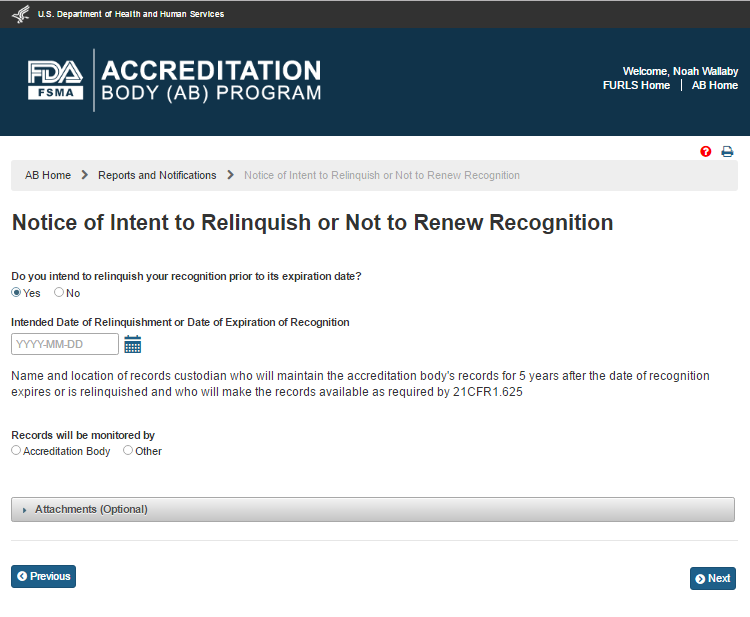
Figure 6.5.3 – Intended Date of Relinquishment or Date of Expiration of Recognition
If the user selects ‘No’ the system displays the read-only date of ‘Intended Date of Relinquishment or Date of Expiration of Recognition’ (Figures 6.5.4).

Figure 6.5.4 – Read only Date of ‘Intended Date of Relinquishment or Date of Expiration of Recognition’
The AB user can select one of the options for, “Records will be maintained by”. The two options available to the AB user are ‘Accreditation Body’ or ‘Other’. If the user selects ‘Accreditation Body’ the system displays the ABs information (Figure 6.5.5).
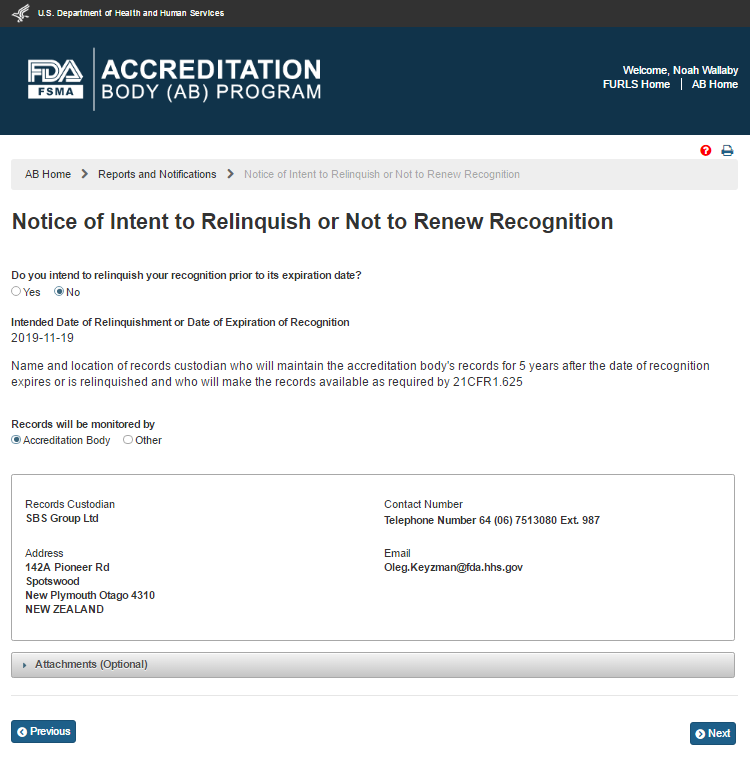
Figure 6.5.5 – Records monitored by AB information
If the user selects ‘Other’ the system displays (Figure 6.5.6) the following data fields that the user can complete:
Records Custodian – the name of the accreditation body’s records custodian
Country – the country of residence of the accreditation body’s records custodian
Address 1 – the street address of the accreditation body’s records custodian
Address 2 – (Optional field)
City – the city of the accreditation body’s records custodian
State/ Province/ Territory – the State/ Province/ Territory of the accreditation body’s records custodian
Zip Code (Postal Code) – the postal code of the accreditation body’s records custodian
Telephone – (Optional field)
Country – (Optional field)
Area – (Optional field)
Phone Number – (Optional field)
Extension – (Optional field)
E-mail Address – the electronic mail address of the accreditation body’s records custodian
The user can also upload files to the notice, as needed, using “Attachment” feature.
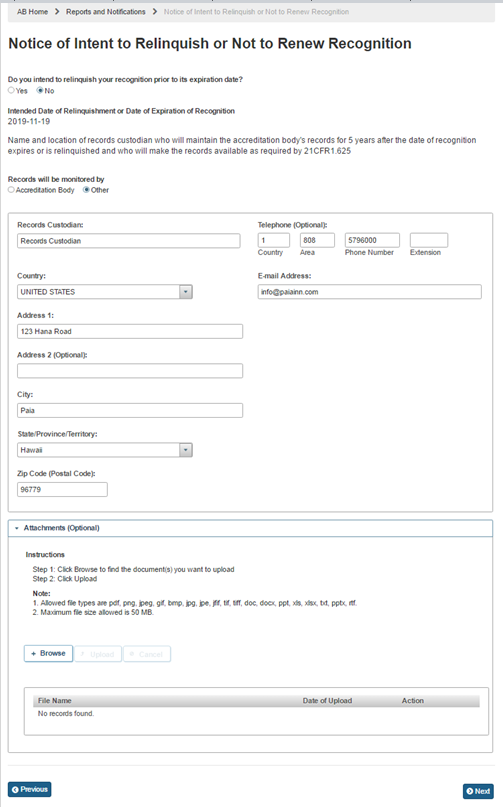
Figure 6.5.6 – Records monitored by information
The AB user can click ‘Next’ button. The system displays the “e-Signature” page (Figure 6.5.7). The user fills out the following data fields:
Name of Submitter - the first and last name of the application submitter
Title of Submitter - the titles of the application submitter

Figure 6.5.7 – e-Signature page - Please note in a future release, language will be changed to say “may constitute sufficient grounds” instead of “will constitute sufficient grounds.”
The AB user can click ‘Submit’ button and the system will display the ‘Confirmation’ message (Figure 6.5.8)
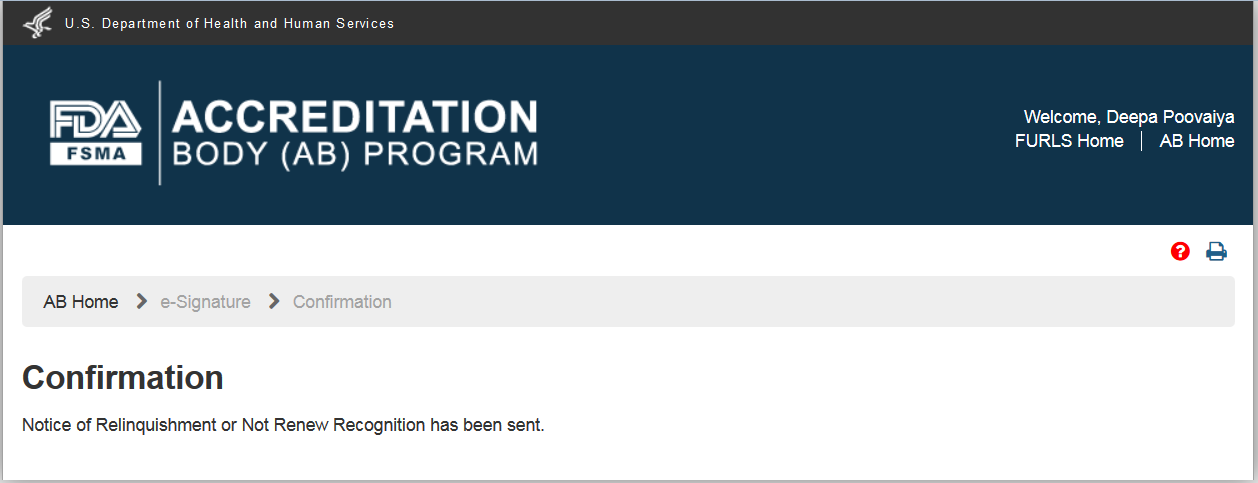
Figure 6.5.8 – Confirmation message page
An email is also sent to the AB user indicating the Notice of Intent to Relinquish or not to Renew Recognition was received by FDA (Figure 6.5.9).

Figure 6.5.9 – Email sent to AB user
The AB user can return to the “Reports and Notifications” page via ‘AB Home’ link on the top of the Banner or by selecting the “Reports and Notifications” menu.
The AB user can select ‘Notice of Expansion of Scope of Accredited CB’ in the “Reports and Notifications” page (Figure 6.5.1).

Figure 6.6.1 – ‘Reports and Notifications’ page
The system displays the “Notice of Expansion of Scope of Accredited CB” page (Figure 6.6.2).
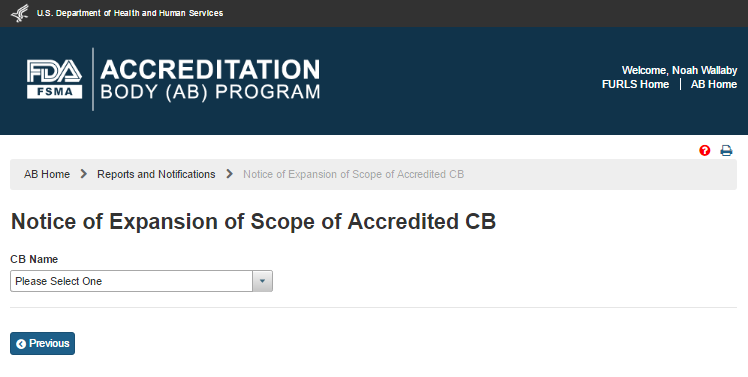
Figure 6.6.2 – ‘Notice of Expansion of Scope of Accredited CB’ page
The AB user can select a ‘CB Name’ from the dropdown menu options. The system displays the CB’s information along with the list of expanded scope(s) (Figure 6.6.3).
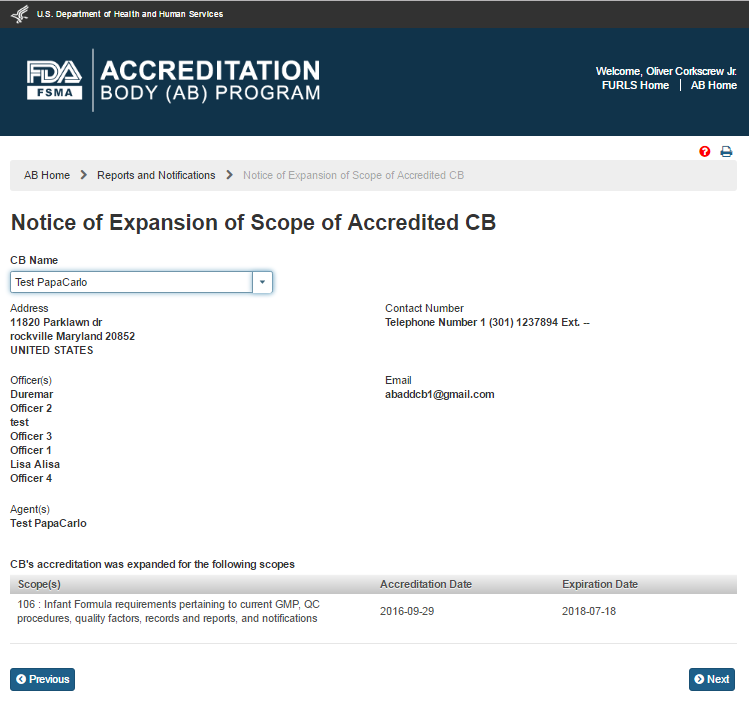
Figure 6.6.3 – CB and scope information
The AB user can click ‘Next’ button. The system displays the “e-Signature” page (Figure 6.6.4). The user fills out the following data fields:
Name of Submitter - the first and last name of the application submitter
Title of Submitter - the titles of the application submitter

Figure 6.6.4– e-Signature page - Please note in a future release, language will be changed to say “may constitute sufficient grounds” instead of “will constitute sufficient grounds.”
The AB user can click ‘Submit’ button and the system will display the ‘Confirmation’ message (Figure 6.6.5)
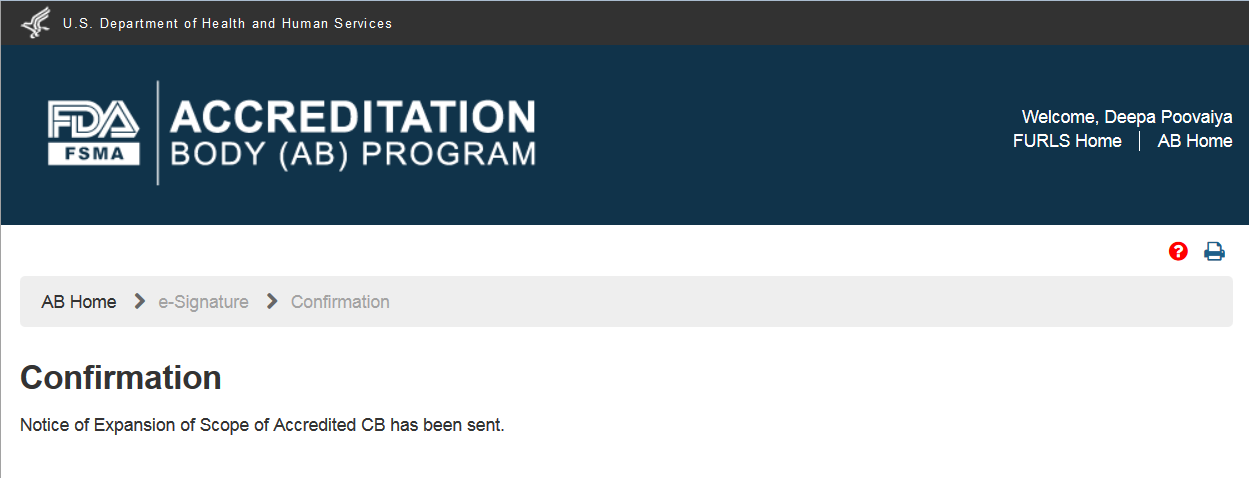
Figure 6.6.5 – Confirmation message page
An email is also sent to the AB user indicating the Notice of Intent to Relinquish or not to Renew Recognition was received by FDA (Figure 6.6.6).

Figure 6.6.6 – Email sent to AB user
The AB user can return to the “Reports and Notifications” page via ‘AB Home’ link on the top of the Banner or by selecting the “Reports and Notifications” menu.
| File Type | application/msword |
| Author | Poovaiya, Deepa |
| Last Modified By | Bean, Domini |
| File Modified | 2017-03-01 |
| File Created | 2017-03-01 |
© 2026 OMB.report | Privacy Policy